> ## Documentation Index
> Fetch the complete documentation index at: https://moengage-analytics-query-api-docs.mintlify.site/llms.txt
> Use this file to discover all available pages before exploring further.
# Migrate To The Extension Integrator Tool
> Migrate from a manual iOS notification extension setup to the MoEngage Extension Integrator Tool in your Flutter app.
All steps in this guide are performed in Xcode, open your iOS project by launching `ios/Runner.xcworkspace` in Xcode before proceeding.
To migrate from an existing manual implementation to the integrator tool, follow the below steps:
### Step 1: Prerequisites
Before proceeding, ensure the following are in place:
* Ensure you are using MoEngage Flutter SDK version [10.6.0](/release-notes/sdks/flutter#core-10-6-0) or above to utilize the extension integrator tool.
* **SDK initialization:** Initialize the MoEngage SDK using [file-based initialization](/developer-guide/flutter-sdk/sdk-integration/sdk-initialization/file-based-initialization).
* **App Group configuration:** Provide the `AppGroupName` key (for example, `group.com.organization.app`) you are using with your `sdkConfig.appGroupID`.
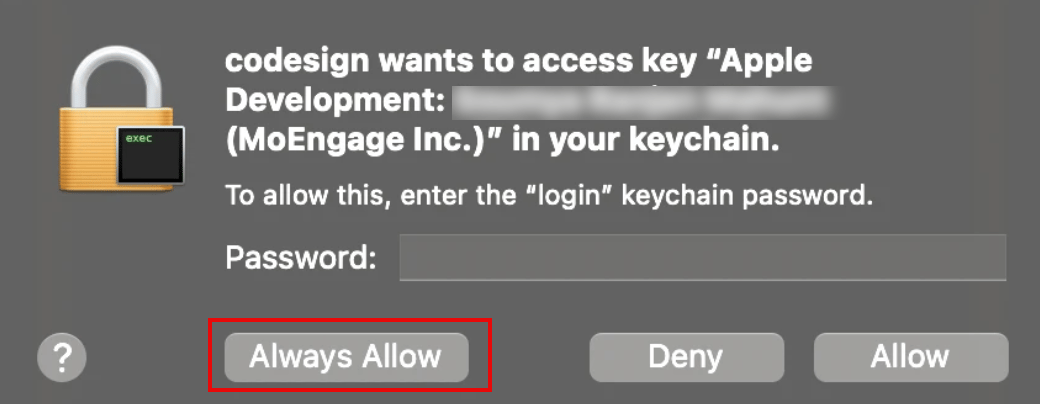
* After integration is complete, you may be prompted to access the keychain for code signing. Click **Always Allow.**
 ### Step 2: Integrate MoEngageRichNotification
Integrate `MoEngageRichNotification` if you need to support either of the following push notification features:
* **Rich media** — display images, GIFs, or video in the notification banner
* **Rich push templates** — render interactive notification layouts such as carousel
This step is mandatory if you have integrated the content extension.
To install the `MoEngageRichNotification` through SPM, perform the following steps:
1. Navigate to **File > Add Package**.
2. Enter the repository URL:
* `https://github.com/moengage/apple-sdk.git`
3. Select the **master** branch or a specific version and select **Add Package**.
4. Target the package to your application.
**Information** CocoaPods is being deprecated. MoEngage recommends using Swift Package Manager for all new integrations. For more info, refer [here](/developer-guide/ios-sdk/sdk-integration/basic/sdk-integration).
1. Add the following line to your `Podfile` inside your app target.
The `moengage_flutter` package already brings in `MoEngage-iOS-SDK`, you only need to add the `RichNotification` subspec.
```ruby lines wrap theme={null}
pod 'MoEngage-iOS-SDK/RichNotification'
```
2. Run pod install:
```ruby lines wrap theme={null}
pod repo update
pod install
```
### Step 3: Integrate the extension integrator tool
Automate the extension configuration by adding a custom script to your build process.
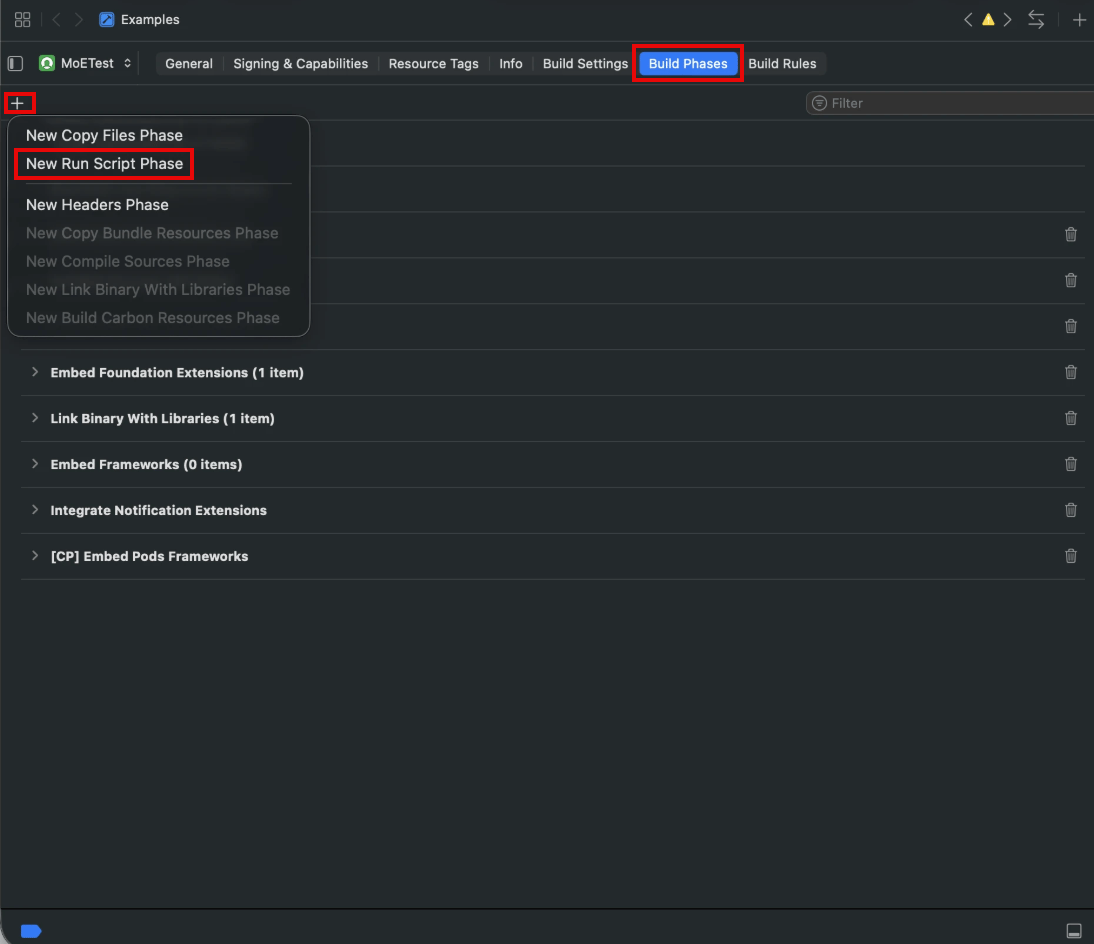
1. In Xcode, select your application target, go to **Build Phases**, and click **+** to add a **New Run Script Phase**.
### Step 2: Integrate MoEngageRichNotification
Integrate `MoEngageRichNotification` if you need to support either of the following push notification features:
* **Rich media** — display images, GIFs, or video in the notification banner
* **Rich push templates** — render interactive notification layouts such as carousel
This step is mandatory if you have integrated the content extension.
To install the `MoEngageRichNotification` through SPM, perform the following steps:
1. Navigate to **File > Add Package**.
2. Enter the repository URL:
* `https://github.com/moengage/apple-sdk.git`
3. Select the **master** branch or a specific version and select **Add Package**.
4. Target the package to your application.
**Information** CocoaPods is being deprecated. MoEngage recommends using Swift Package Manager for all new integrations. For more info, refer [here](/developer-guide/ios-sdk/sdk-integration/basic/sdk-integration).
1. Add the following line to your `Podfile` inside your app target.
The `moengage_flutter` package already brings in `MoEngage-iOS-SDK`, you only need to add the `RichNotification` subspec.
```ruby lines wrap theme={null}
pod 'MoEngage-iOS-SDK/RichNotification'
```
2. Run pod install:
```ruby lines wrap theme={null}
pod repo update
pod install
```
### Step 3: Integrate the extension integrator tool
Automate the extension configuration by adding a custom script to your build process.
1. In Xcode, select your application target, go to **Build Phases**, and click **+** to add a **New Run Script Phase**.
 If you have already added a script phase and configured the input files, you can simply update the run command as described in step 3 below.
2. Add the following paths to the **Input Files** section:
* `$(BUILT_PRODUCTS_DIR)/$(INFOPLIST_PATH)`
* `$(INSTALL_DIR)/$(INFOPLIST_PATH)`
If you have already added a script phase and configured the input files, you can simply update the run command as described in step 3 below.
2. Add the following paths to the **Input Files** section:
* `$(BUILT_PRODUCTS_DIR)/$(INFOPLIST_PATH)`
* `$(INSTALL_DIR)/$(INFOPLIST_PATH)`
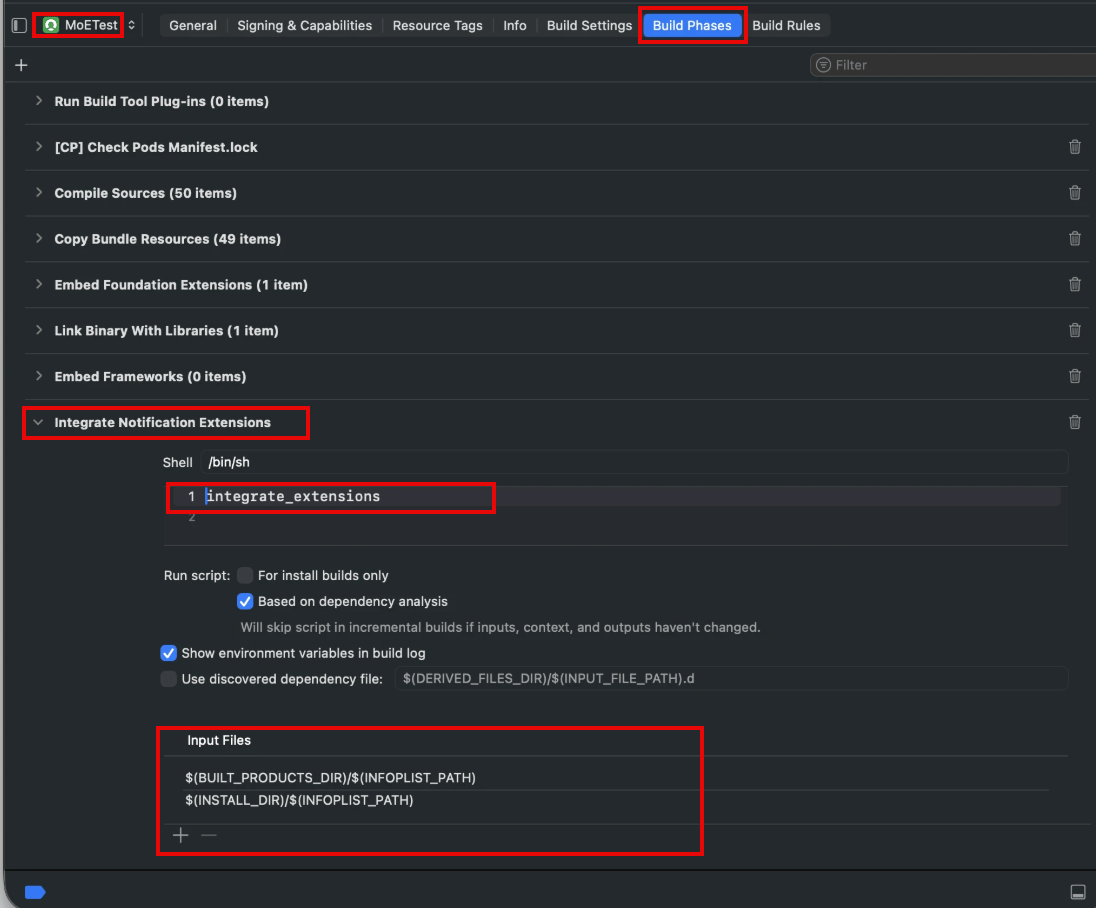 3. In the shell script input box of the Run Script Phase added in step 1, enter the command relevant to your dependency manager, replacing `$OPTIONS` with your desired configuration:
```bash Swift Package Manager (SPM) lines wrap theme={null}
${OBJROOT}/../../SourcePackages/artifacts/apple-sdk/moengage-extensions-integration/moengage-extensions-integration.artifactbundle/moengage-extensions-integration/bin/moengage-extensions-integration $OPTIONS
```
```bash CocoaPods lines wrap theme={null}
${PODS_ROOT}/MoEngageExtensionsIntegration/moengage-extensions-integration.artifactbundle/moengage-extensions-integration/bin/moengage-extensions-integration $OPTIONS
```
#### Available options
Replace `$OPTIONS` with one or more of the following:
| Option | Description |
| :--------------------------------------------------------------------- | :---------------------------------------------------------------------------------------------------------------------------------------------------------------------------- |
| `--enable-push-notification-templates` | Required if the content extension from Step 2 is used. |
| `--notification-service-extension-name $CUSTOM_SERVICE_EXTENSION_NAME` | Sets a custom name for the service extension. Use this when migrating to this tool from a custom service extension implementation. (Default: `MoEngageNotificationService`). |
| `--notification-content-extension-name $CUSTOM_CONTENT_EXTENSION_NAME` | Sets a custom name for the content extension. Use this when migrating to this tool from a custom content extension implementation. (Default: `MoEngageNotificationContent`). |
### Step 3: Remove existing extensions
Remove existing service and content extensions added in **Frameworks**, **Libraries** and **Embedded Content** section.
3. In the shell script input box of the Run Script Phase added in step 1, enter the command relevant to your dependency manager, replacing `$OPTIONS` with your desired configuration:
```bash Swift Package Manager (SPM) lines wrap theme={null}
${OBJROOT}/../../SourcePackages/artifacts/apple-sdk/moengage-extensions-integration/moengage-extensions-integration.artifactbundle/moengage-extensions-integration/bin/moengage-extensions-integration $OPTIONS
```
```bash CocoaPods lines wrap theme={null}
${PODS_ROOT}/MoEngageExtensionsIntegration/moengage-extensions-integration.artifactbundle/moengage-extensions-integration/bin/moengage-extensions-integration $OPTIONS
```
#### Available options
Replace `$OPTIONS` with one or more of the following:
| Option | Description |
| :--------------------------------------------------------------------- | :---------------------------------------------------------------------------------------------------------------------------------------------------------------------------- |
| `--enable-push-notification-templates` | Required if the content extension from Step 2 is used. |
| `--notification-service-extension-name $CUSTOM_SERVICE_EXTENSION_NAME` | Sets a custom name for the service extension. Use this when migrating to this tool from a custom service extension implementation. (Default: `MoEngageNotificationService`). |
| `--notification-content-extension-name $CUSTOM_CONTENT_EXTENSION_NAME` | Sets a custom name for the content extension. Use this when migrating to this tool from a custom content extension implementation. (Default: `MoEngageNotificationContent`). |
### Step 3: Remove existing extensions
Remove existing service and content extensions added in **Frameworks**, **Libraries** and **Embedded Content** section.
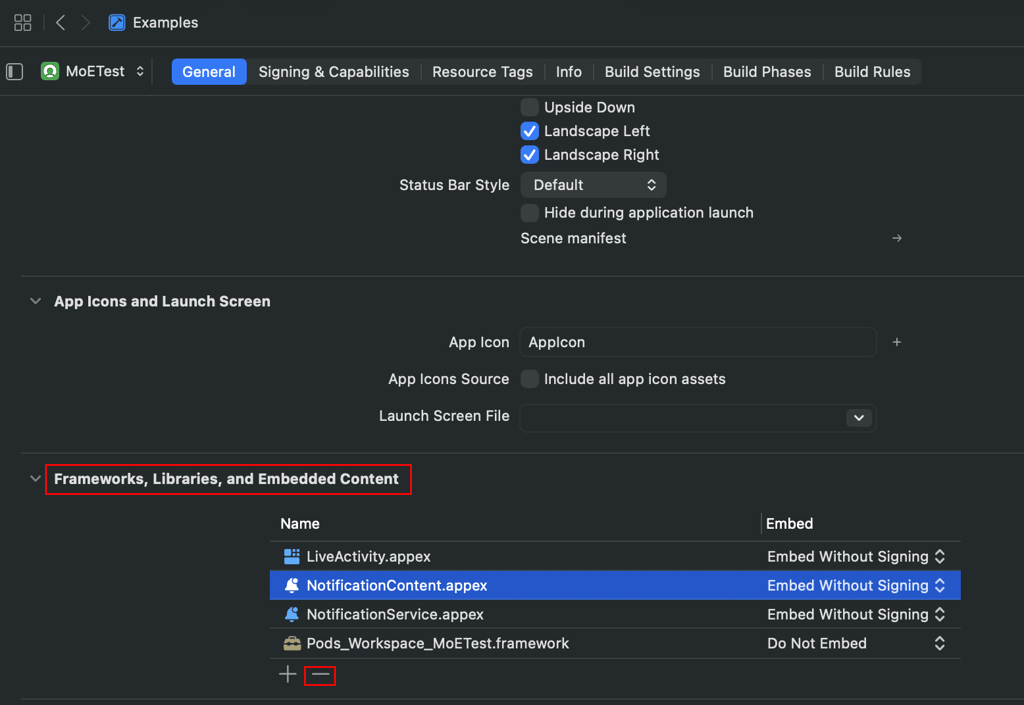 Failing to remove prevents push delivery impressions and rich push notifications.