> ## Documentation Index
> Fetch the complete documentation index at: https://moengage-analytics-query-api-docs.mintlify.site/llms.txt
> Use this file to discover all available pages before exploring further.

# Set up MoEngage activity in SFMC

> Install and configure MoEngage custom activities, CloudPages, and Data Extensions in Salesforce Marketing Cloud so you can use MoEngage Push and Event activities in Journey Builder.

## Introduction

This guide provides detailed instructions for setting up MoEngage Custom Activities in Salesforce Marketing Cloud (SFMC). Follow these steps to ensure a smooth integration and usage.

<Info>
  **Prerequisites**

  * Salesforce Marketing Cloud Access: Administrator and Marketing Cloud Administrator permissions are required.
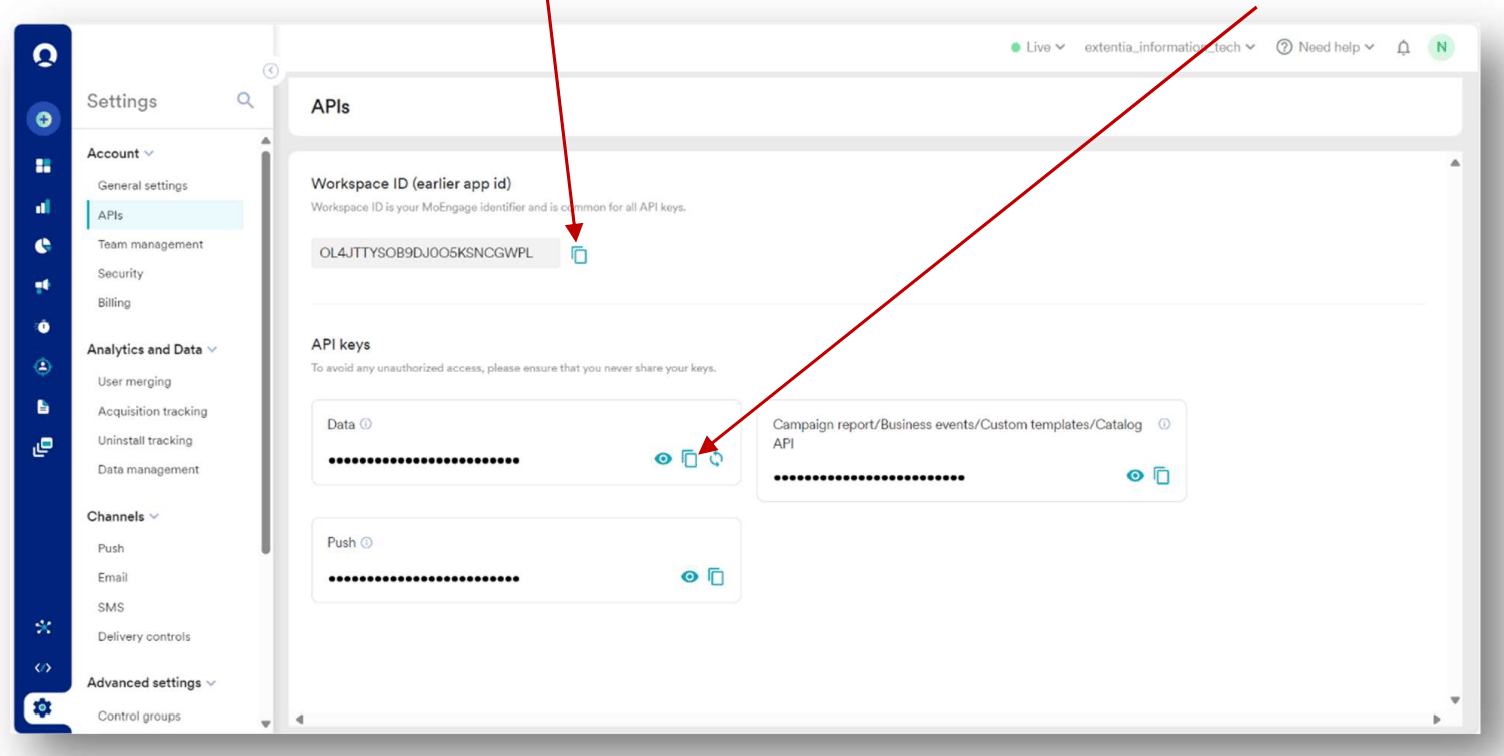
  * MoEngage API Credentials: Ensure you have access to your MoEngage APIs (Settings > Accounts > APIs).
</Info>

## Step 1: Set up MoEngage custom activity

To set up the MoEngage custom activity, perform the following steps:

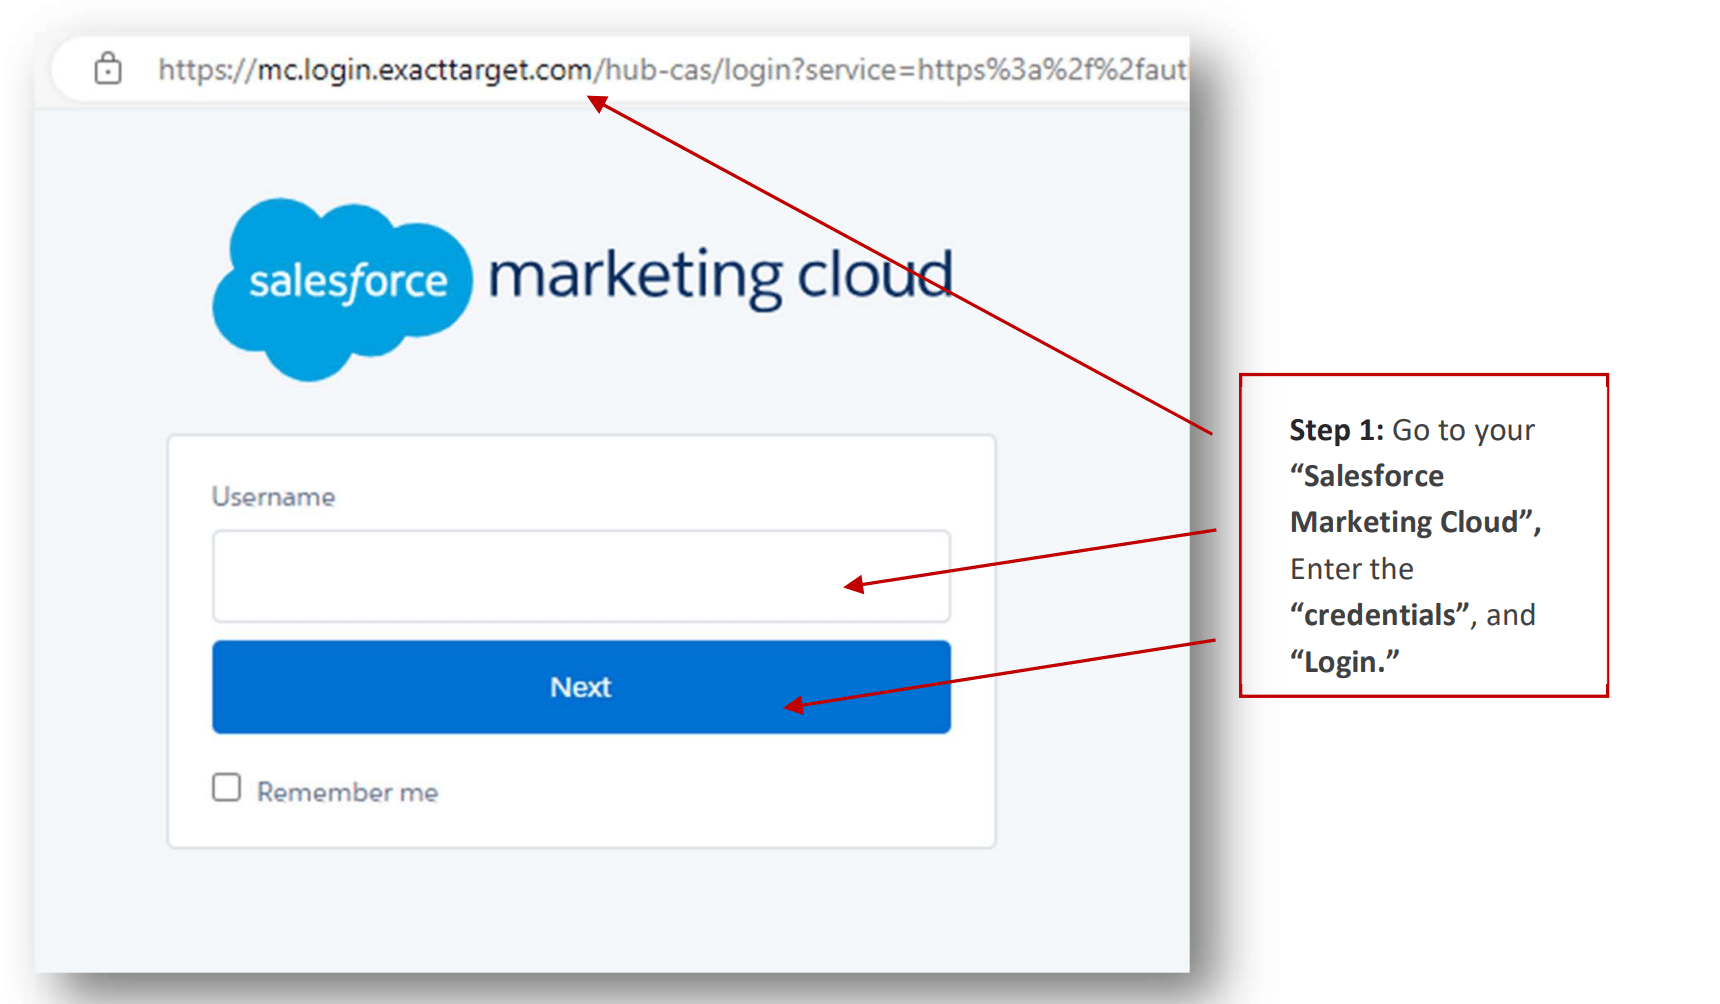
1. Log in to your Salesforce Marketing Cloud (SFMC).
   <img src="https://mintcdn.com/moengage-analytics-query-api-docs/m_gwafhL_lIGxs-0/images/partner_36576006441364.png?fit=max&auto=format&n=m_gwafhL_lIGxs-0&q=85&s=eaf27c0f8d4b0e723e237cc347d17f2e" alt="Salesforce Marketing Cloud login screen" width="1720" height="1004" data-path="images/partner_36576006441364.png" />

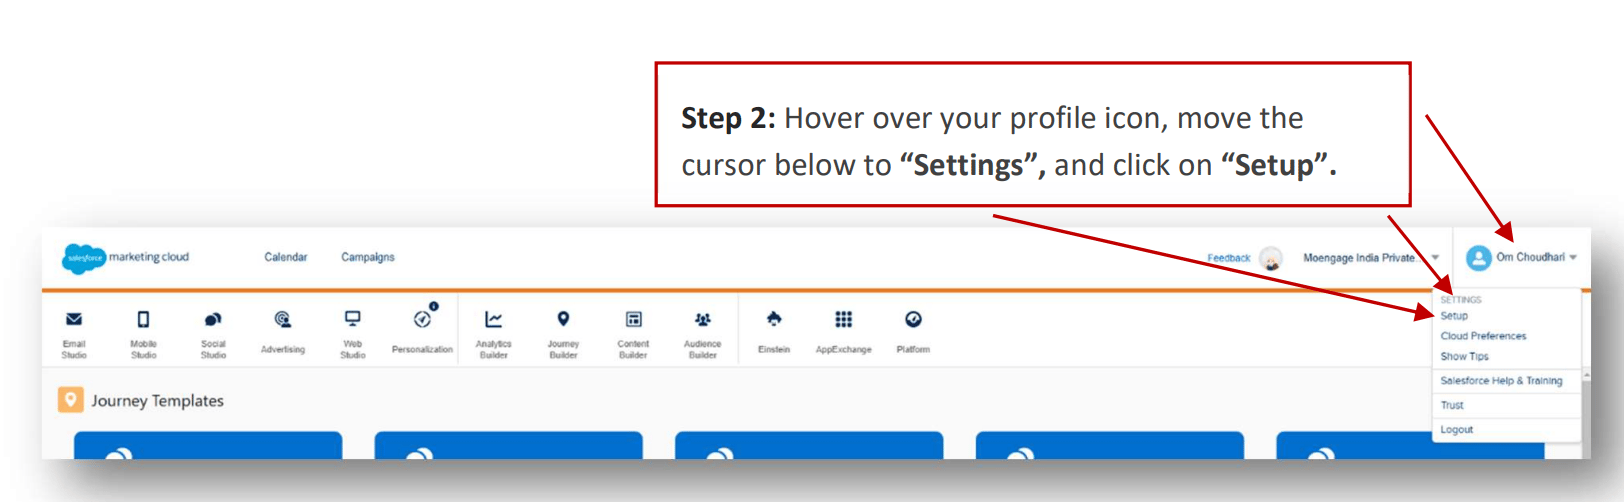
2. Access SFMC settings.

   <img src="https://mintcdn.com/moengage-analytics-query-api-docs/m_gwafhL_lIGxs-0/images/partner_36576006441620.png?fit=max&auto=format&n=m_gwafhL_lIGxs-0&q=85&s=3edd178dcbaf49f7a5296e9b5192f943" alt="Accessing SFMC settings from the dashboard" width="1624" height="502" data-path="images/partner_36576006441620.png" />

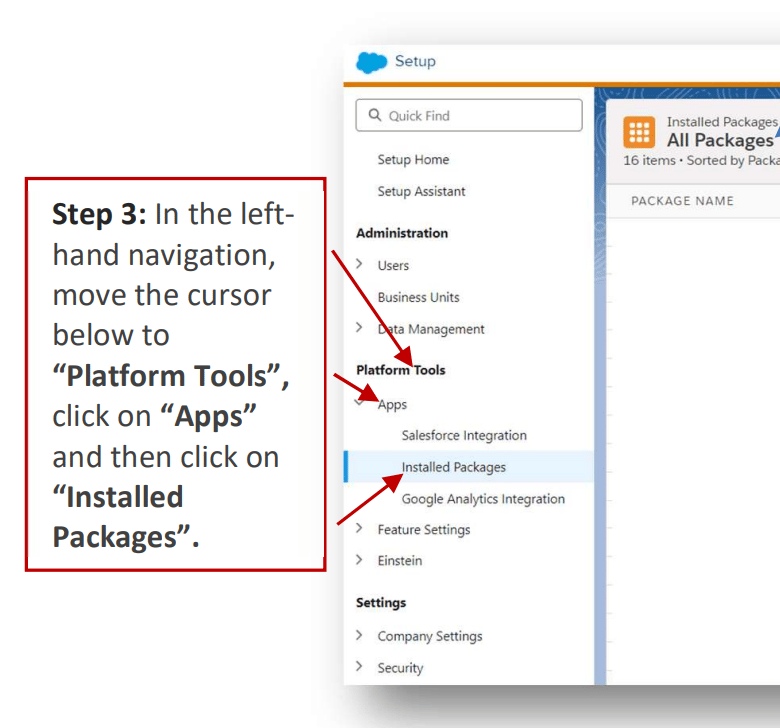
3. Once you click on "Installed Packages", this tab will be visible on the right side of the page.
   <img src="https://mintcdn.com/moengage-analytics-query-api-docs/m_gwafhL_lIGxs-0/images/partner_36576013645972.png?fit=max&auto=format&n=m_gwafhL_lIGxs-0&q=85&s=aca5fecdd0ea37f03ce7ad3963027547" alt="Installed Packages tab in SFMC settings" width="780" height="728" data-path="images/partner_36576013645972.png" />

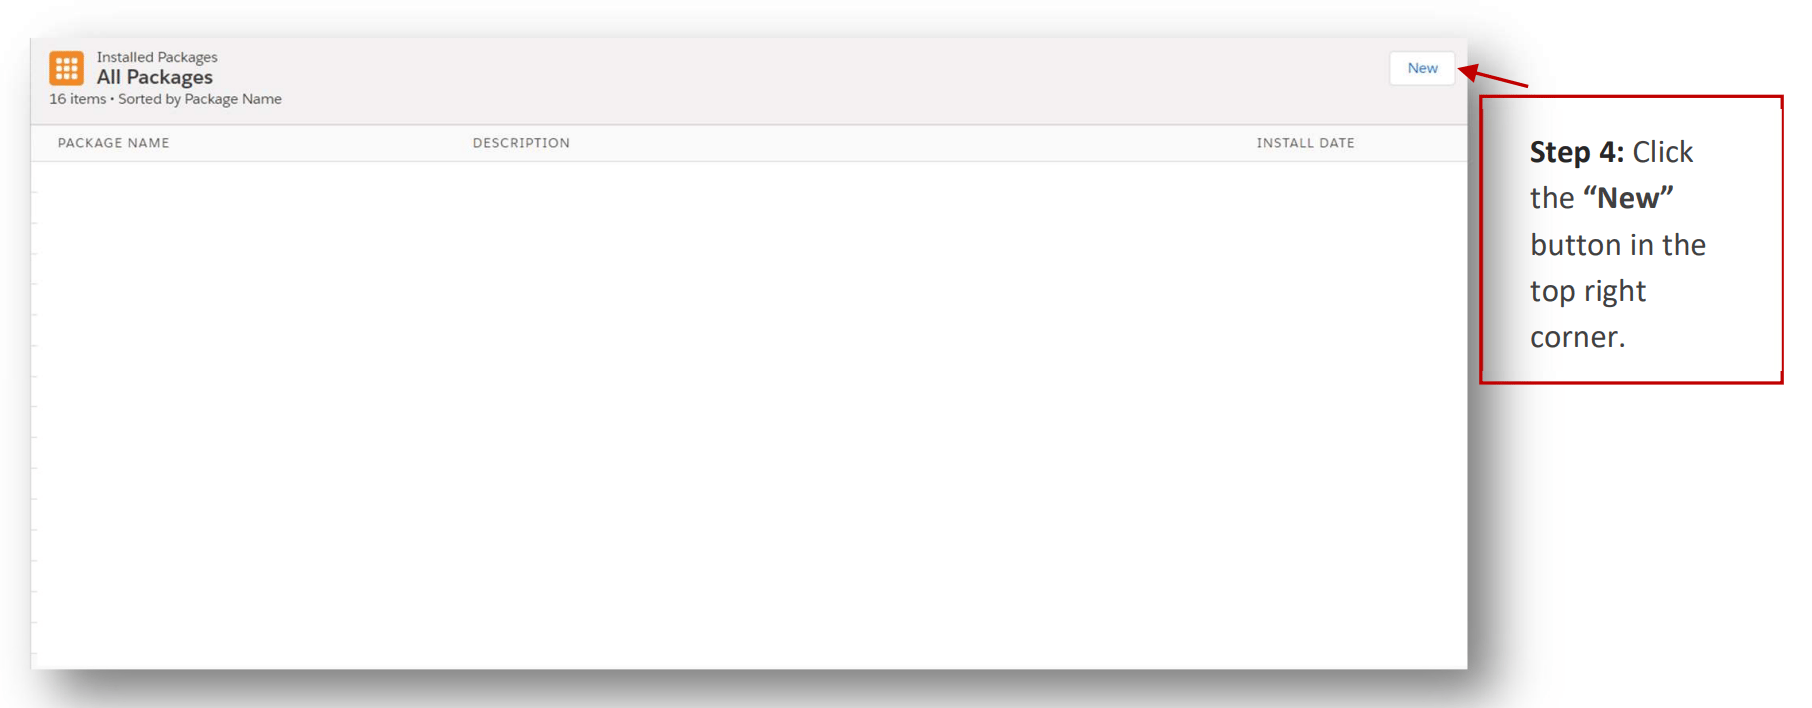
4. Create a new package.

   <img src="https://mintcdn.com/moengage-analytics-query-api-docs/m_gwafhL_lIGxs-0/images/partner_36576013646228.png?fit=max&auto=format&n=m_gwafhL_lIGxs-0&q=85&s=19f4b01fd48d42c869a4088d780db436" alt="Creating a new package in SFMC Installed Packages" width="1812" height="708" data-path="images/partner_36576013646228.png" />

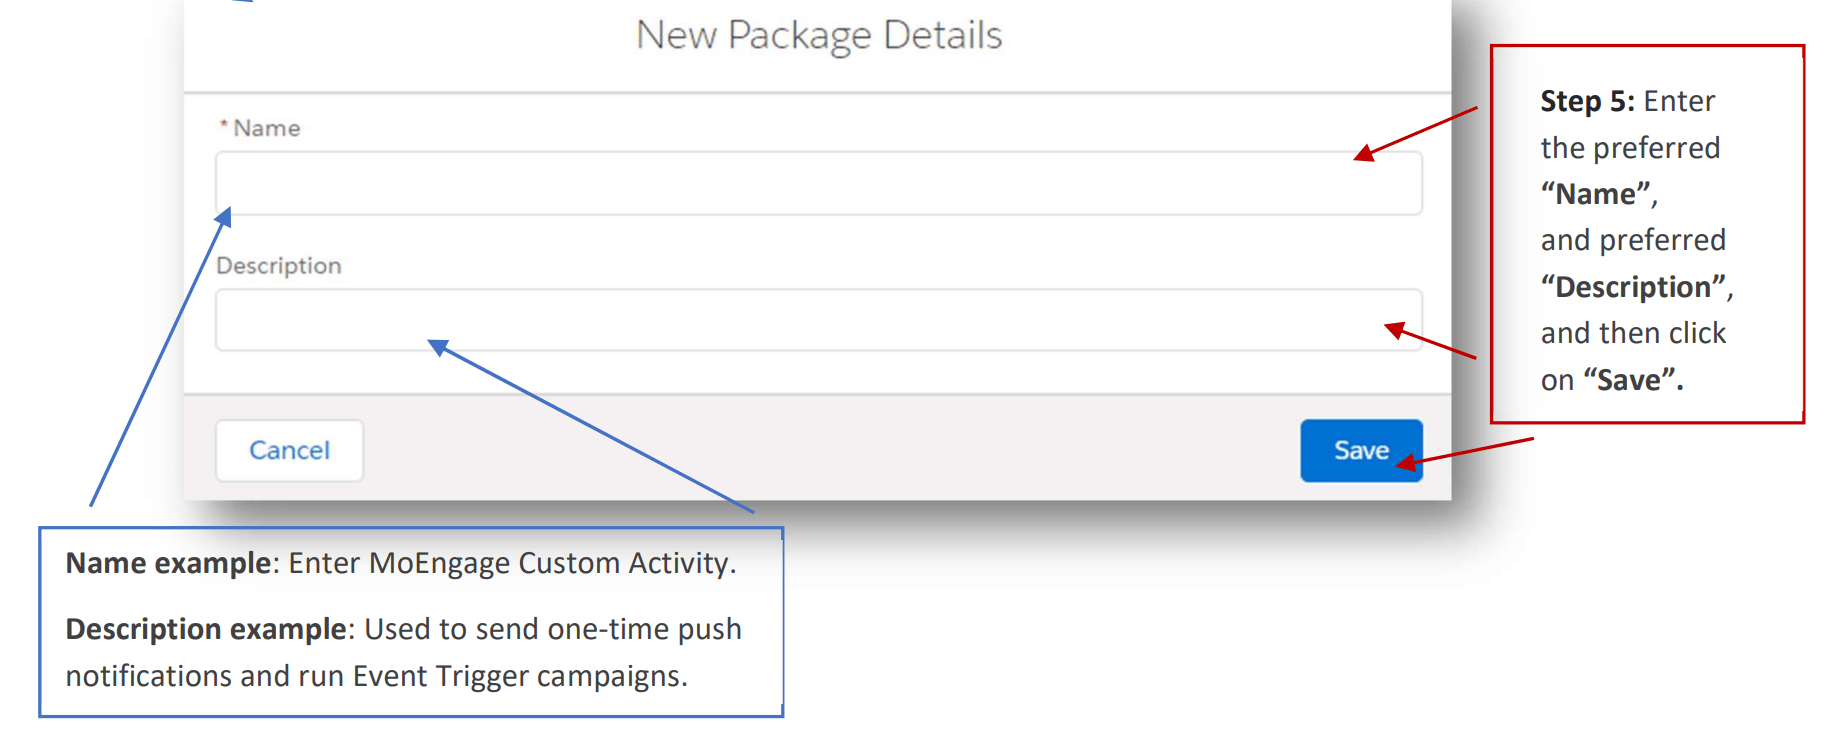
5. Add package details. You can name it "MoEngage Custom Activity" and add description as "Used to send one-time push notifications and run Event Trigger campaigns".
   <img src="https://mintcdn.com/moengage-analytics-query-api-docs/m_gwafhL_lIGxs-0/images/partner_36576013646484.png?fit=max&auto=format&n=m_gwafhL_lIGxs-0&q=85&s=c435a322add6eccd1e068d7b17628917" alt="Entering name and description for the MoEngage Custom Activity package" width="1838" height="740" data-path="images/partner_36576013646484.png" />

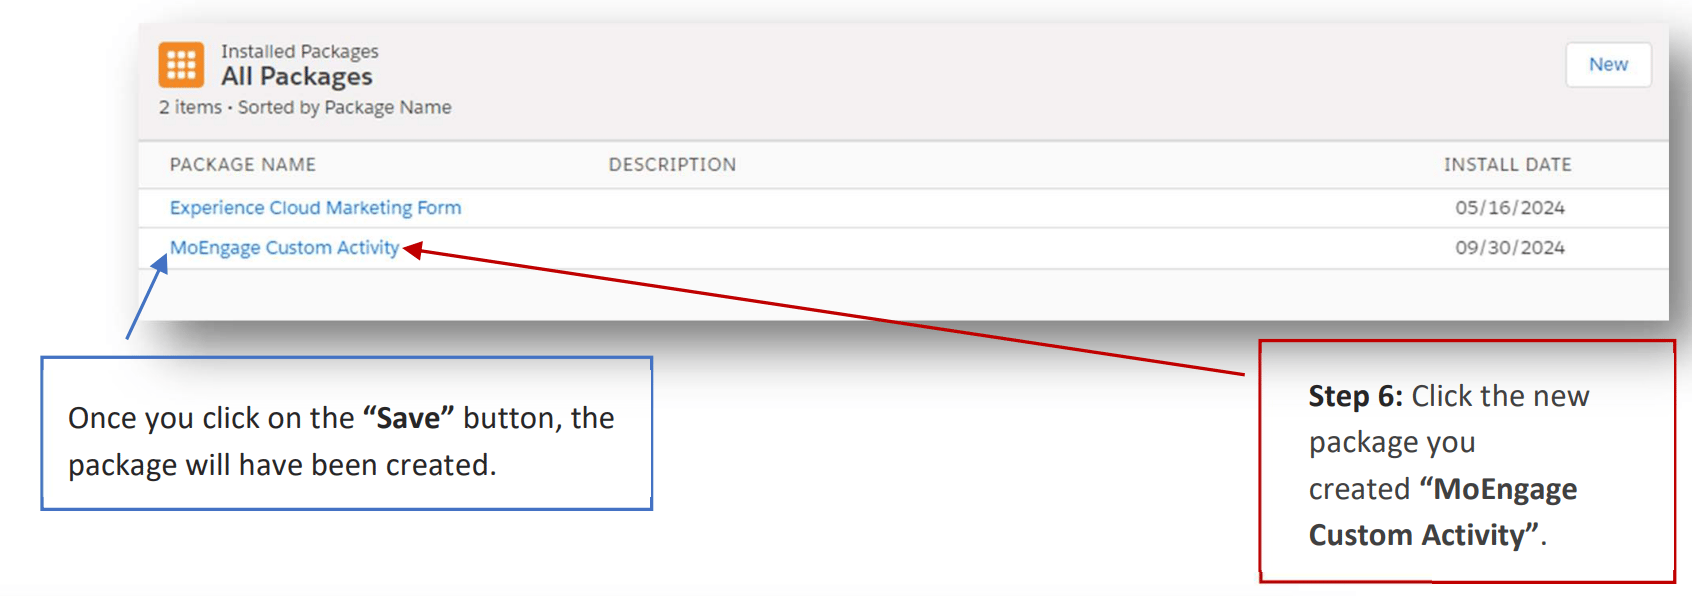
6. Add MoEngage Components.

   <img src="https://mintcdn.com/moengage-analytics-query-api-docs/m_gwafhL_lIGxs-0/images/partner_36576006447124.png?fit=max&auto=format&n=m_gwafhL_lIGxs-0&q=85&s=d57fa15e486e2ed135beb1c53c0634ca" alt="Adding MoEngage Components to the package" width="1692" height="596" data-path="images/partner_36576006447124.png" />

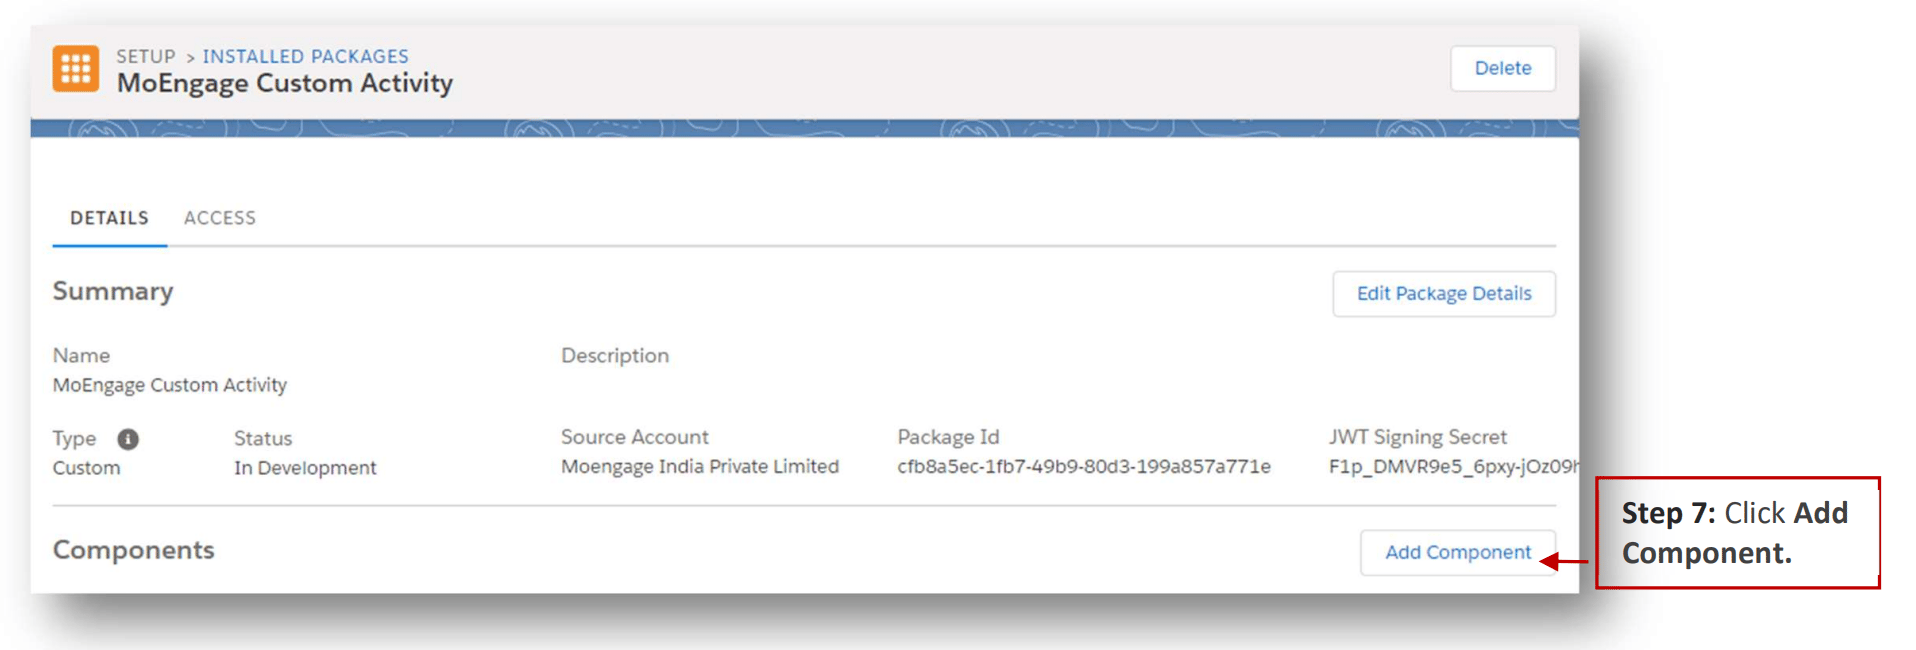
7. Click Add Component.

   <img src="https://mintcdn.com/moengage-analytics-query-api-docs/m_gwafhL_lIGxs-0/images/partner_36576006447636.png?fit=max&auto=format&n=m_gwafhL_lIGxs-0&q=85&s=c369aac68411a91828e780d466f31c3f" alt="Add Component button in SFMC package configuration" width="1916" height="650" data-path="images/partner_36576006447636.png" />

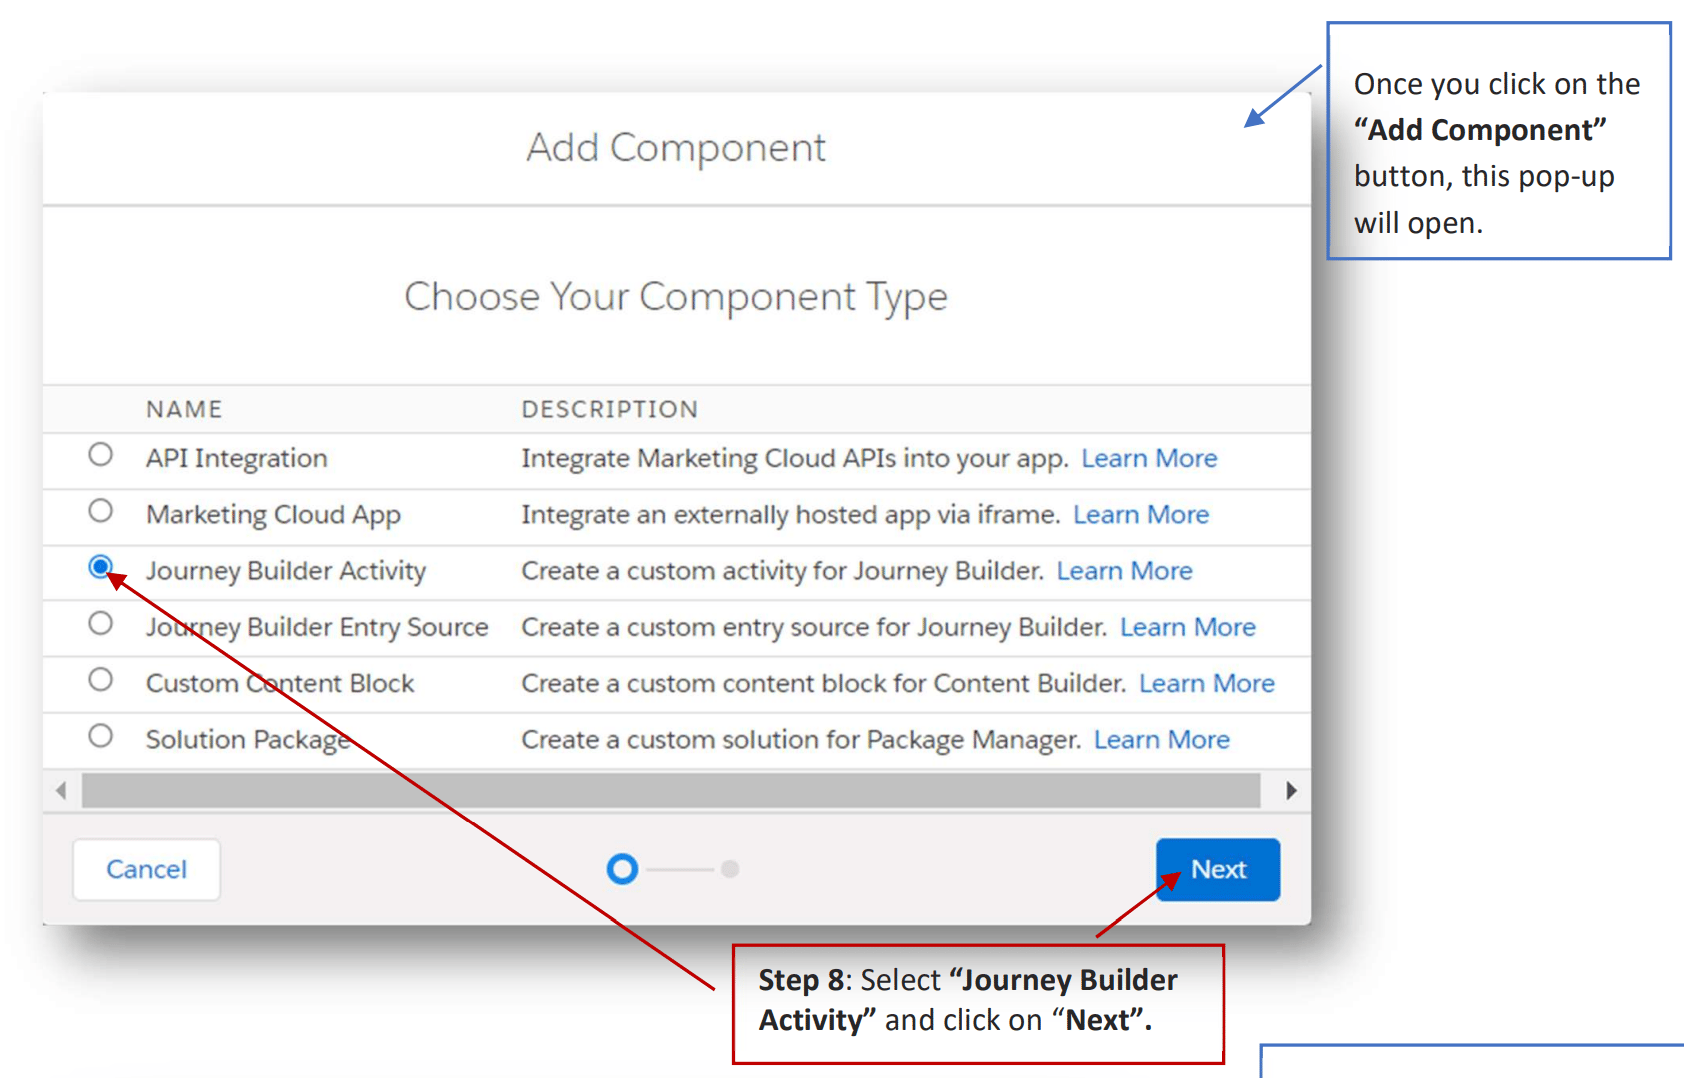
8. Select "Journey Builder Activity" and click on "Next".
   <img src="https://mintcdn.com/moengage-analytics-query-api-docs/m_gwafhL_lIGxs-0/images/partner_36576006447764.png?fit=max&auto=format&n=m_gwafhL_lIGxs-0&q=85&s=e751265c7788e66645352fe040633494" alt="Selecting Journey Builder Activity as the component type" width="1684" height="1078" data-path="images/partner_36576006447764.png" />

9. Click Save.

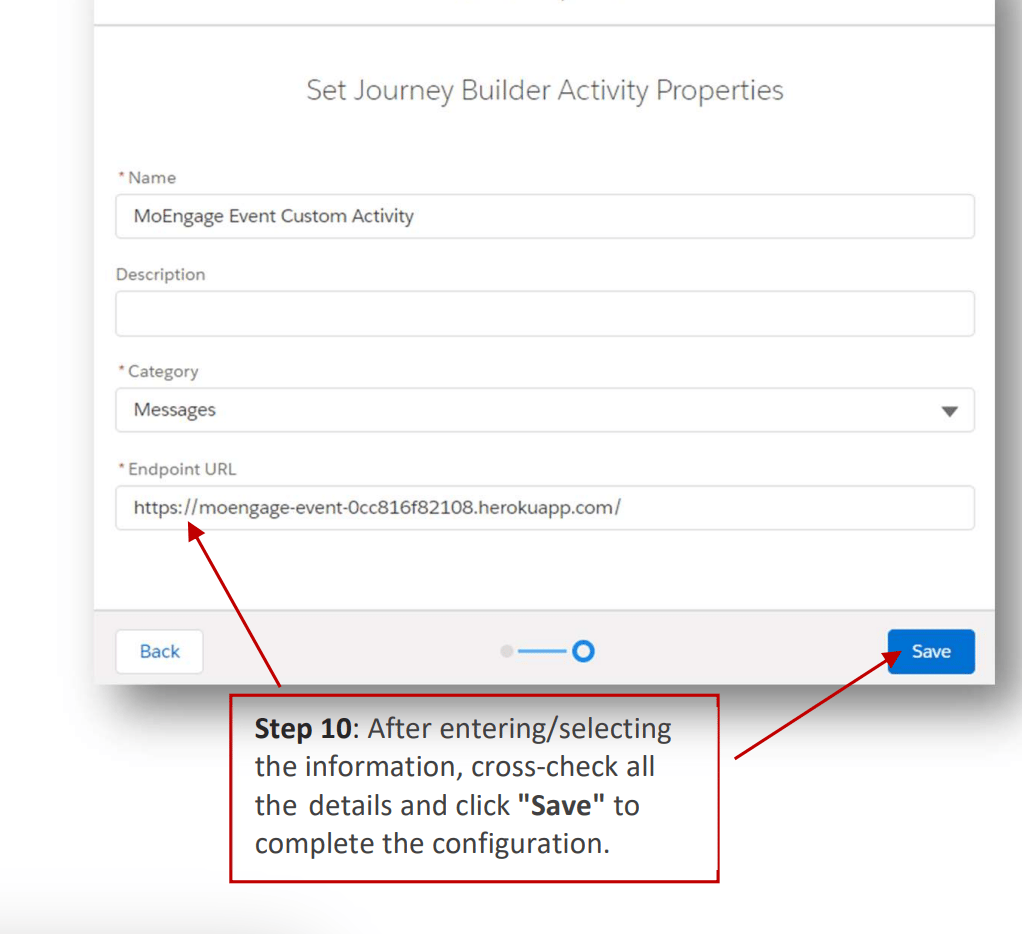
10. Repeat the same steps for MoEngage Event Destination.
    <img src="https://mintcdn.com/moengage-analytics-query-api-docs/m_gwafhL_lIGxs-0/images/partner_36576013650708.png?fit=max&auto=format&n=m_gwafhL_lIGxs-0&q=85&s=3f90bf301bcdd8a57b86e25ab3a8873a" alt="Adding MoEngage Event Destination component" width="1022" height="934" data-path="images/partner_36576013650708.png" />

## Step 2: Set up the Cloud Page and the Data Extension

You need to set up a cloud page along with a data extension to capture the MoEngage workspace details. These can then be used while configuring a MoEngage destination in Journey Builder:

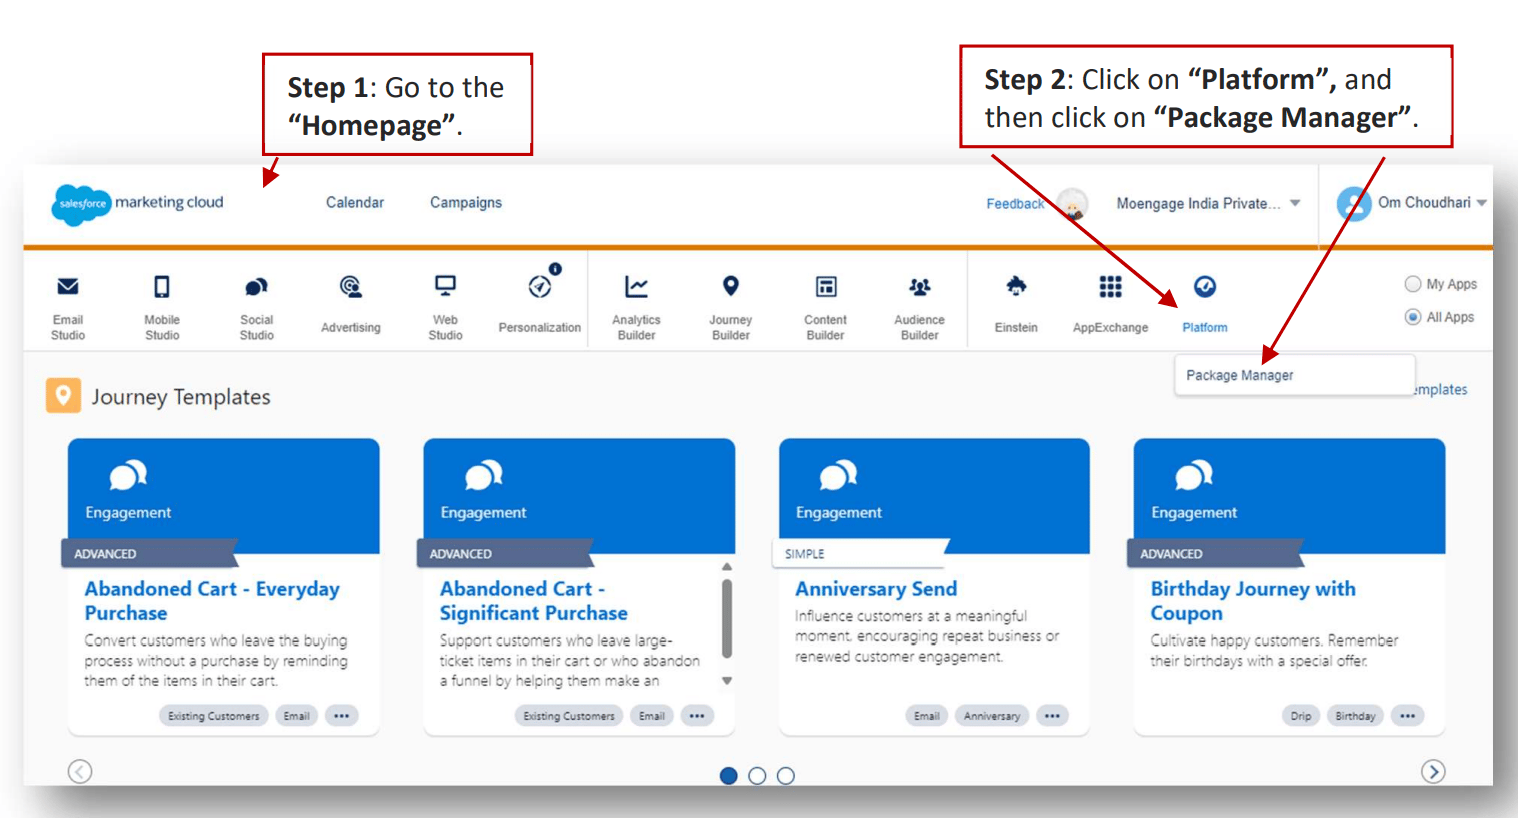
1. Navigate to the SFMC Home page.

2. Click "Platform" > "Package Manager".
   <img src="https://mintcdn.com/moengage-analytics-query-api-docs/m_gwafhL_lIGxs-0/images/partner_36576006448404.png?fit=max&auto=format&n=m_gwafhL_lIGxs-0&q=85&s=1657feb55606cf5c75ae219ba6a7eeb7" alt="Navigating to Platform > Package Manager in SFMC" data-og-width="1518" width="1518" data-og-height="818" height="818" data-path="images/partner_36576006448404.png" data-optimize="true" data-opv="3" srcset="https://mintcdn.com/moengage-analytics-query-api-docs/m_gwafhL_lIGxs-0/images/partner_36576006448404.png?w=280&fit=max&auto=format&n=m_gwafhL_lIGxs-0&q=85&s=b0544f15e31c32f587157b8791bd60e3 280w, https://mintcdn.com/moengage-analytics-query-api-docs/m_gwafhL_lIGxs-0/images/partner_36576006448404.png?w=560&fit=max&auto=format&n=m_gwafhL_lIGxs-0&q=85&s=51229abe3d32d4ec8208a066b56c78c5 560w, https://mintcdn.com/moengage-analytics-query-api-docs/m_gwafhL_lIGxs-0/images/partner_36576006448404.png?w=840&fit=max&auto=format&n=m_gwafhL_lIGxs-0&q=85&s=94a8777435624f009d56e5e73ede7da3 840w, https://mintcdn.com/moengage-analytics-query-api-docs/m_gwafhL_lIGxs-0/images/partner_36576006448404.png?w=1100&fit=max&auto=format&n=m_gwafhL_lIGxs-0&q=85&s=42857433c2a5d9de7ab8ad2f086ace89 1100w, https://mintcdn.com/moengage-analytics-query-api-docs/m_gwafhL_lIGxs-0/images/partner_36576006448404.png?w=1650&fit=max&auto=format&n=m_gwafhL_lIGxs-0&q=85&s=483b1b5a6c2fba2b228c6adc6826e140 1650w, https://mintcdn.com/moengage-analytics-query-api-docs/m_gwafhL_lIGxs-0/images/partner_36576006448404.png?w=2500&fit=max&auto=format&n=m_gwafhL_lIGxs-0&q=85&s=f62aae096082ef3c45ee2b2561342325 2500w" />

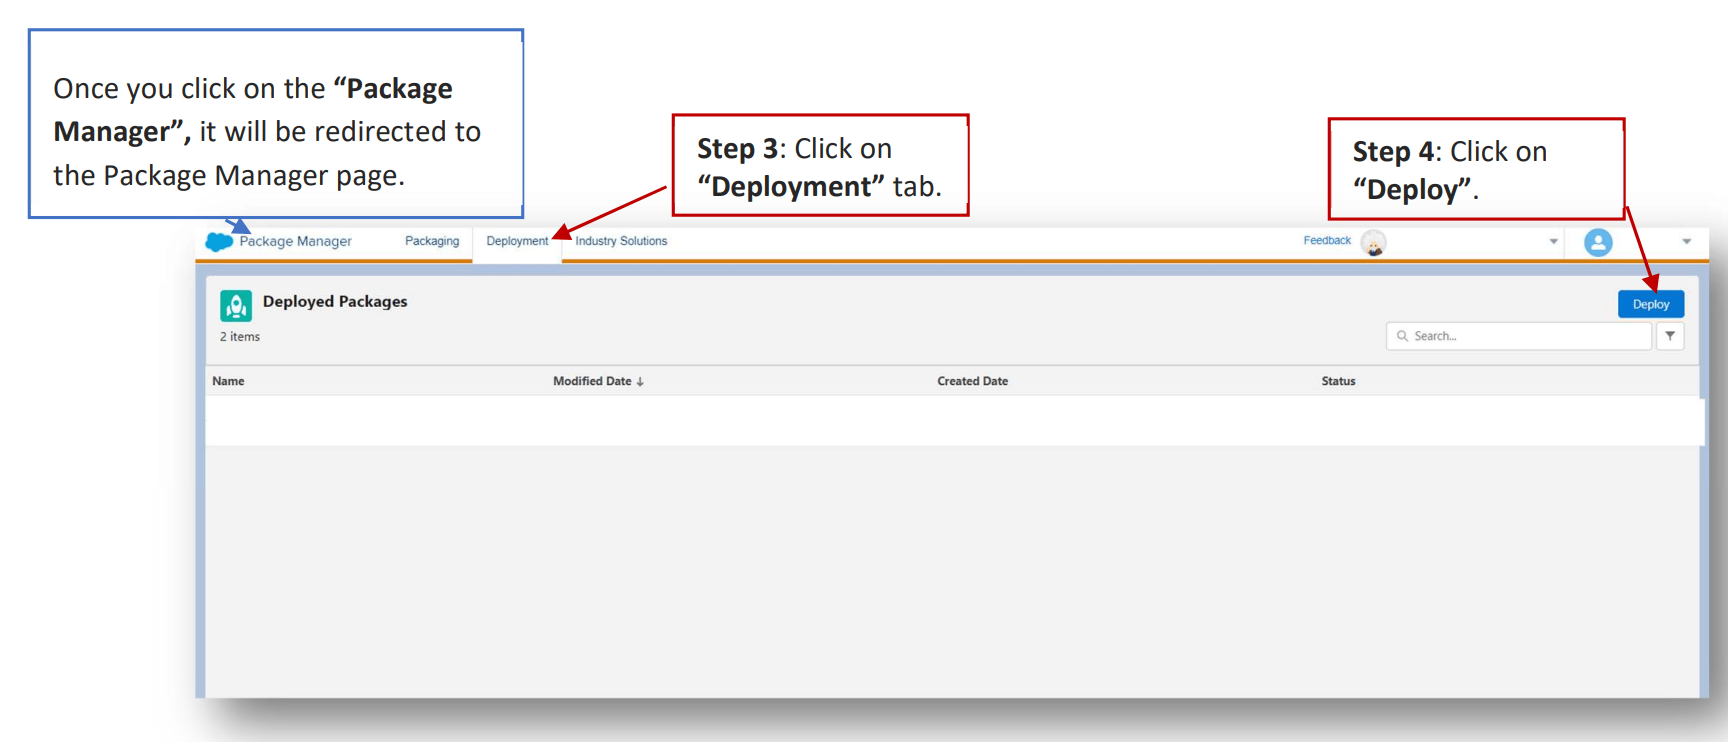
   Once you click on the "Package Manager", it will be redirected to the Package Manager page.

3. Click on the "Deployment" tab.

4. Click "Deploy".
   <img src="https://mintcdn.com/moengage-analytics-query-api-docs/m_gwafhL_lIGxs-0/images/partner_36576013651476.png?fit=max&auto=format&n=m_gwafhL_lIGxs-0&q=85&s=fb98076034edde8c8a130e17465193a8" alt="Deployment tab and Deploy button in Package Manager" width="1728" height="742" data-path="images/partner_36576013651476.png" />

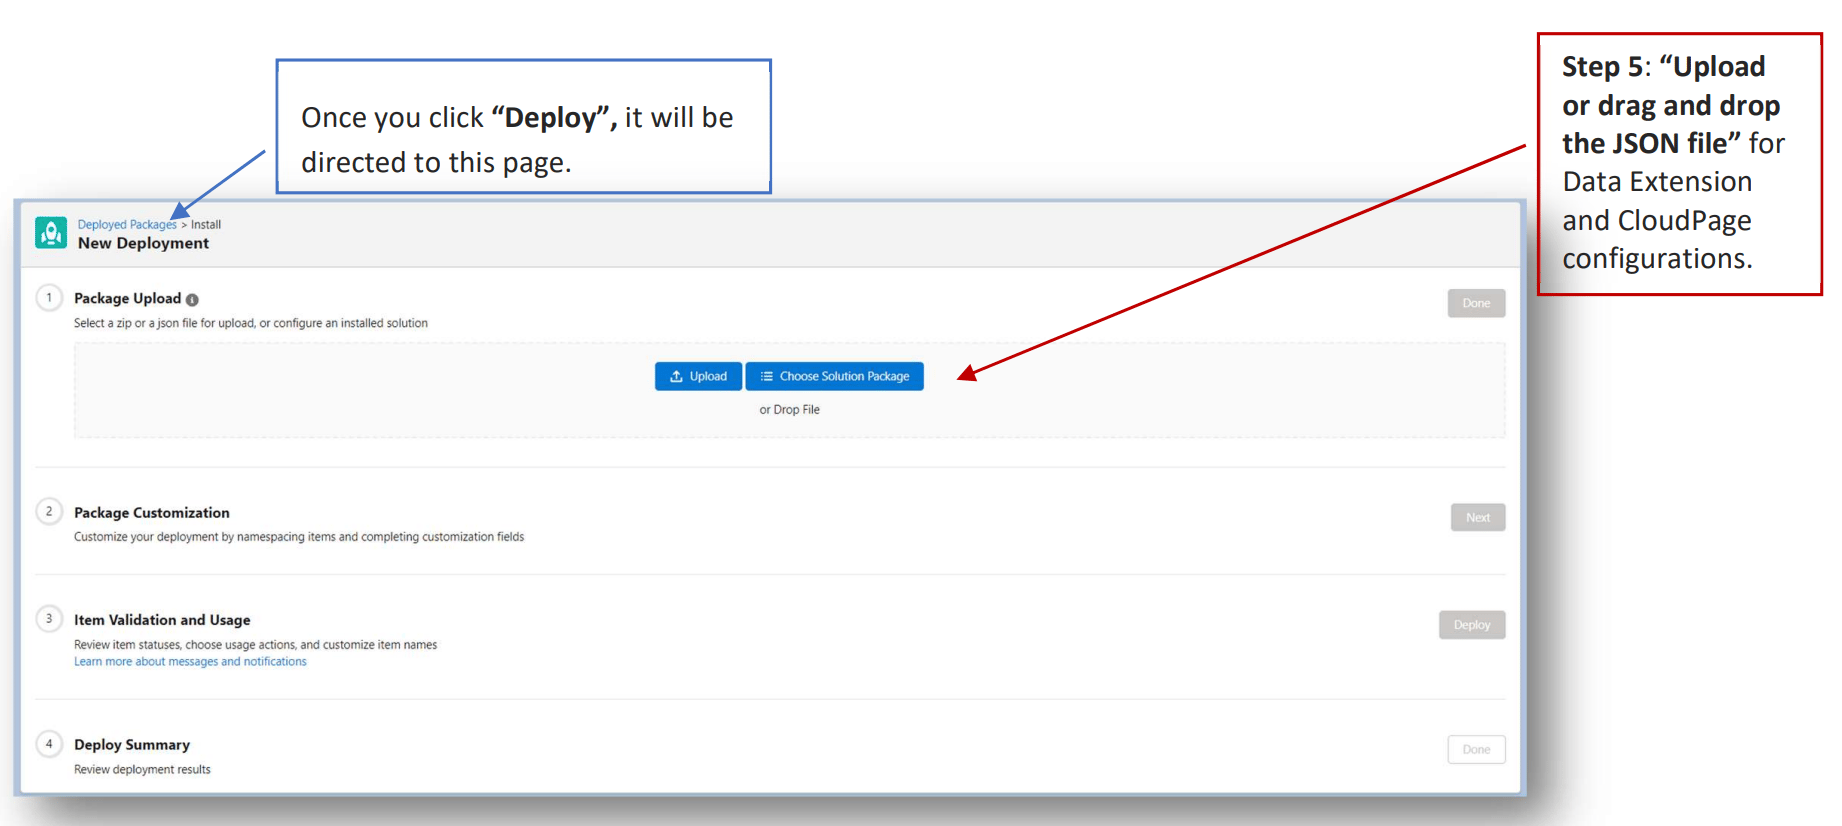
5. Upload the MoEngage solution package [JSON file](https://partners.moengage.com/hc/en-us/article_attachments/45740967830932).
   <img src="https://mintcdn.com/moengage-analytics-query-api-docs/m_gwafhL_lIGxs-0/images/partner_36576013651860.png?fit=max&auto=format&n=m_gwafhL_lIGxs-0&q=85&s=cd0ad7f560f1782513d304416e9f97f5" alt="Uploading the MoEngage solution package JSON" width="1842" height="826" data-path="images/partner_36576013651860.png" />

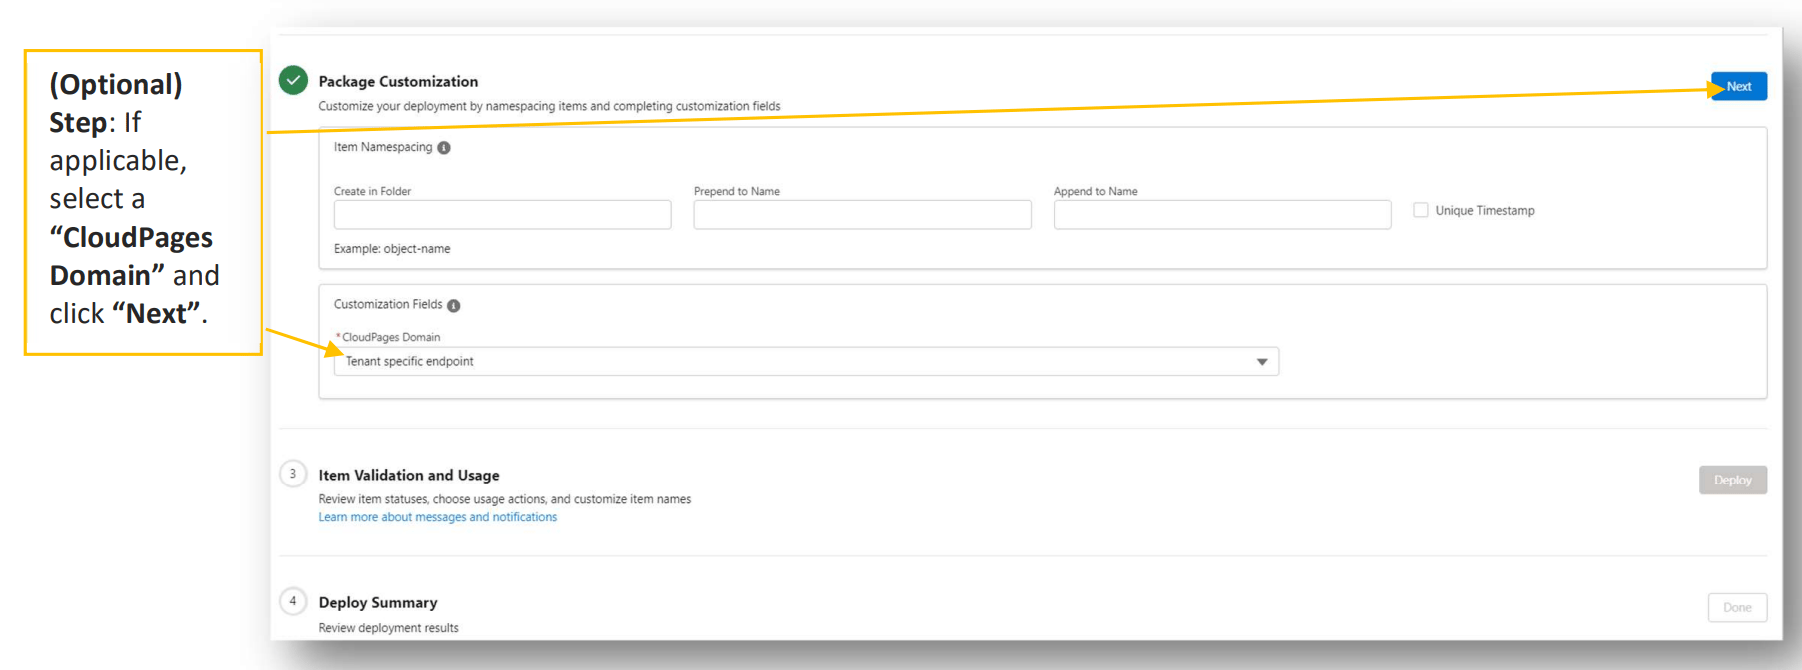
   \[Optional] If applicable, select a "CloudPages Domain" and click "Next".
   <img src="https://mintcdn.com/moengage-analytics-query-api-docs/m_gwafhL_lIGxs-0/images/partner_36576006449428.png?fit=max&auto=format&n=m_gwafhL_lIGxs-0&q=85&s=b562ee463e51c0e9be1b7c28e833cfd4" alt="Selecting an optional CloudPages Domain during deployment" width="1802" height="670" data-path="images/partner_36576006449428.png" />

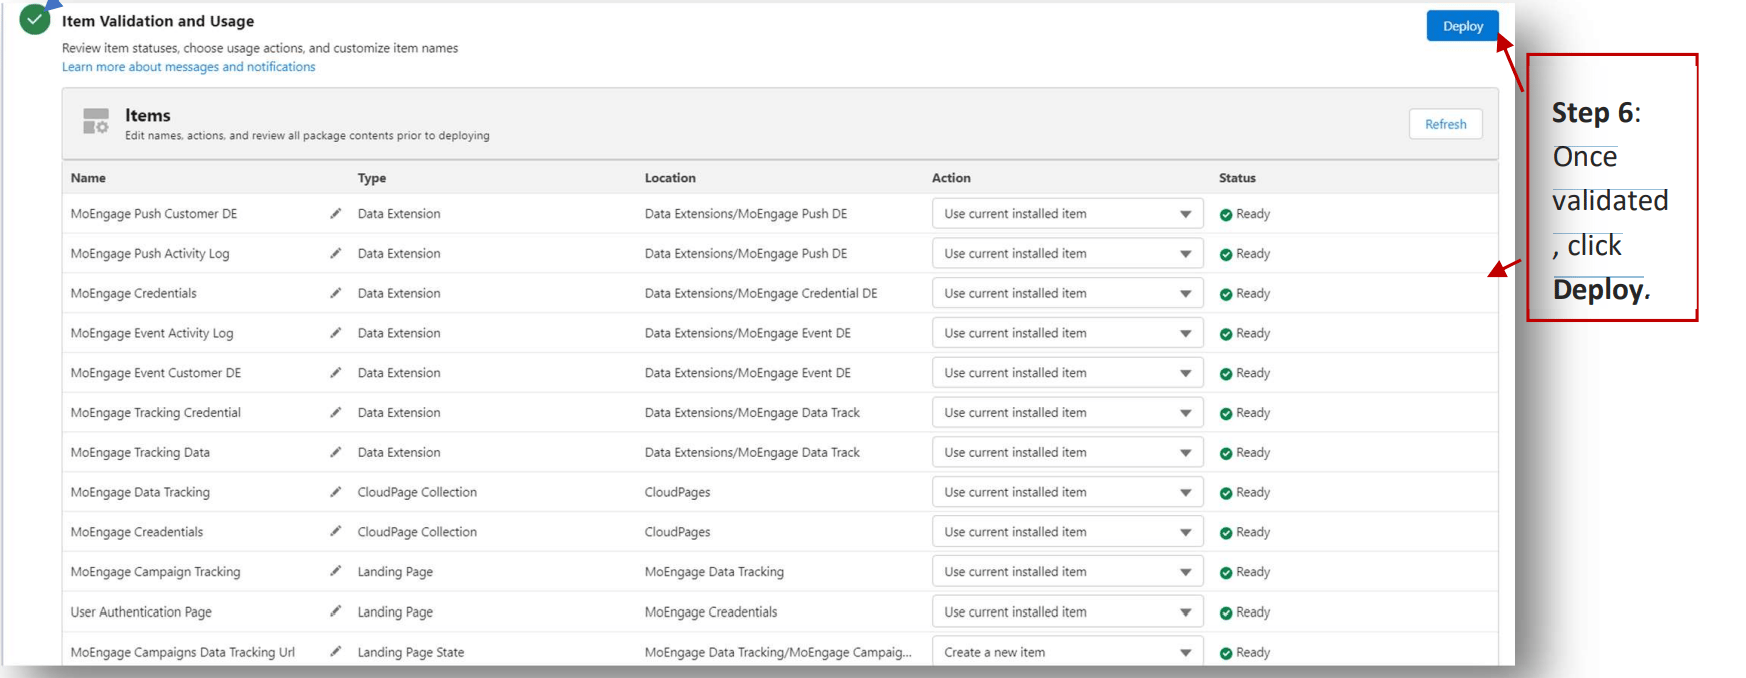
6. The system will validate the setup and check for any issues. Once validated, click Deploy.
   <img src="https://mintcdn.com/moengage-analytics-query-api-docs/m_gwafhL_lIGxs-0/images/partner_36576006449556.png?fit=max&auto=format&n=m_gwafhL_lIGxs-0&q=85&s=21803688a103be229bef9d5ead6d623e" alt="Validating and clicking Deploy in Package Manager" width="1746" height="678" data-path="images/partner_36576006449556.png" />

### Publish Data Extensions and CloudPages

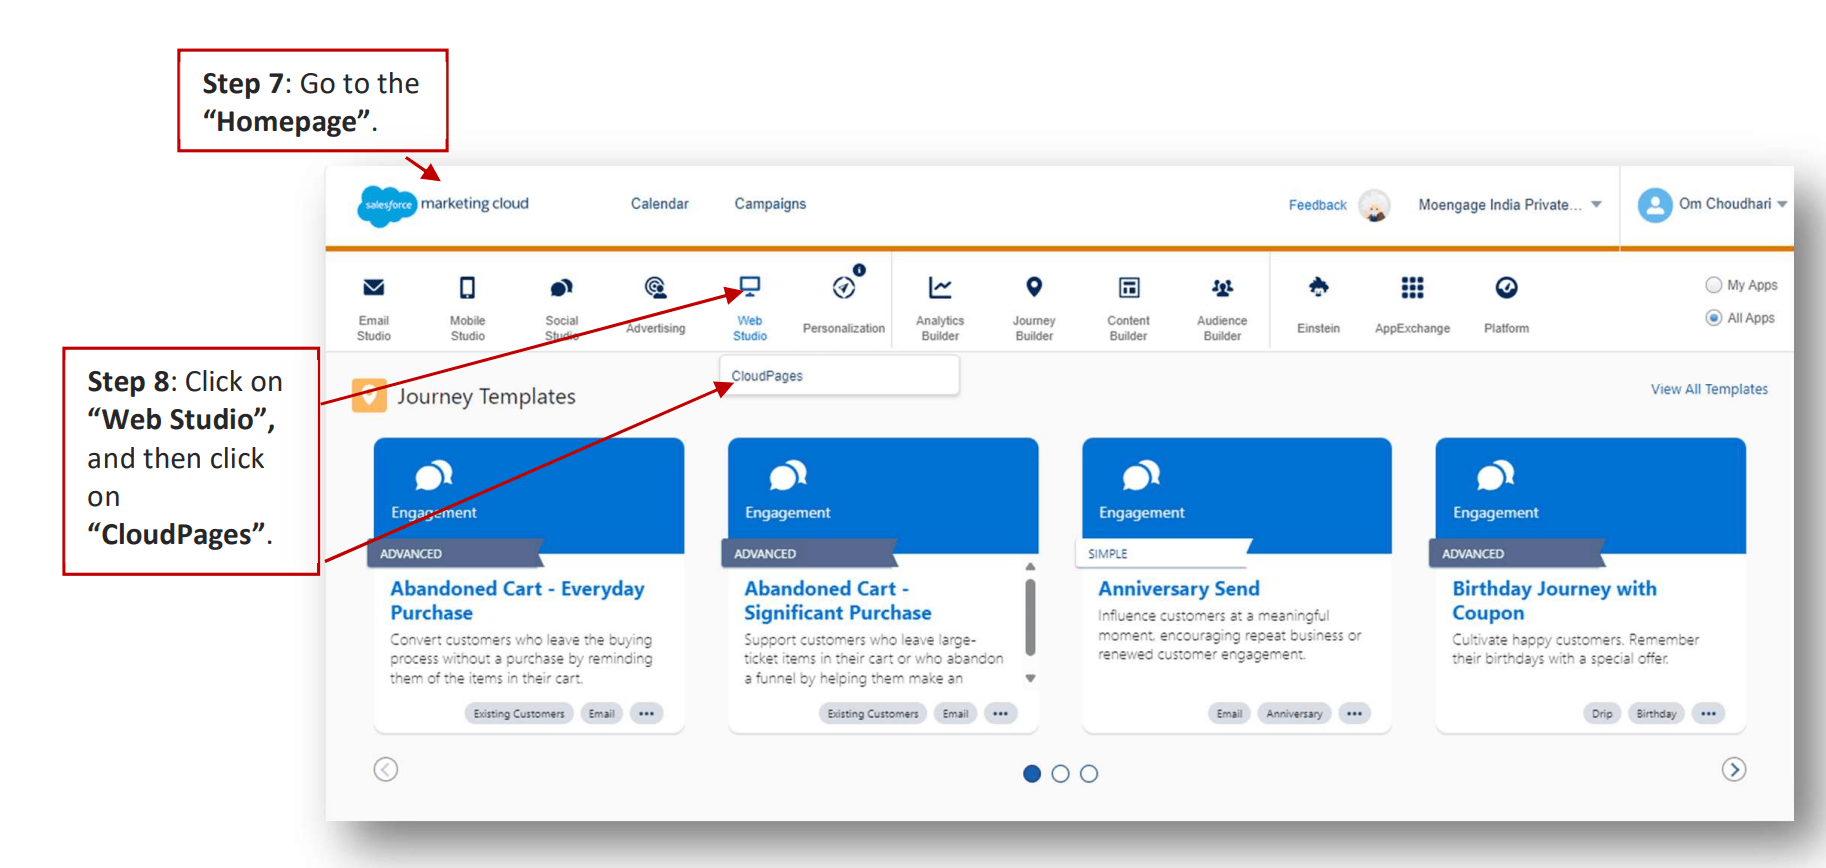
7. Go to the "Homepage".

8. Click on "Web Studio", and then click on "CloudPages".
   <img src="https://mintcdn.com/moengage-analytics-query-api-docs/m_gwafhL_lIGxs-0/images/partner_36576006449684.png?fit=max&auto=format&n=m_gwafhL_lIGxs-0&q=85&s=9f28606d7ee7fc482a274f07ade44413" alt="Navigating to Web Studio > CloudPages" data-og-width="1826" width="1826" data-og-height="868" height="868" data-path="images/partner_36576006449684.png" data-optimize="true" data-opv="3" srcset="https://mintcdn.com/moengage-analytics-query-api-docs/m_gwafhL_lIGxs-0/images/partner_36576006449684.png?w=280&fit=max&auto=format&n=m_gwafhL_lIGxs-0&q=85&s=5261823e8d63812c6fca83380d75135d 280w, https://mintcdn.com/moengage-analytics-query-api-docs/m_gwafhL_lIGxs-0/images/partner_36576006449684.png?w=560&fit=max&auto=format&n=m_gwafhL_lIGxs-0&q=85&s=409df26f554672d334ecbd25bfb83c7c 560w, https://mintcdn.com/moengage-analytics-query-api-docs/m_gwafhL_lIGxs-0/images/partner_36576006449684.png?w=840&fit=max&auto=format&n=m_gwafhL_lIGxs-0&q=85&s=4e3defa8e1ec9489187da682ddea52ea 840w, https://mintcdn.com/moengage-analytics-query-api-docs/m_gwafhL_lIGxs-0/images/partner_36576006449684.png?w=1100&fit=max&auto=format&n=m_gwafhL_lIGxs-0&q=85&s=a22bddefaf621c6a74257e11fb4acf08 1100w, https://mintcdn.com/moengage-analytics-query-api-docs/m_gwafhL_lIGxs-0/images/partner_36576006449684.png?w=1650&fit=max&auto=format&n=m_gwafhL_lIGxs-0&q=85&s=06fd5003b58345fcdbb594e7e52ef5b2 1650w, https://mintcdn.com/moengage-analytics-query-api-docs/m_gwafhL_lIGxs-0/images/partner_36576006449684.png?w=2500&fit=max&auto=format&n=m_gwafhL_lIGxs-0&q=85&s=38c0cdcfdb84f4fbb4c778eb52b2b649 2500w" />

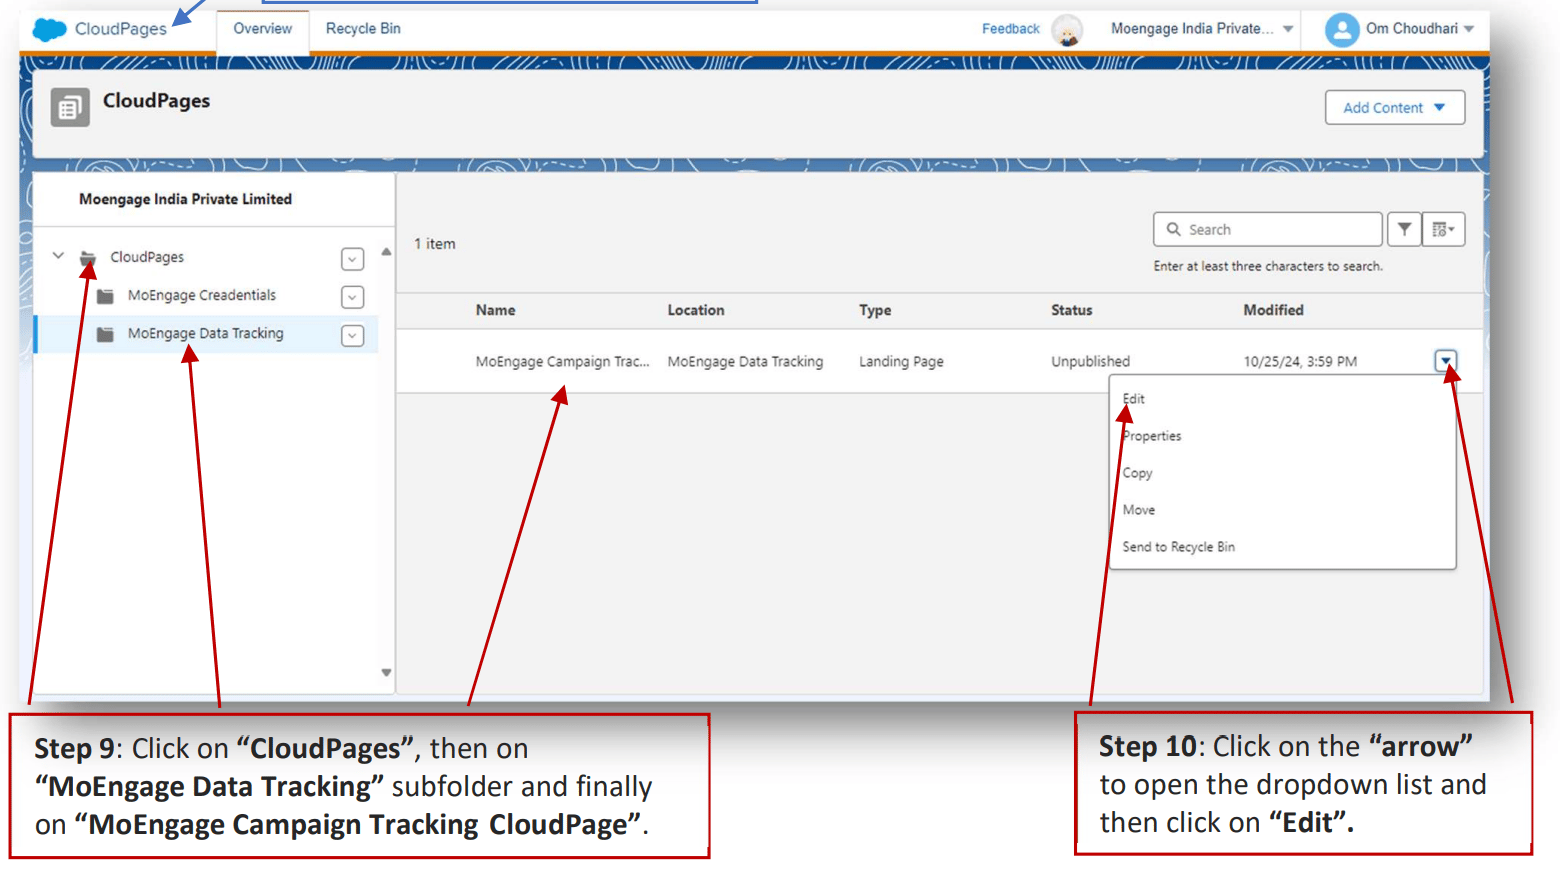
9. Once you click "CloudPages", it will be directed to this page. Click on "CloudPages", then on "MoEngage Data Tracking" subfolder, and finally on "MoEngage Campaign Tracking CloudPage".

10. Click on the "arrow" to open the dropdown list and then click on "Edit".
    <img src="https://mintcdn.com/moengage-analytics-query-api-docs/m_gwafhL_lIGxs-0/images/partner_36576013658644.png?fit=max&auto=format&n=m_gwafhL_lIGxs-0&q=85&s=edf4203a8df8292bc3b76eb2259c61a4" alt="Editing the MoEngage Campaign Tracking CloudPage" width="1560" height="890" data-path="images/partner_36576013658644.png" />

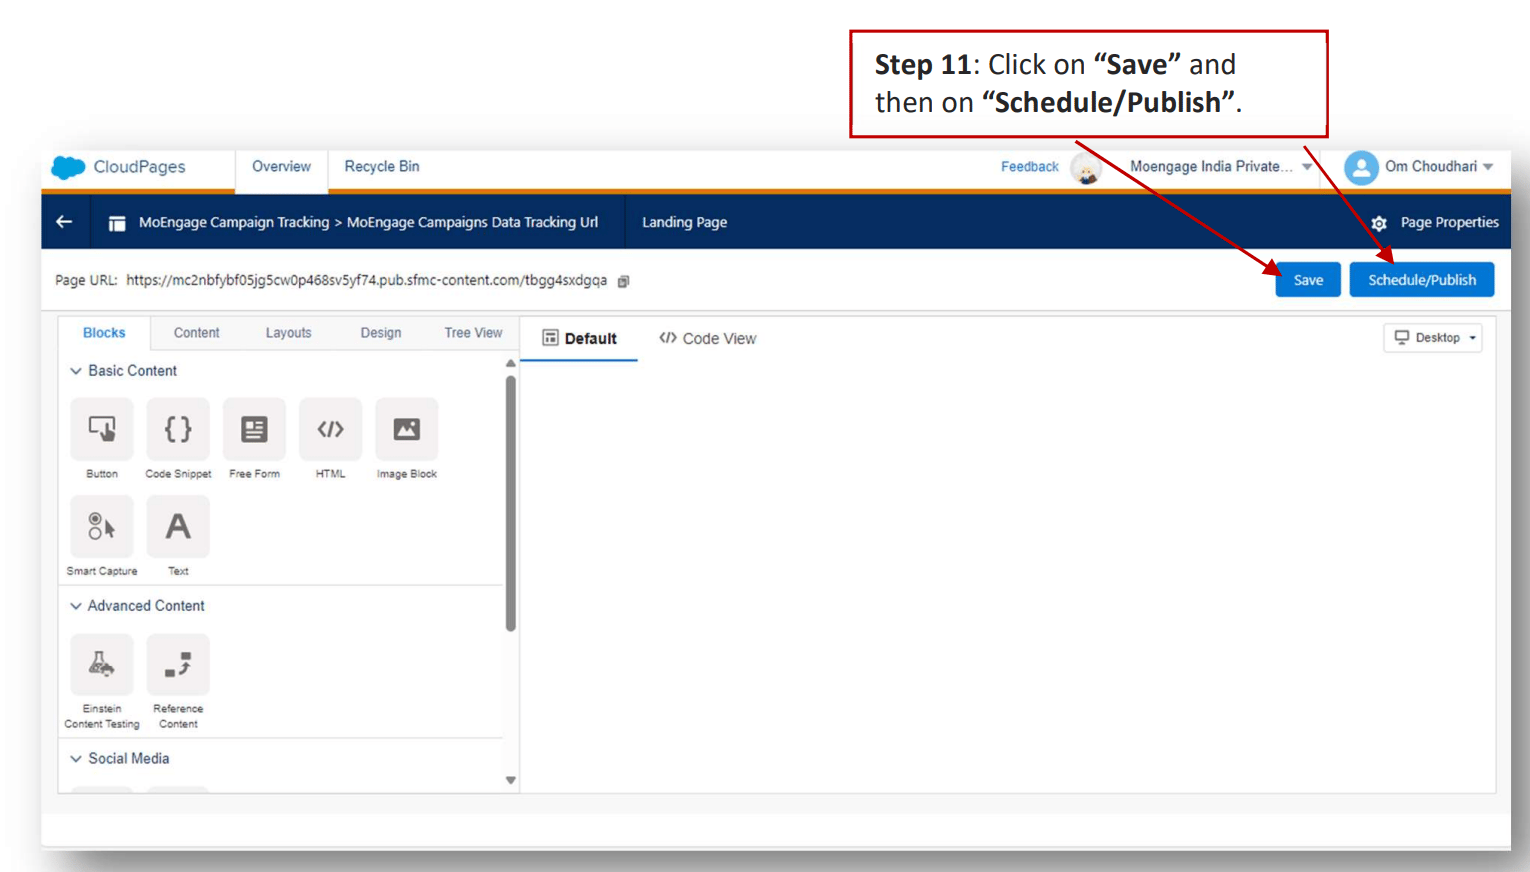
11. Click on "Save" and then on "Schedule/Publish".
    <img src="https://mintcdn.com/moengage-analytics-query-api-docs/m_gwafhL_lIGxs-0/images/partner_36576013658900.png?fit=max&auto=format&n=m_gwafhL_lIGxs-0&q=85&s=aee8702cd540b10f06e6b19092920ecc" alt="Saving and publishing the MoEngage Campaign Tracking CloudPage" width="1530" height="872" data-path="images/partner_36576013658900.png" />

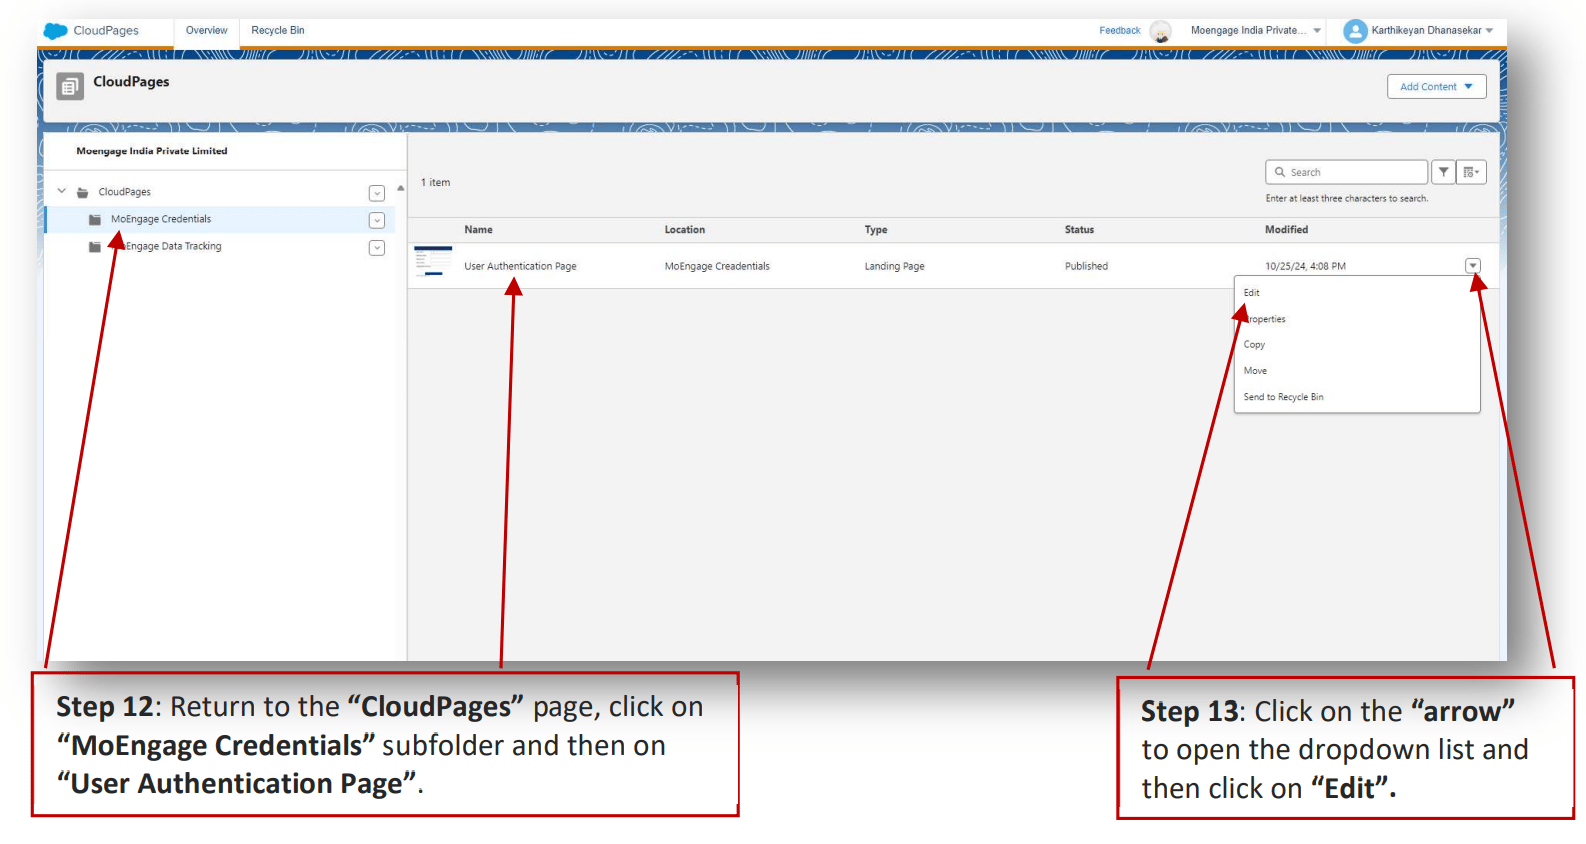
12. Return to the "CloudPages" page, click on "MoEngage Credentials" subfolder and then on "User Authentication Page".

13. Click on the "arrow" to open the dropdown list and then click on "Edit".
    <img src="https://mintcdn.com/moengage-analytics-query-api-docs/m_gwafhL_lIGxs-0/images/partner_36576006451220.png?fit=max&auto=format&n=m_gwafhL_lIGxs-0&q=85&s=025b1a234c3041840969b84f139d8563" alt="Editing the User Authentication Page CloudPage" width="1586" height="844" data-path="images/partner_36576006451220.png" />

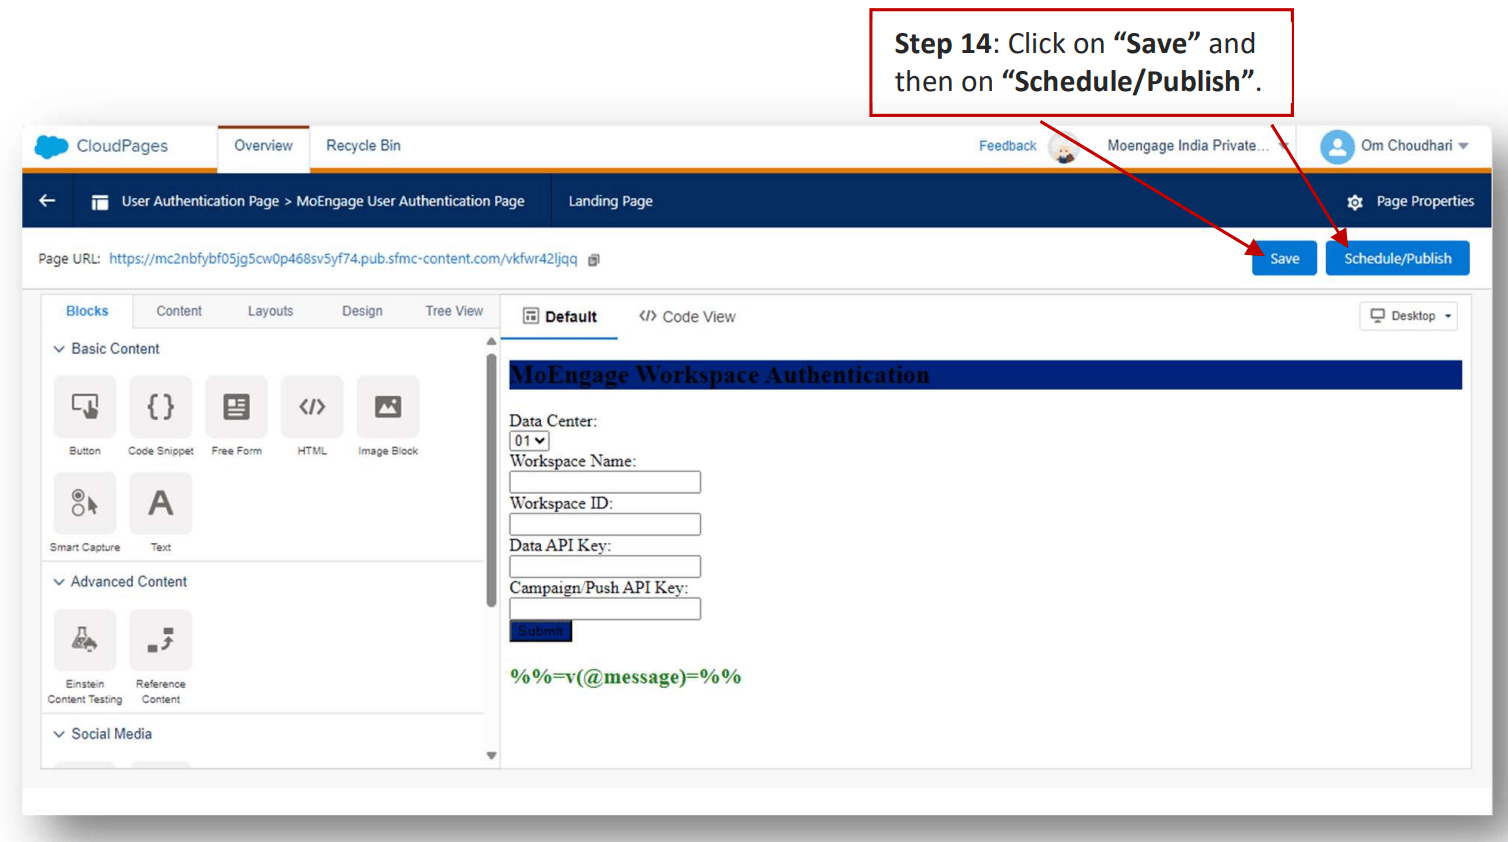
14. Click on "Save" and then on "Schedule/Publish".
    <img src="https://mintcdn.com/moengage-analytics-query-api-docs/m_gwafhL_lIGxs-0/images/partner_36576013659540.png?fit=max&auto=format&n=m_gwafhL_lIGxs-0&q=85&s=719ca0ffffb9cd62ca9831c4d277af28" alt="Saving and publishing the User Authentication Page" width="1508" height="842" data-path="images/partner_36576013659540.png" />

## Verify Data Extension and external keys

Ensure the following Data Extensions (DEs) are properly named and configured:

### A. MoEngage Tracking Data

It stores campaign tracking information.

1. Go to the "Homepage".

2. Click on "Audience Builder", and then click on "Contact Builder".
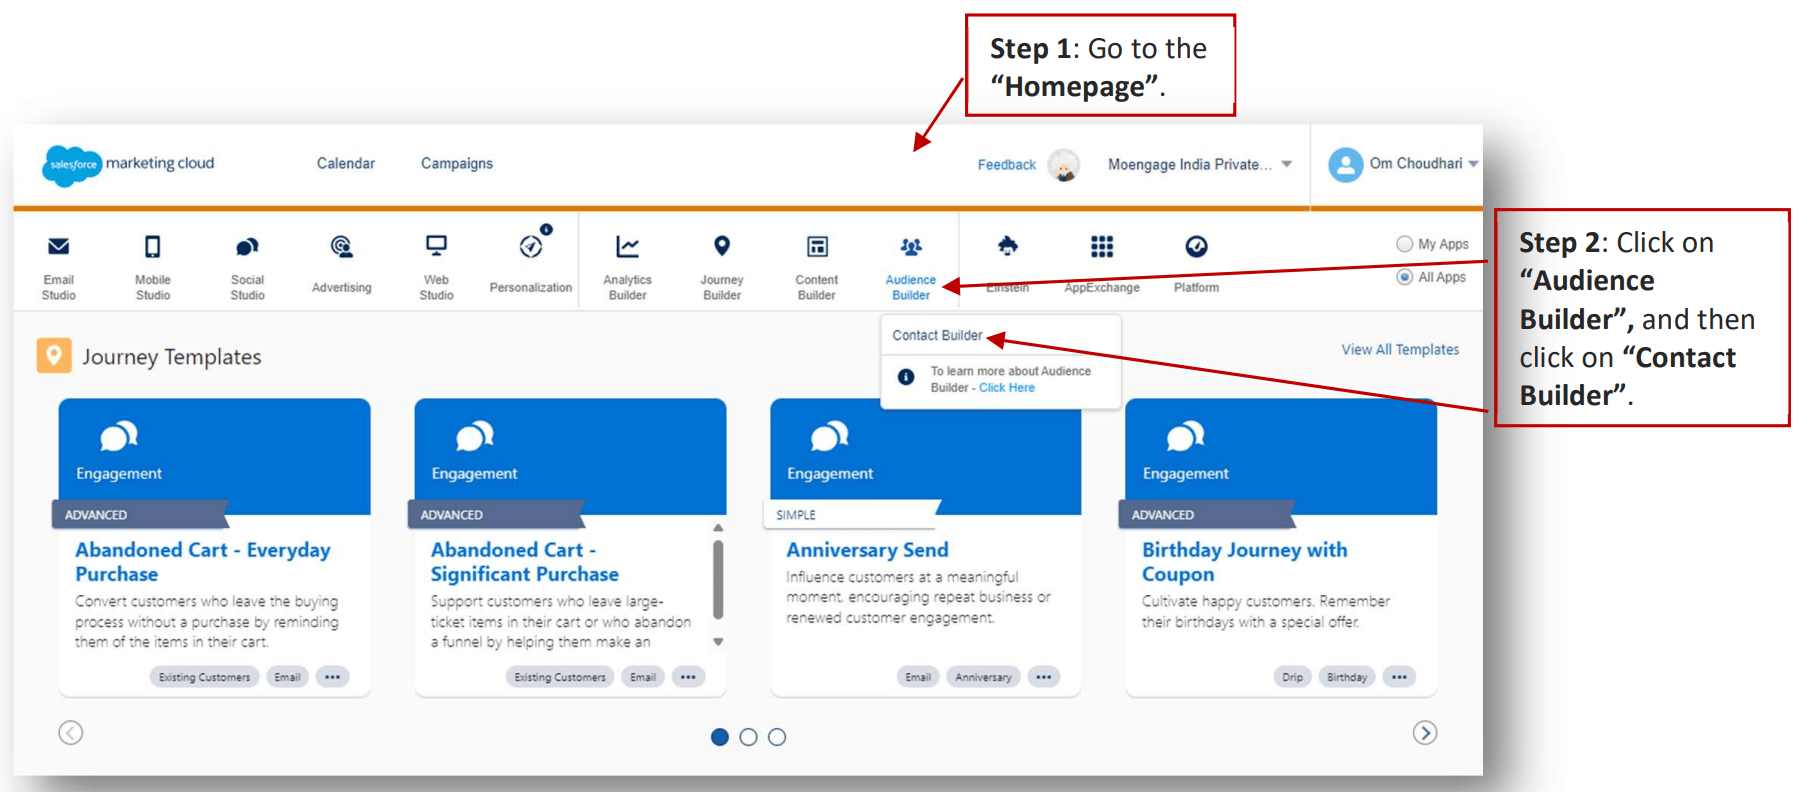
   <img src="https://mintcdn.com/moengage-analytics-query-api-docs/m_gwafhL_lIGxs-0/images/partner_36576006452372.png?fit=max&auto=format&n=m_gwafhL_lIGxs-0&q=85&s=7a92fec20ed98868bd9110e23e7a6564" alt="Navigating to Audience Builder > Contact Builder" data-og-width="1812" width="1812" data-og-height="792" height="792" data-path="images/partner_36576006452372.png" data-optimize="true" data-opv="3" srcset="https://mintcdn.com/moengage-analytics-query-api-docs/m_gwafhL_lIGxs-0/images/partner_36576006452372.png?w=280&fit=max&auto=format&n=m_gwafhL_lIGxs-0&q=85&s=d8c33d5af301c002bea124d0e31ed2ad 280w, https://mintcdn.com/moengage-analytics-query-api-docs/m_gwafhL_lIGxs-0/images/partner_36576006452372.png?w=560&fit=max&auto=format&n=m_gwafhL_lIGxs-0&q=85&s=4ff07b275cddb31ffa9dddc5f6382ed0 560w, https://mintcdn.com/moengage-analytics-query-api-docs/m_gwafhL_lIGxs-0/images/partner_36576006452372.png?w=840&fit=max&auto=format&n=m_gwafhL_lIGxs-0&q=85&s=83a6c870e7267ee0f431399c2b9fd868 840w, https://mintcdn.com/moengage-analytics-query-api-docs/m_gwafhL_lIGxs-0/images/partner_36576006452372.png?w=1100&fit=max&auto=format&n=m_gwafhL_lIGxs-0&q=85&s=a4fcf02a8a0a893970644020c430fde8 1100w, https://mintcdn.com/moengage-analytics-query-api-docs/m_gwafhL_lIGxs-0/images/partner_36576006452372.png?w=1650&fit=max&auto=format&n=m_gwafhL_lIGxs-0&q=85&s=51881f8de92d057192a7d29269298fdc 1650w, https://mintcdn.com/moengage-analytics-query-api-docs/m_gwafhL_lIGxs-0/images/partner_36576006452372.png?w=2500&fit=max&auto=format&n=m_gwafhL_lIGxs-0&q=85&s=ad4c2c8ba34906ee379f6f54e5058d54 2500w" />

3. Select "Data Extensions" tab.

4. Click on "Data Extensions" folder, and then click on "MoEngage Data Track" subfolder.

5. Select "MoEngage Tracking data" extension.
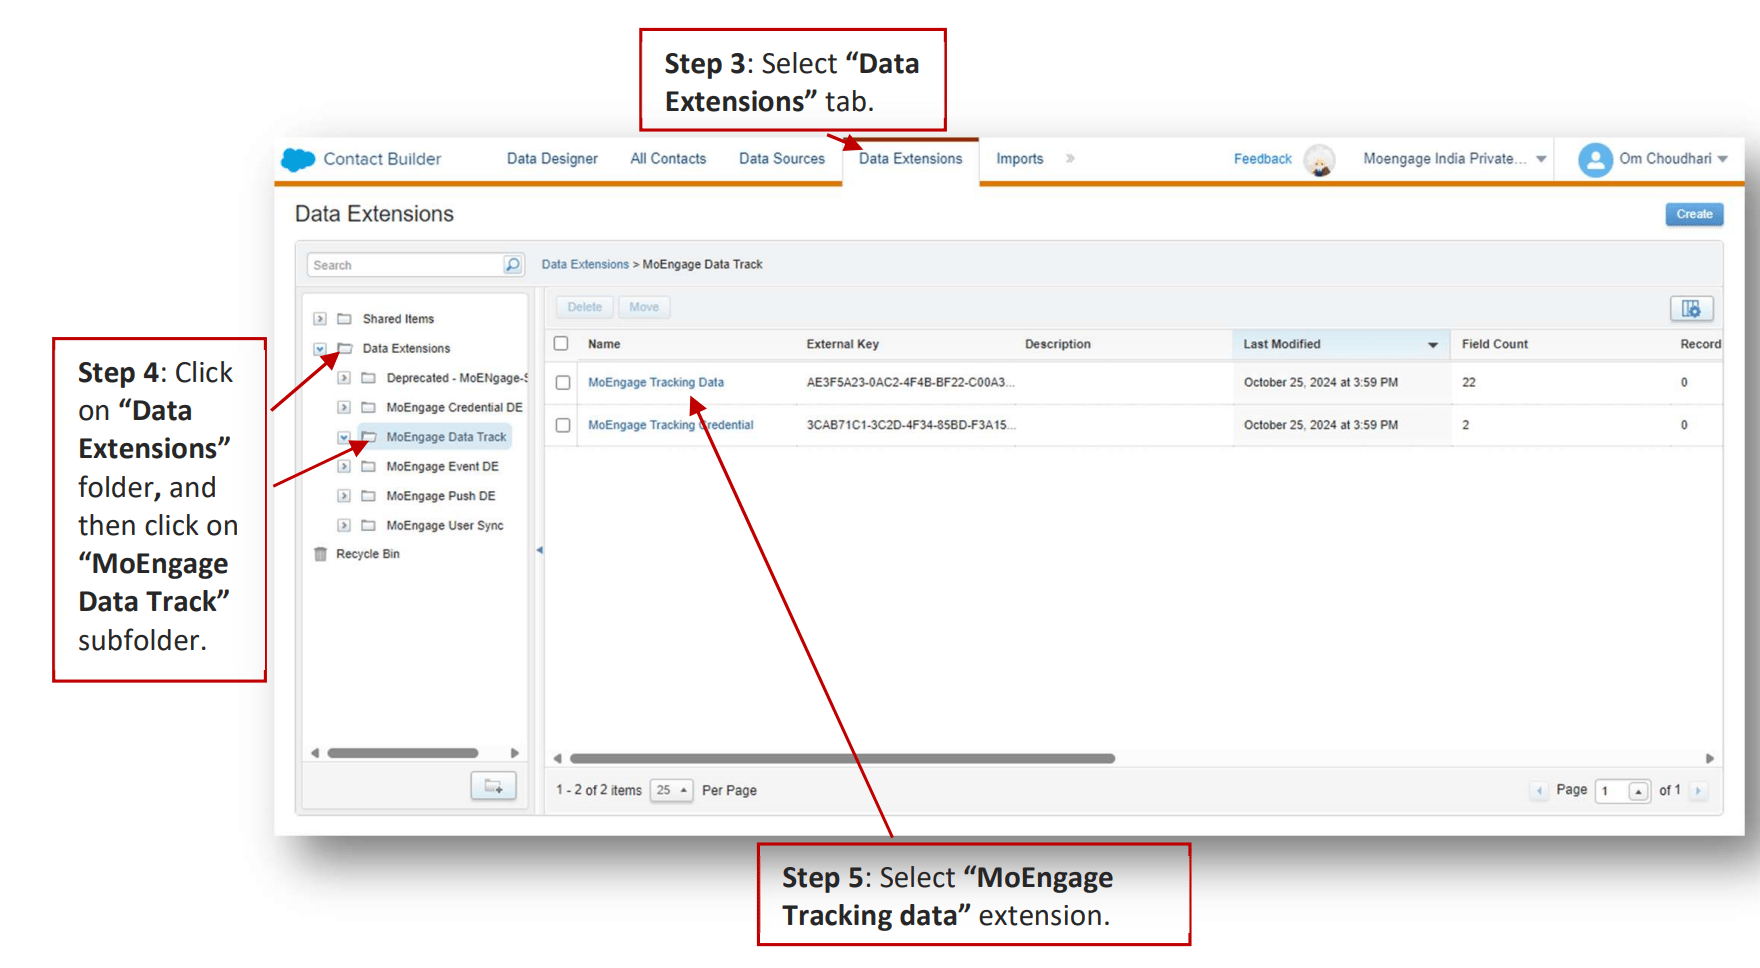
   <img src="https://mintcdn.com/moengage-analytics-query-api-docs/m_gwafhL_lIGxs-0/images/partner_36576013660052.png?fit=max&auto=format&n=m_gwafhL_lIGxs-0&q=85&s=4e64eda86f5374fd47c0ffaad103bb1e" alt="MoEngage Tracking data Data Extension details" width="1760" height="968" data-path="images/partner_36576013660052.png" />

   Here you can find the "External Key". Please ensure it is accurate. \[Optional] If external key needs to be entered or changed, click on "External Key" input field, paste or enter the external key and click on "Done".

### B. MoEngage Credentials

It stores the credentials for the Data Tracking CloudPage:

1. Go to the "Homepage".

2. Click on "Audience Builder", and then click on "Contact Builder".
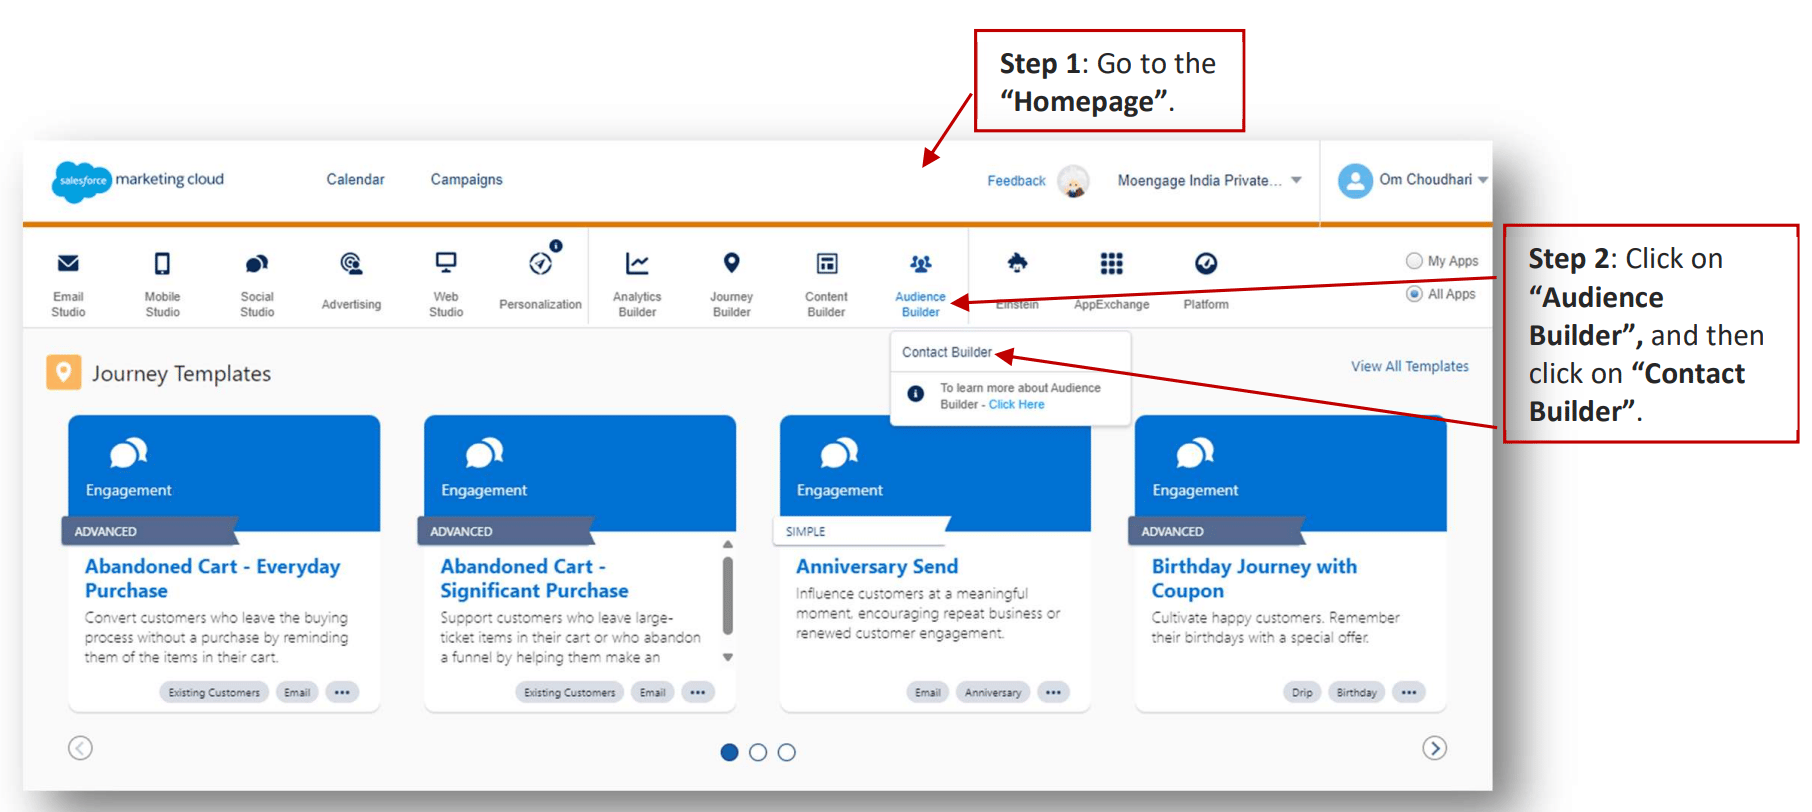
   <img src="https://mintcdn.com/moengage-analytics-query-api-docs/m_gwafhL_lIGxs-0/images/partner_36576013660564.png?fit=max&auto=format&n=m_gwafhL_lIGxs-0&q=85&s=b665cb2cef369b6c410822f3c0124bc8" alt="Navigating to Audience Builder > Contact Builder" data-og-width="1812" width="1812" data-og-height="812" height="812" data-path="images/partner_36576013660564.png" data-optimize="true" data-opv="3" srcset="https://mintcdn.com/moengage-analytics-query-api-docs/m_gwafhL_lIGxs-0/images/partner_36576013660564.png?w=280&fit=max&auto=format&n=m_gwafhL_lIGxs-0&q=85&s=e77d81330a90a8bb47a6210887ebde2d 280w, https://mintcdn.com/moengage-analytics-query-api-docs/m_gwafhL_lIGxs-0/images/partner_36576013660564.png?w=560&fit=max&auto=format&n=m_gwafhL_lIGxs-0&q=85&s=893261476c8775166f56bc509a074d77 560w, https://mintcdn.com/moengage-analytics-query-api-docs/m_gwafhL_lIGxs-0/images/partner_36576013660564.png?w=840&fit=max&auto=format&n=m_gwafhL_lIGxs-0&q=85&s=bed7ef26f53b3db734a5249a211b0fbd 840w, https://mintcdn.com/moengage-analytics-query-api-docs/m_gwafhL_lIGxs-0/images/partner_36576013660564.png?w=1100&fit=max&auto=format&n=m_gwafhL_lIGxs-0&q=85&s=b4ddd0b6d3f615b65b6c8590ec8ec6f2 1100w, https://mintcdn.com/moengage-analytics-query-api-docs/m_gwafhL_lIGxs-0/images/partner_36576013660564.png?w=1650&fit=max&auto=format&n=m_gwafhL_lIGxs-0&q=85&s=71164acca1a9733ba47a193acc57ec6e 1650w, https://mintcdn.com/moengage-analytics-query-api-docs/m_gwafhL_lIGxs-0/images/partner_36576013660564.png?w=2500&fit=max&auto=format&n=m_gwafhL_lIGxs-0&q=85&s=b2f8f49e63dd98fdfc5f080adf0212fb 2500w" />

3. Select "Data Extensions" tab.

4. Click on "Data Extensions" folder, and then click on "MoEngage Data Track" subfolder.

5. Select "MoEngage Tracking Credential".
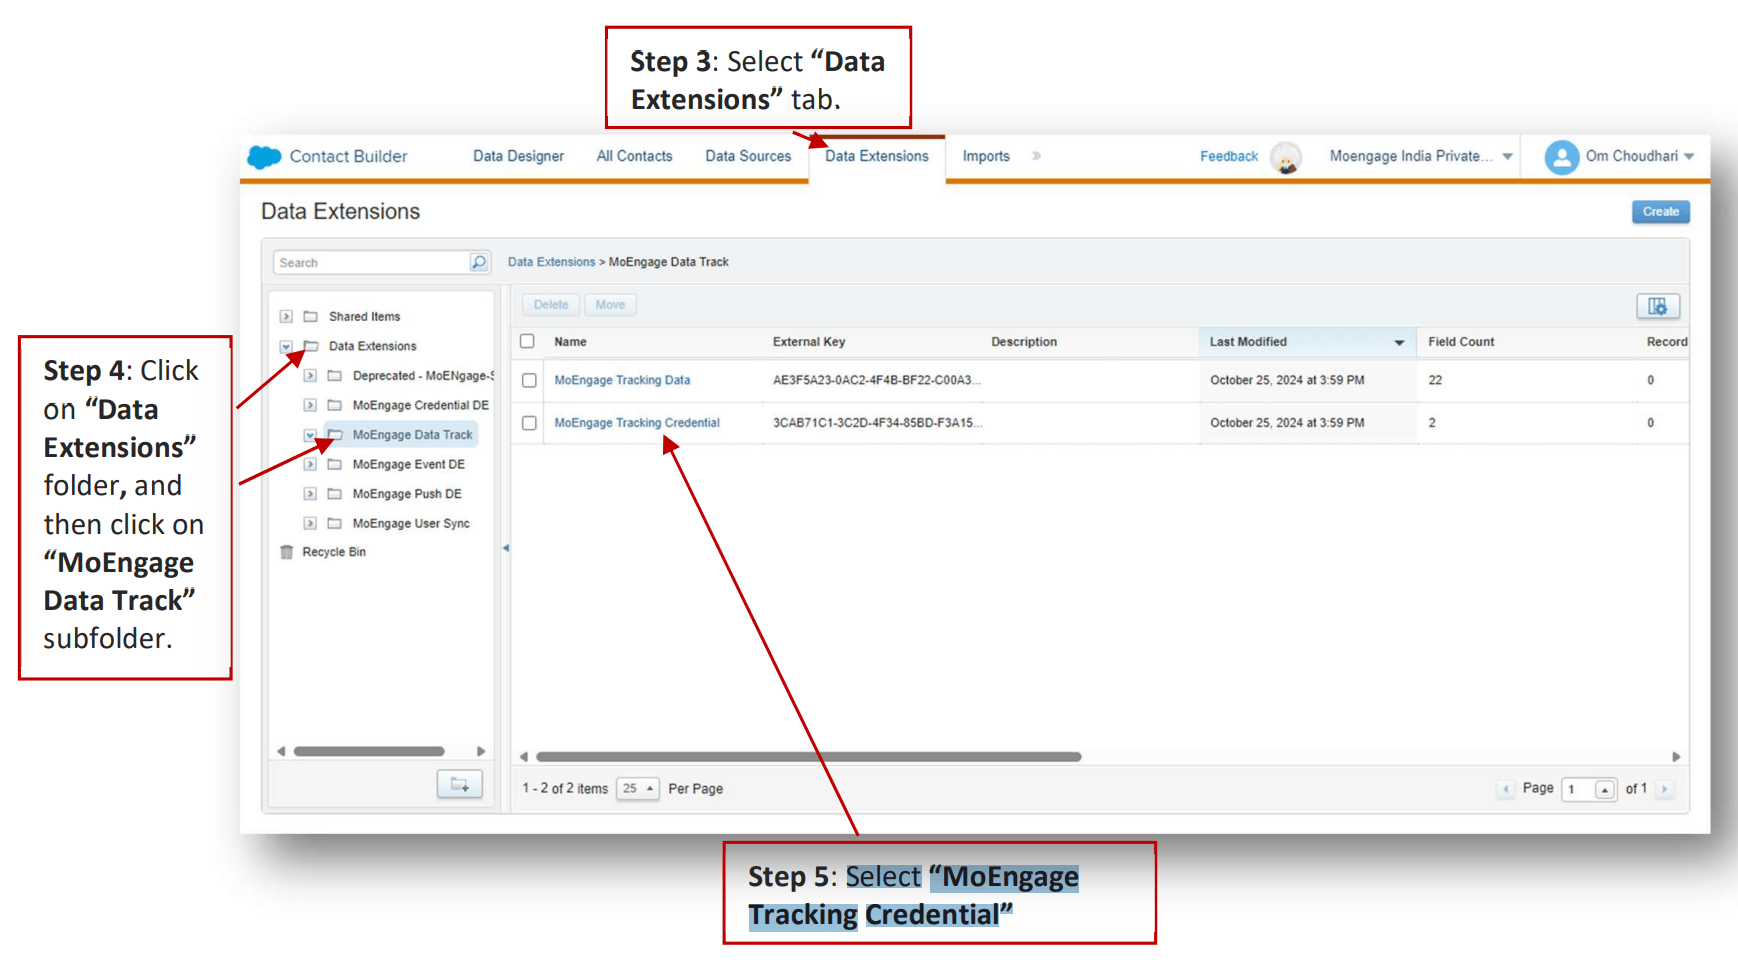
   <img src="https://mintcdn.com/moengage-analytics-query-api-docs/m_gwafhL_lIGxs-0/images/partner_36576013660820.png?fit=max&auto=format&n=m_gwafhL_lIGxs-0&q=85&s=8a306dc07115840b45a00a96f6e995c4" alt="MoEngage Tracking Credential Data Extension details" width="1738" height="974" data-path="images/partner_36576013660820.png" />

   Here you can find the "External Key". Please ensure it is accurate. \[Optional] If external key needs to be entered or changed, click on "External Key" input field, paste or enter the external key and click on "Done".

### C. MoEngage Event Activity Log

It logs Event Custom Activity information.

1. Go to the "Homepage".

2. Click on "Audience Builder", and then click on "Contact Builder".
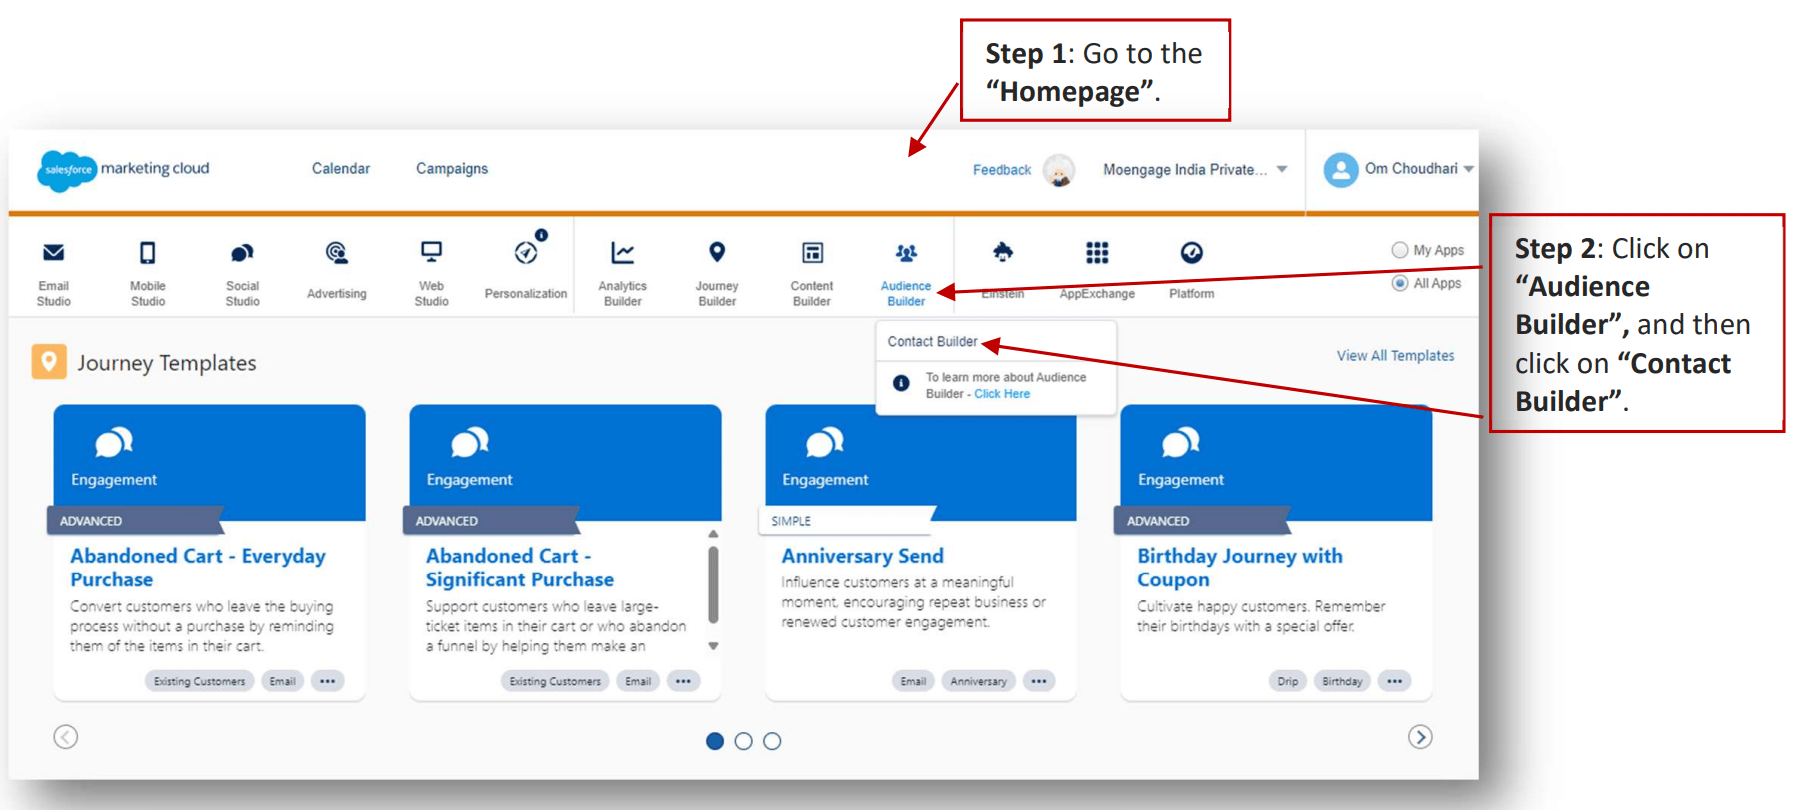
   <img src="https://mintcdn.com/moengage-analytics-query-api-docs/m_gwafhL_lIGxs-0/images/partner_36576006453524.png?fit=max&auto=format&n=m_gwafhL_lIGxs-0&q=85&s=422bcd96631f1c0e06c87cd1ad3a88e6" alt="Navigating to Audience Builder > Contact Builder" data-og-width="1808" width="1808" data-og-height="810" height="810" data-path="images/partner_36576006453524.png" data-optimize="true" data-opv="3" srcset="https://mintcdn.com/moengage-analytics-query-api-docs/m_gwafhL_lIGxs-0/images/partner_36576006453524.png?w=280&fit=max&auto=format&n=m_gwafhL_lIGxs-0&q=85&s=5a7e5e0bf17db1f0c835501406314866 280w, https://mintcdn.com/moengage-analytics-query-api-docs/m_gwafhL_lIGxs-0/images/partner_36576006453524.png?w=560&fit=max&auto=format&n=m_gwafhL_lIGxs-0&q=85&s=88f05b16ff6499abf68afb03e1c19f19 560w, https://mintcdn.com/moengage-analytics-query-api-docs/m_gwafhL_lIGxs-0/images/partner_36576006453524.png?w=840&fit=max&auto=format&n=m_gwafhL_lIGxs-0&q=85&s=5199b3bed85139030bfc8fb2c6d30226 840w, https://mintcdn.com/moengage-analytics-query-api-docs/m_gwafhL_lIGxs-0/images/partner_36576006453524.png?w=1100&fit=max&auto=format&n=m_gwafhL_lIGxs-0&q=85&s=4e69bdb0506b8fc6df4447b025cd03f7 1100w, https://mintcdn.com/moengage-analytics-query-api-docs/m_gwafhL_lIGxs-0/images/partner_36576006453524.png?w=1650&fit=max&auto=format&n=m_gwafhL_lIGxs-0&q=85&s=71797bead385e16fe9459c342ebbff64 1650w, https://mintcdn.com/moengage-analytics-query-api-docs/m_gwafhL_lIGxs-0/images/partner_36576006453524.png?w=2500&fit=max&auto=format&n=m_gwafhL_lIGxs-0&q=85&s=3f125b038683be616cd7c2afc7f449c5 2500w" />

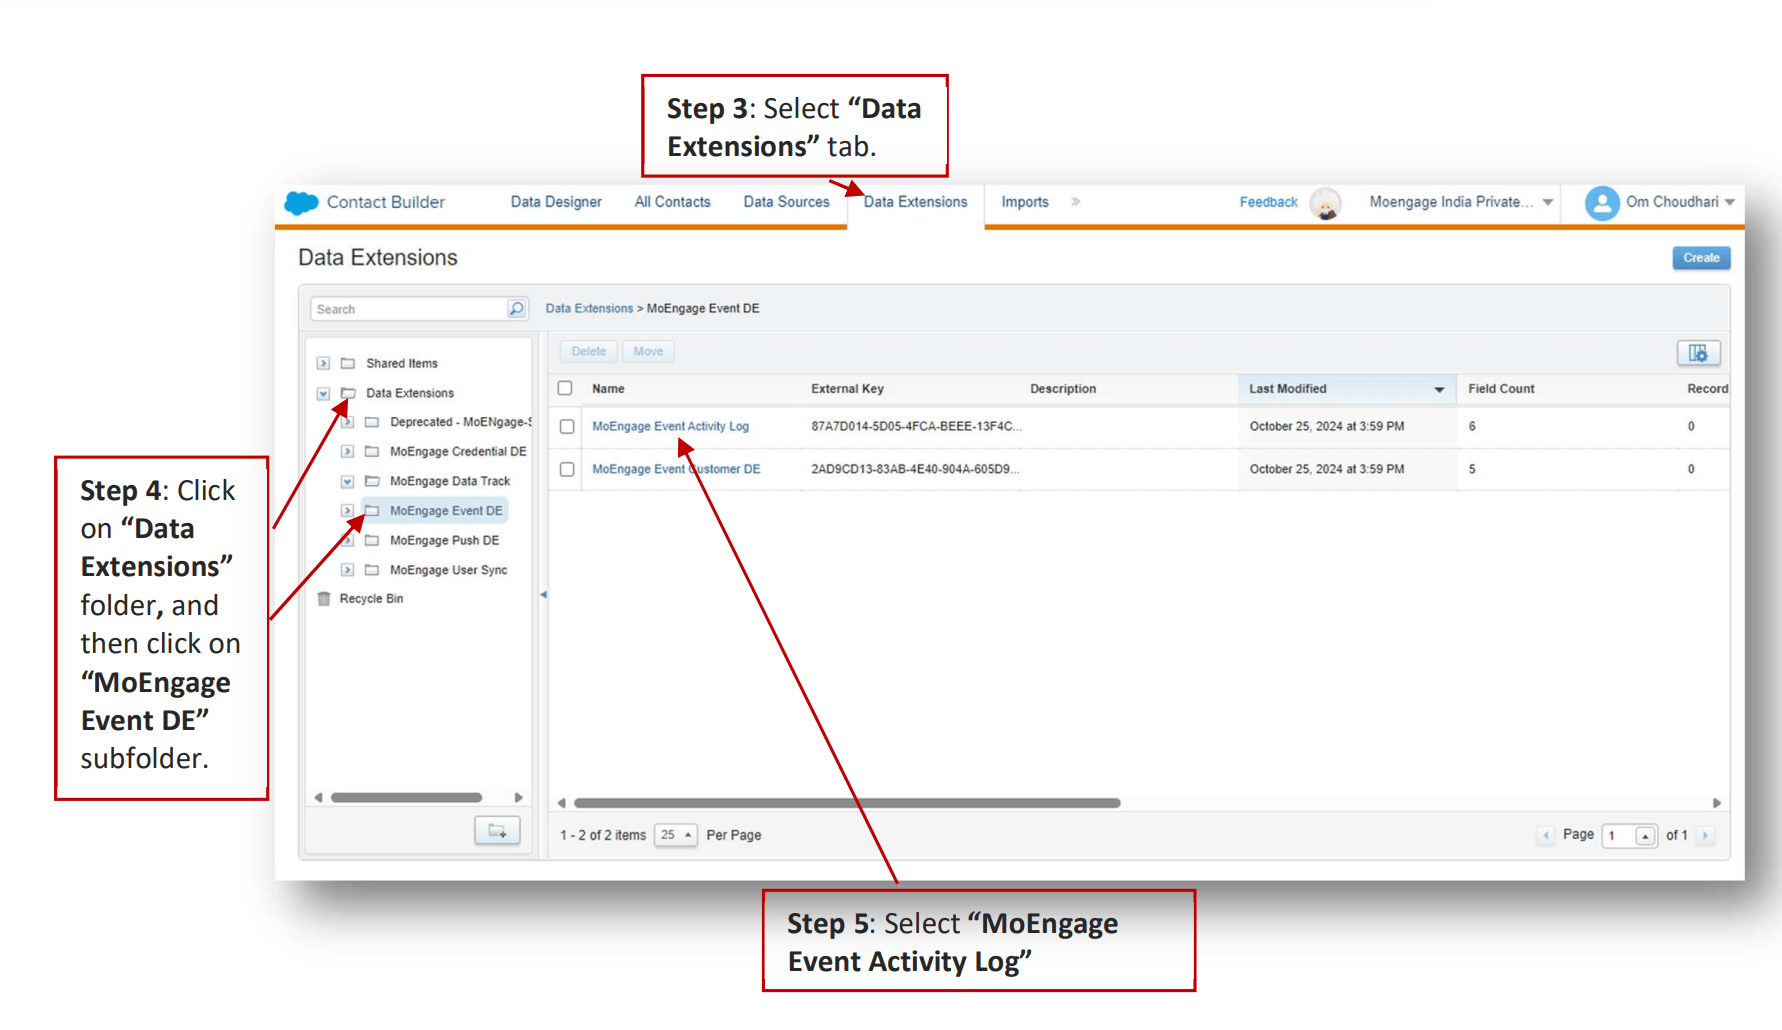
3. Select "Data Extensions" tab.

4. Click on "Data Extensions" folder, and then click on "MoEngage Event DE" subfolder.

5. Select "MoEngage Tracking Credential".
   <img src="https://mintcdn.com/moengage-analytics-query-api-docs/m_gwafhL_lIGxs-0/images/partner_36576006453908.png?fit=max&auto=format&n=m_gwafhL_lIGxs-0&q=85&s=c30f013b795354f5fd083d944d580be0" alt="MoEngage Event DE folder with Data Extensions" width="1782" height="1030" data-path="images/partner_36576006453908.png" />

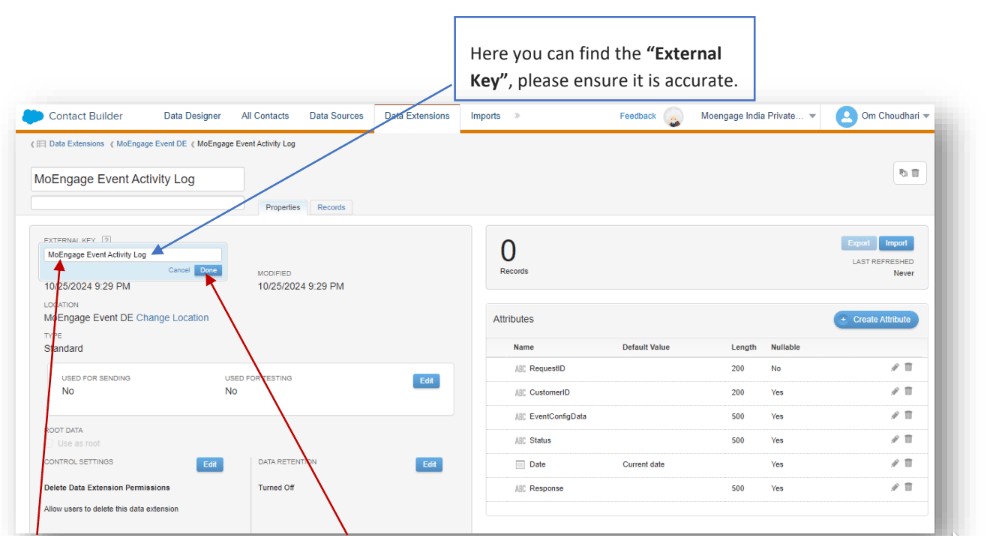
6. Select "MoEngage Event Activity Log".

   Here you can find the "External Key". Please ensure it is accurate. \[Optional] If external key needs to be entered or changed, click on "External Key" input field, paste or enter the external key and click on "Done".
   <img src="https://mintcdn.com/moengage-analytics-query-api-docs/EtqWM20TduLjcrl1/images/partner_43091841847828.png?fit=max&auto=format&n=EtqWM20TduLjcrl1&q=85&s=3934c5f95ad7693fbdca8afe99d776ac" alt="MoEngage Event Activity Log External Key field" width="1004" height="536" data-path="images/partner_43091841847828.png" />

### D. MoEngage Push Activity Log

It logs Push Custom Activity information.

1. Go to the "Homepage".

2. Click on "Audience Builder", and then click on "Contact Builder".

   <img src="https://mintcdn.com/moengage-analytics-query-api-docs/m_gwafhL_lIGxs-0/images/partner_36576006453524.png?fit=max&auto=format&n=m_gwafhL_lIGxs-0&q=85&s=422bcd96631f1c0e06c87cd1ad3a88e6" alt="Navigating to Audience Builder > Contact Builder" data-og-width="1808" width="1808" data-og-height="810" height="810" data-path="images/partner_36576006453524.png" data-optimize="true" data-opv="3" srcset="https://mintcdn.com/moengage-analytics-query-api-docs/m_gwafhL_lIGxs-0/images/partner_36576006453524.png?w=280&fit=max&auto=format&n=m_gwafhL_lIGxs-0&q=85&s=5a7e5e0bf17db1f0c835501406314866 280w, https://mintcdn.com/moengage-analytics-query-api-docs/m_gwafhL_lIGxs-0/images/partner_36576006453524.png?w=560&fit=max&auto=format&n=m_gwafhL_lIGxs-0&q=85&s=88f05b16ff6499abf68afb03e1c19f19 560w, https://mintcdn.com/moengage-analytics-query-api-docs/m_gwafhL_lIGxs-0/images/partner_36576006453524.png?w=840&fit=max&auto=format&n=m_gwafhL_lIGxs-0&q=85&s=5199b3bed85139030bfc8fb2c6d30226 840w, https://mintcdn.com/moengage-analytics-query-api-docs/m_gwafhL_lIGxs-0/images/partner_36576006453524.png?w=1100&fit=max&auto=format&n=m_gwafhL_lIGxs-0&q=85&s=4e69bdb0506b8fc6df4447b025cd03f7 1100w, https://mintcdn.com/moengage-analytics-query-api-docs/m_gwafhL_lIGxs-0/images/partner_36576006453524.png?w=1650&fit=max&auto=format&n=m_gwafhL_lIGxs-0&q=85&s=71797bead385e16fe9459c342ebbff64 1650w, https://mintcdn.com/moengage-analytics-query-api-docs/m_gwafhL_lIGxs-0/images/partner_36576006453524.png?w=2500&fit=max&auto=format&n=m_gwafhL_lIGxs-0&q=85&s=3f125b038683be616cd7c2afc7f449c5 2500w" />

3. Select "Data Extensions" tab.

4. Click on "Data Extensions" folder, and then click on "MoEngage Push DE" subfolder.

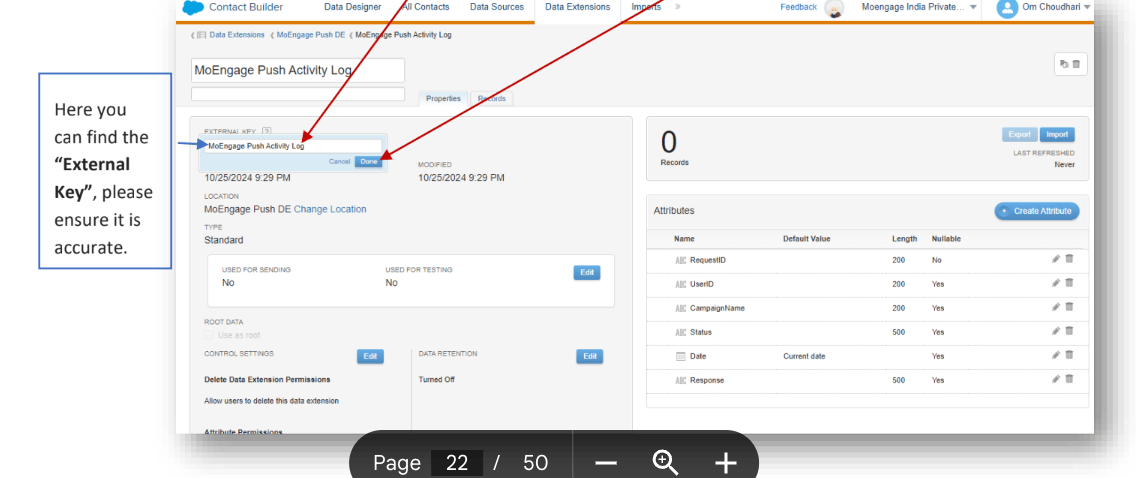
5. Select "MoEngage Push Activity Log".

   <img src="https://mintcdn.com/moengage-analytics-query-api-docs/m_gwafhL_lIGxs-0/images/partner_36576006453908.png?fit=max&auto=format&n=m_gwafhL_lIGxs-0&q=85&s=c30f013b795354f5fd083d944d580be0" alt="MoEngage Push DE folder with Data Extensions" width="1782" height="1030" data-path="images/partner_36576006453908.png" />

   Here you can find the "External Key". Please ensure it is accurate. \[Optional] If external key needs to be entered or changed, click on "External Key" input field, paste or enter the external key and click on "Done".
   <img src="https://mintcdn.com/moengage-analytics-query-api-docs/EtqWM20TduLjcrl1/images/partner_43091889316756.png?fit=max&auto=format&n=EtqWM20TduLjcrl1&q=85&s=0f8a16da494154d533c5943411f7bdd6" alt="MoEngage Push Activity Log External Key field" width="1136" height="478" data-path="images/partner_43091889316756.png" />

## Configure Data Extension

### A. Configure Data Extensions

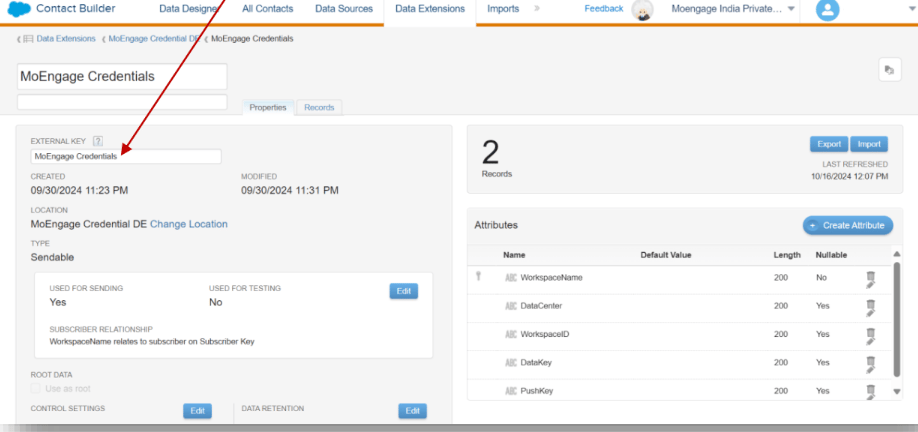
1. Change the external key of the credentials data extension from the solution package to "MoEngage Credentials".
   <img src="https://mintcdn.com/moengage-analytics-query-api-docs/EtqWM20TduLjcrl1/images/partner_43091841852564.png?fit=max&auto=format&n=EtqWM20TduLjcrl1&q=85&s=4b3a9da2ed35b0290f95cad619624c9f" alt="Changing external key of the Credentials Data Extension" width="918" height="432" data-path="images/partner_43091841852564.png" />

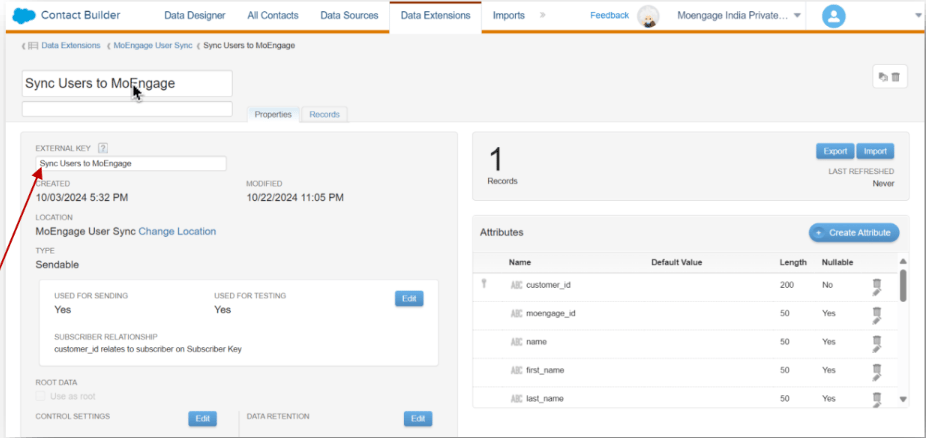
2. Change the external key of the "Sync Users to MoEngage" data extension from the solution package to "Sync Users to MoEngage".
   <img src="https://mintcdn.com/moengage-analytics-query-api-docs/EtqWM20TduLjcrl1/images/partner_43091889328020.png?fit=max&auto=format&n=EtqWM20TduLjcrl1&q=85&s=142f0b00a2d51a4da39db60f60db665e" alt="Changing external key of the Sync Users to MoEngage Data Extension" width="926" height="438" data-path="images/partner_43091889328020.png" />

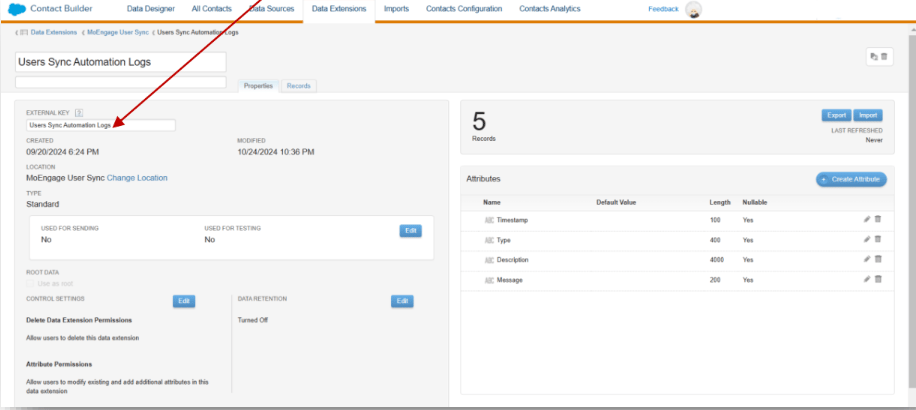
3. Change the external key of the "User Sync Automation Logs" data extension from the solution package to "User Sync Automation Logs".
   <img src="https://mintcdn.com/moengage-analytics-query-api-docs/EtqWM20TduLjcrl1/images/partner_43091841854484.png?fit=max&auto=format&n=EtqWM20TduLjcrl1&q=85&s=b374df6d3a83fadda7e4588d5f369c8c" alt="Changing external key of the User Sync Automation Logs Data Extension" width="916" height="410" data-path="images/partner_43091841854484.png" />

## Connect your MoEngage workspace

### A. Access the credentials cloud page

On your SFMC dashboard, perform the following steps:

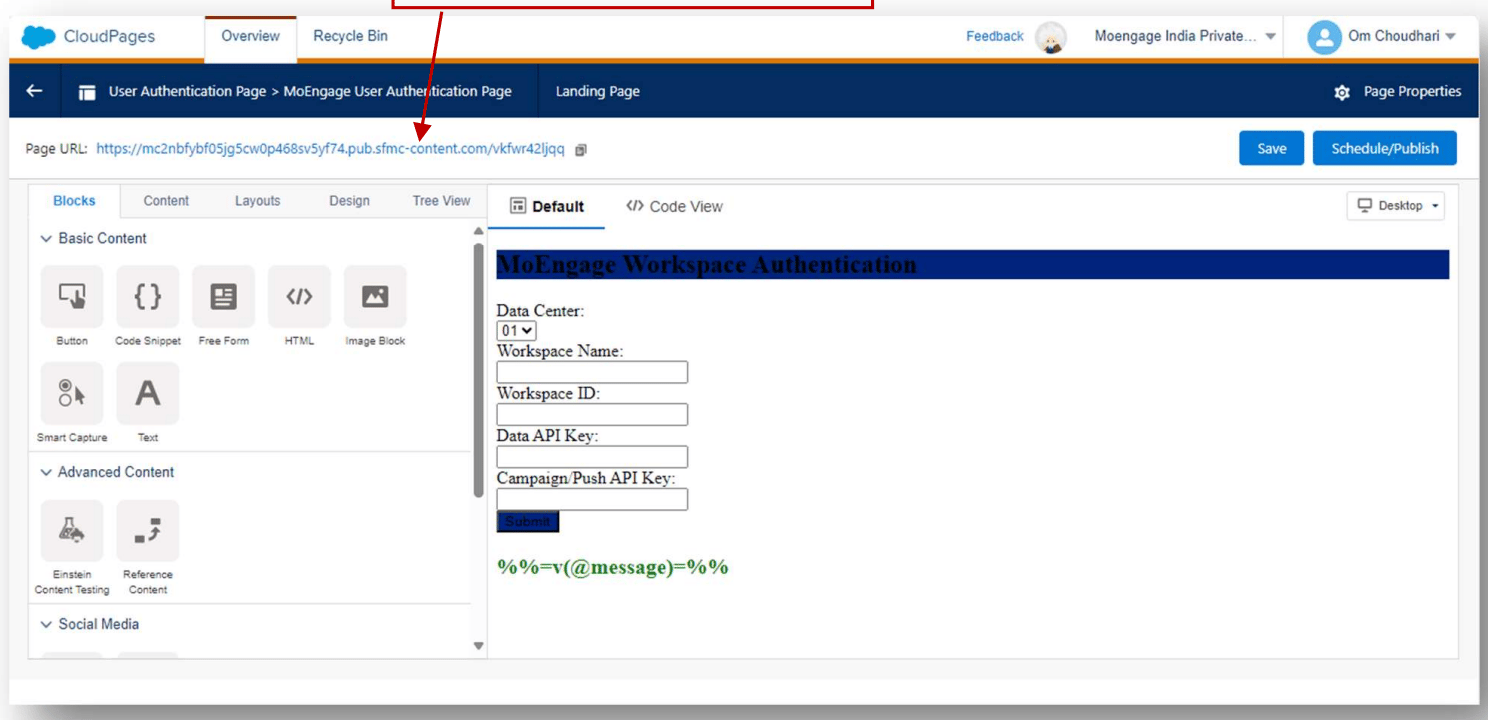
1. Navigate to "Web Studio" > "CloudPages" > "MoEngage Credentials" subfolder. Finally click on "MoEngage Authentication Page". Click Edit.

2. Click on the "Page URL" to open the Authentication Page.
   <img src="https://mintcdn.com/moengage-analytics-query-api-docs/m_gwafhL_lIGxs-0/images/partner_36576013661716.png?fit=max&auto=format&n=m_gwafhL_lIGxs-0&q=85&s=ad30d9d8fce5532b92d03c0e8996e276" alt="Opening the MoEngage Authentication Page URL" width="1488" height="720" data-path="images/partner_36576013661716.png" />

3. Enter details of your MoEngage workspace and click Submit.

| Field                   | Value                                                                                                                                                                   |
| ----------------------- | ----------------------------------------------------------------------------------------------------------------------------------------------------------------------- |
| Data center             | Select your MoEngage data center. Refer to [Data Centers in MoEngage](https://www.moengage.com/docs/user-guide/data/key-concepts/data-centers-in-moengage) for details. |
| Workspace Name          | Enter your workspace name. It is present in the header on your MoEngage dashboard. See the screenshot below.                                                            |
| Workspace ID            | Navigate to Settings > Accounts > APIs.                                                                                                                                 |
| Data API key            | Navigate to Settings > Accounts > APIs.                                                                                                                                 |
| Campaign (Push) API Key | Navigate to Settings > Accounts > APIs.                                                                                                                                 |

<img src="https://mintcdn.com/moengage-analytics-query-api-docs/m_gwafhL_lIGxs-0/images/partner_36576013662100.png?fit=max&auto=format&n=m_gwafhL_lIGxs-0&q=85&s=f6a98a92a94fc65590ea88e6794ce1c0" alt="Workspace name displayed in the MoEngage dashboard header" width="2716" height="294" data-path="images/partner_36576013662100.png" />

<img src="https://mintcdn.com/moengage-analytics-query-api-docs/m_gwafhL_lIGxs-0/images/partner_36576006455316.png?fit=max&auto=format&n=m_gwafhL_lIGxs-0&q=85&s=28b468ef6539090dced6f27e2f124592" alt="Locating Workspace ID, Data API key, and Campaign API key in MoEngage Settings" width="1504" height="756" data-path="images/partner_36576006455316.png" />

\[Optional] After done, you can also validate if the newly added workspace is present in the Data Extension.