> ## Documentation Index
> Fetch the complete documentation index at: https://moengage-analytics-query-api-docs.mintlify.site/llms.txt
> Use this file to discover all available pages before exploring further.
# Swipe Pages
> Capture Swipe Pages landing-page form submissions and create or update users and events in MoEngage to trigger personalized, targeted campaigns.
## Introduction
[Swipe Pages](https://swipepages.com/) is a landing page builder that lets you create faster, mobile-optimized landing pages. It uses a powerful drag-and-drop builder with 25+ elements and 80+ pre-built blocks to assist you with the page-building process.
## MoEngage and Swipe Pages
With the MoEngage and Swipe Pages integration, you can capture your landing page inputs and send personalized, targeted campaigns through MoEngage to drive conversions. With this integration, you can:
* Create or update users in MoEngage when a form is submitted.
* Create events with the details submitted from the form.
## Integration
**Prerequisites**
* Ensure you have access to your Swipe Pages webhooks.
### Step 1: Get your MoEngage endpoint
To get a dedicated endpoint for your integration, contact the MoEngage Support team. In your request, specify the common identifier used to link user profiles between MoEngage and the partner platform.
### Step 2: Set up the webhook in Swipe Pages
Follow the [Swipe Pages guide](https://docs.swipepages.com/en/articles/6865541-how-to-setup-global-webhooks) to create a webhook. On your Swipe Pages dashboard:
1. Click **Add Global Webhooks**.
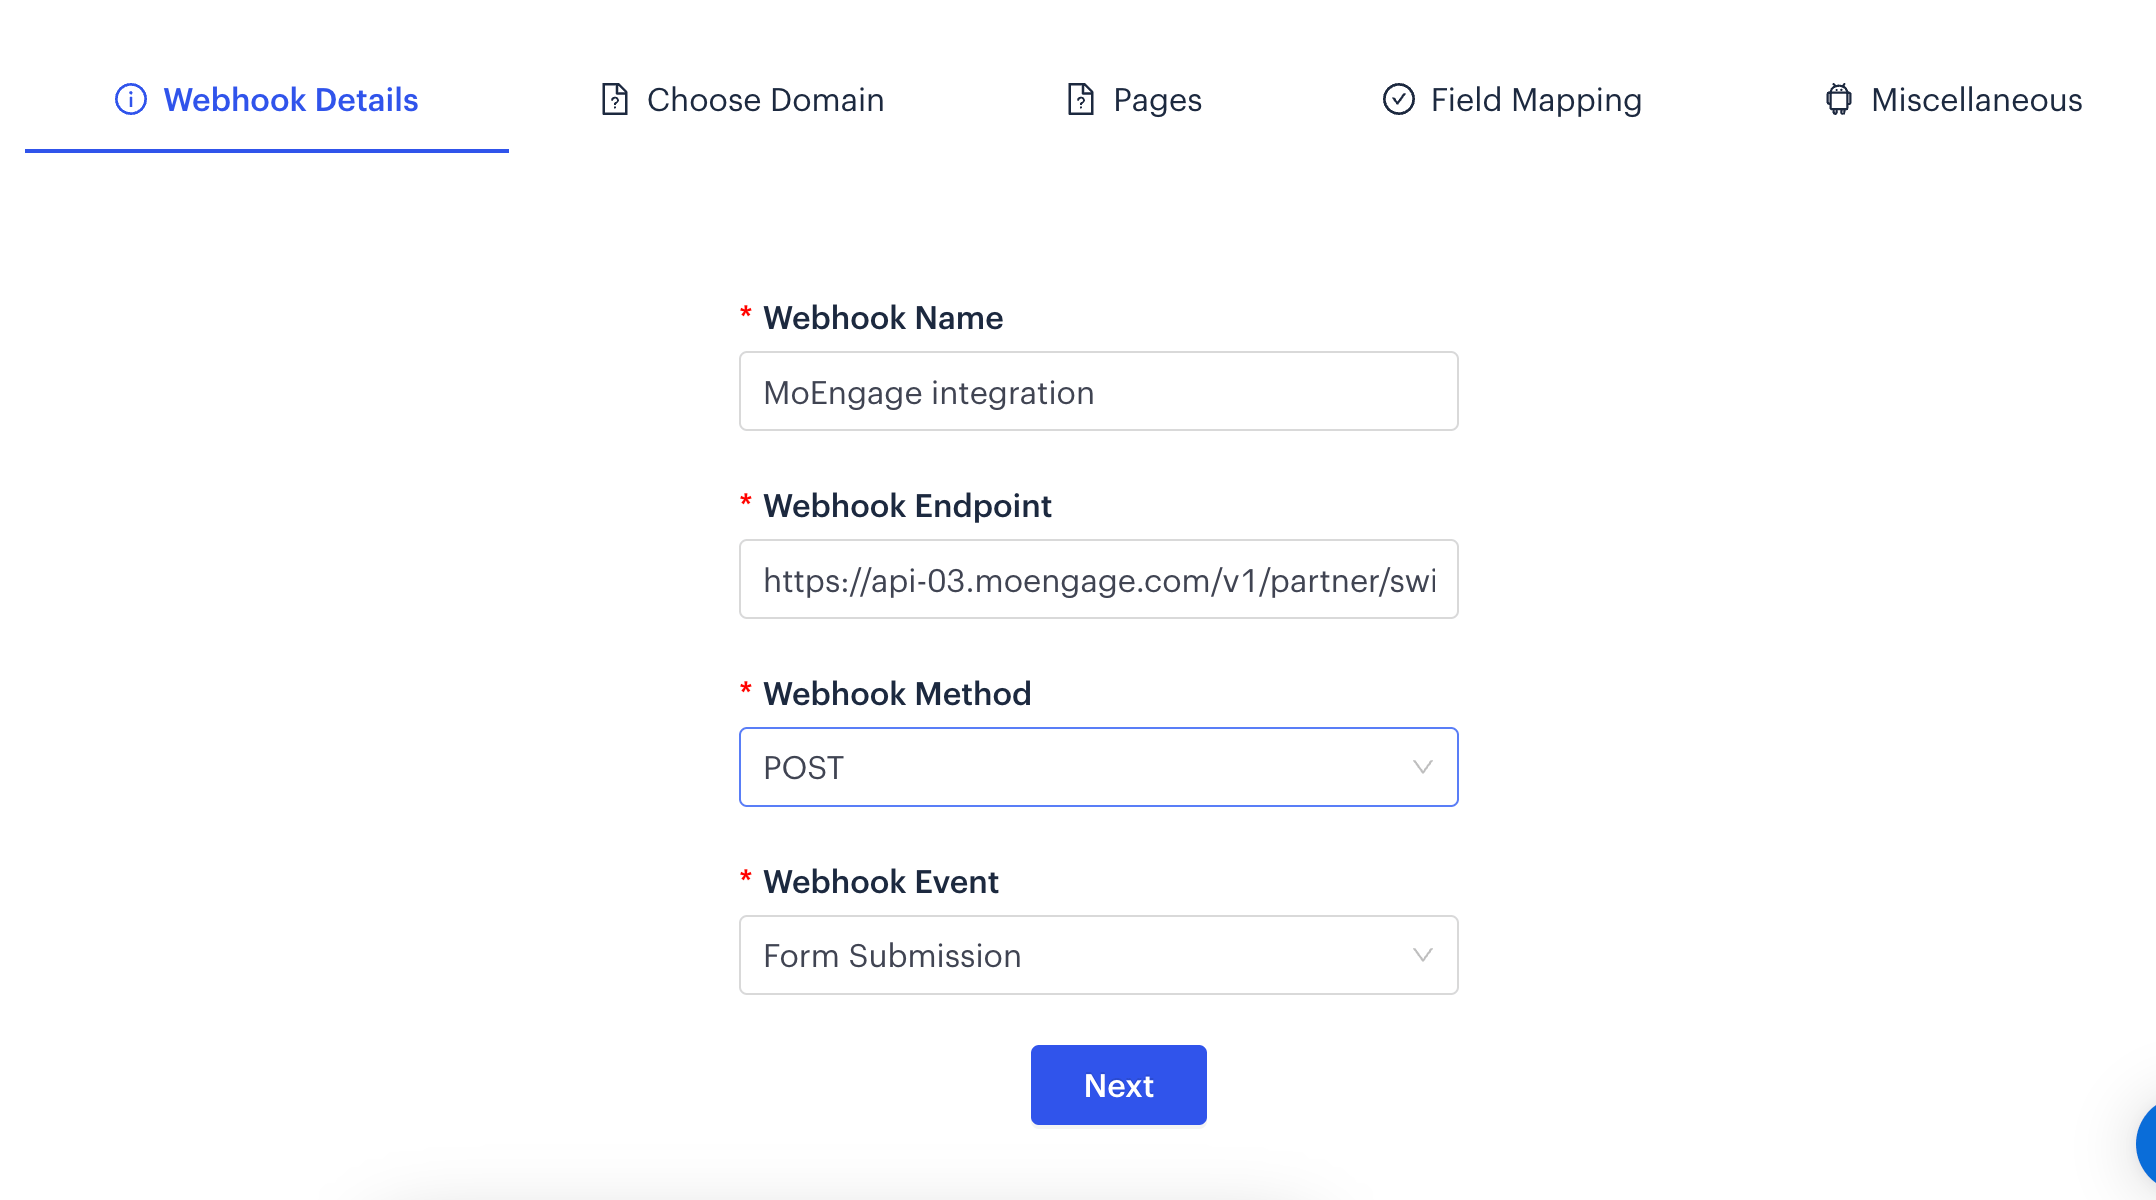
 2. Fill in the webhook details:
* **Name**: Enter `MoEngage integration` or any name of your choice.
* **Webhook endpoint URL**: The dedicated MoEngage endpoint you received in [Step 1](#step-1-get-your-moengage-endpoint).
* **Webhook Method**: `POST`.
* **Webhook Event**: `Form Submitted`.
2. Fill in the webhook details:
* **Name**: Enter `MoEngage integration` or any name of your choice.
* **Webhook endpoint URL**: The dedicated MoEngage endpoint you received in [Step 1](#step-1-get-your-moengage-endpoint).
* **Webhook Method**: `POST`.
* **Webhook Event**: `Form Submitted`.
 3. Click **Next**.
4. Select the pages tied to the selected domain.
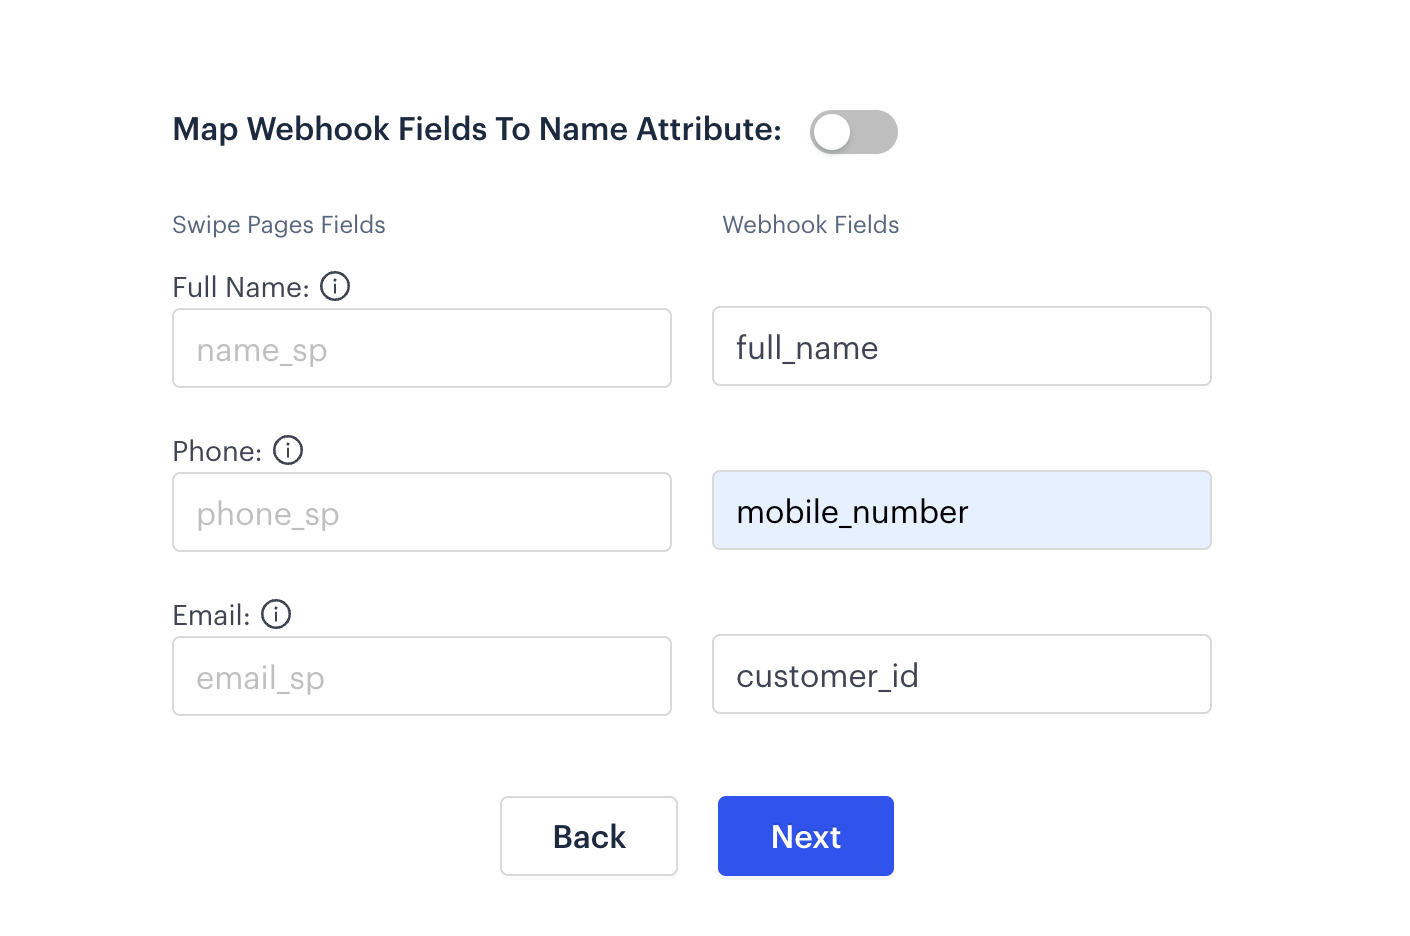
5. Map the Swipe Pages form fields to the appropriate webhook fields. Select the fields you want to send to MoEngage.
**Mandatory fields:**
* `customer_id`: The unique identifier between MoEngage and Swipe Pages. It can be email, mobile number, or any other field captured in the form.
* **Standard MoEngage fields**: MoEngage has fixed keys for some standard fields that must be mapped as-is for the user profile to update correctly. These fields are `first_name`, `last_name`, `email`, and `mobile_number`.
* **Other form fields**: Any other data captured in the form. You can map these to any keys, and they appear in MoEngage as event attributes.
3. Click **Next**.
4. Select the pages tied to the selected domain.
5. Map the Swipe Pages form fields to the appropriate webhook fields. Select the fields you want to send to MoEngage.
**Mandatory fields:**
* `customer_id`: The unique identifier between MoEngage and Swipe Pages. It can be email, mobile number, or any other field captured in the form.
* **Standard MoEngage fields**: MoEngage has fixed keys for some standard fields that must be mapped as-is for the user profile to update correctly. These fields are `first_name`, `last_name`, `email`, and `mobile_number`.
* **Other form fields**: Any other data captured in the form. You can map these to any keys, and they appear in MoEngage as event attributes.
 6. Configure miscellaneous options:
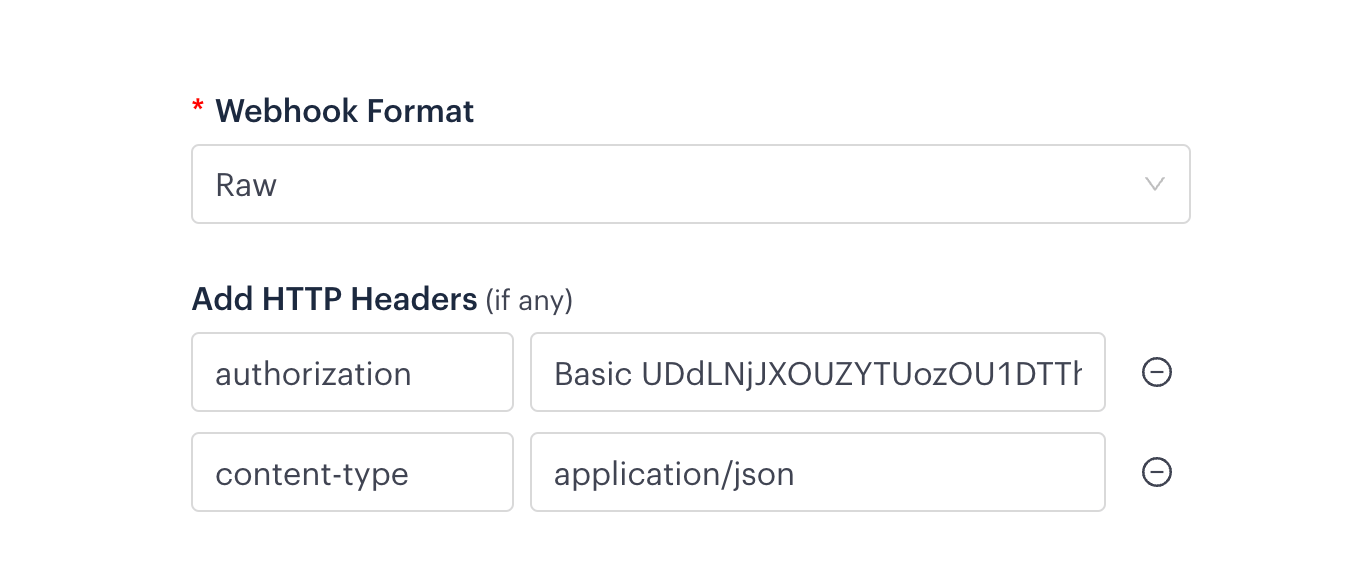
* **Webhook Format**: `Raw`.
* **HTTP headers**:
| Header | Value |
| --------------- | ------------------- |
| `Content-Type` | `application/json` |
| `Authorization` | `Basic ` |
To generate your **Authorization** token:
1. Use a [Basic Auth Header Generator tool](https://www.debugbear.com/basic-auth-header-generator).
2. Enter your **Workspace ID** as the username and your **Data API Key** as the password.
To find your credentials, on the MoEngage dashboard, navigate to **Settings** > **Account** > **APIs**.
6. Configure miscellaneous options:
* **Webhook Format**: `Raw`.
* **HTTP headers**:
| Header | Value |
| --------------- | ------------------- |
| `Content-Type` | `application/json` |
| `Authorization` | `Basic ` |
To generate your **Authorization** token:
1. Use a [Basic Auth Header Generator tool](https://www.debugbear.com/basic-auth-header-generator).
2. Enter your **Workspace ID** as the username and your **Data API Key** as the password.
To find your credentials, on the MoEngage dashboard, navigate to **Settings** > **Account** > **APIs**.
 Ensure the token is copied completely without extra spaces.
7. Click **Create Webhook**.
### Step 3: Test your webhook
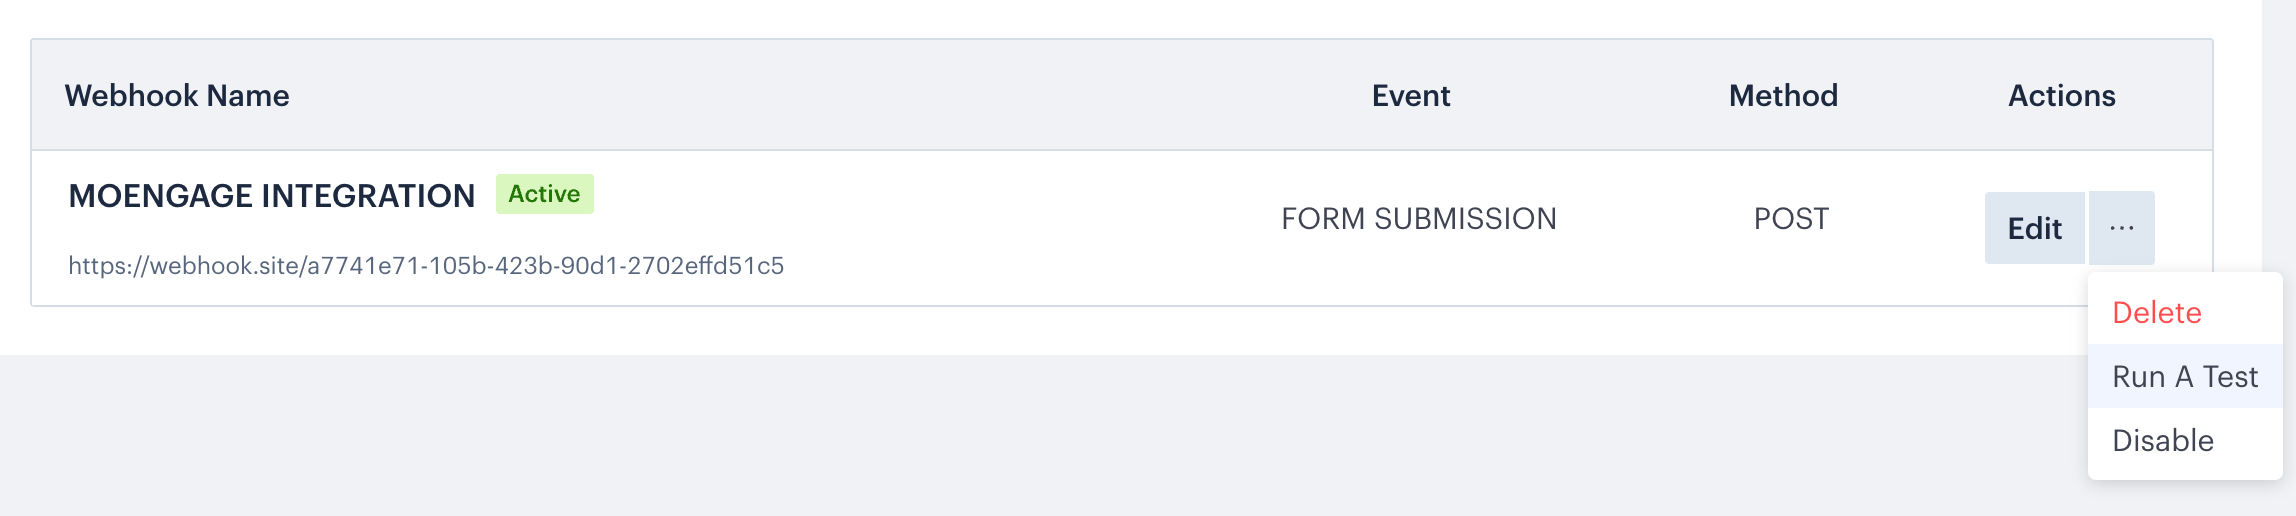
Add leads to your landing page, then click **Run a test**.
Ensure the token is copied completely without extra spaces.
7. Click **Create Webhook**.
### Step 3: Test your webhook
Add leads to your landing page, then click **Run a test**.
 ### Step 4: View details on MoEngage
Your users and events should start showing up in MoEngage. You can validate them from the user profile. The event name appears as `SwipePages Form filled`. You can now run event-triggered campaigns to your users.
The test lead appears as a user in MoEngage with the `SwipePages Form filled` event tracked.
### Step 4: View details on MoEngage
Your users and events should start showing up in MoEngage. You can validate them from the user profile. The event name appears as `SwipePages Form filled`. You can now run event-triggered campaigns to your users.
The test lead appears as a user in MoEngage with the `SwipePages Form filled` event tracked.