> ## Documentation Index
> Fetch the complete documentation index at: https://moengage-analytics-query-api-docs.mintlify.site/llms.txt
> Use this file to discover all available pages before exploring further.
# Add Forms to your In-app Campaign
> Add interactive forms to MoEngage in-app campaigns for lead generation, feedback collection, and user surveys using the drag and drop editor.
## Overview
Use forms in your MoEngage In-App campaigns to make them interactive. Forms help you engage users and encourage participation, which can generate leads, gather feedback, and conduct surveys. This improves the effectiveness of your app and benefits your business.
You can create forms only with the **Drag and drop** editor.
## Add Forms to Your In-App Campaign
Ensure that you're present in Step 2 of creating content for your In-app campaign. For more information, refer to [Create In-App Campaign](/user-guide/campaigns-and-channels/in-app-message/create/create-in-app-campaign).
To configure a form for your In-App campaign, follow these steps:
1. On the **Content** page, select one of the pre-built **Drag and drop** form templates, or create one from scratch. In this article, you will create a new registration form from scratch. Click the **Start with a blank canvas** button.
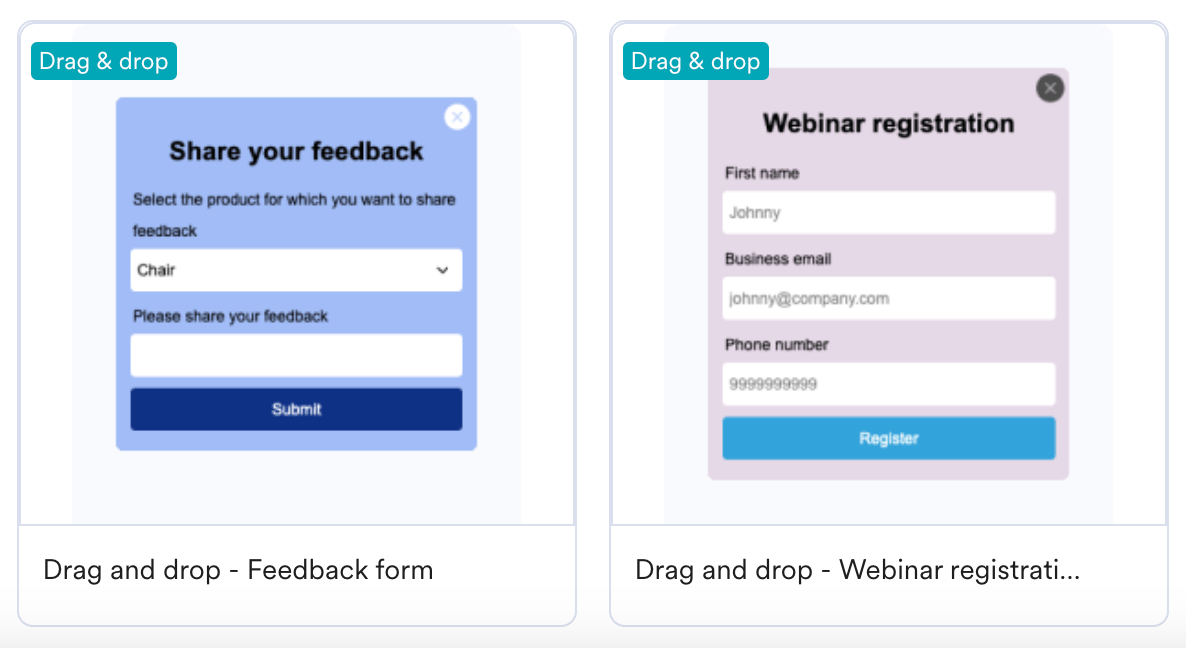
 Your dashboard includes the following pre-built form templates:
 2. Drag the **Form** element to the desired position in the template. Then, click **Edit Form**.
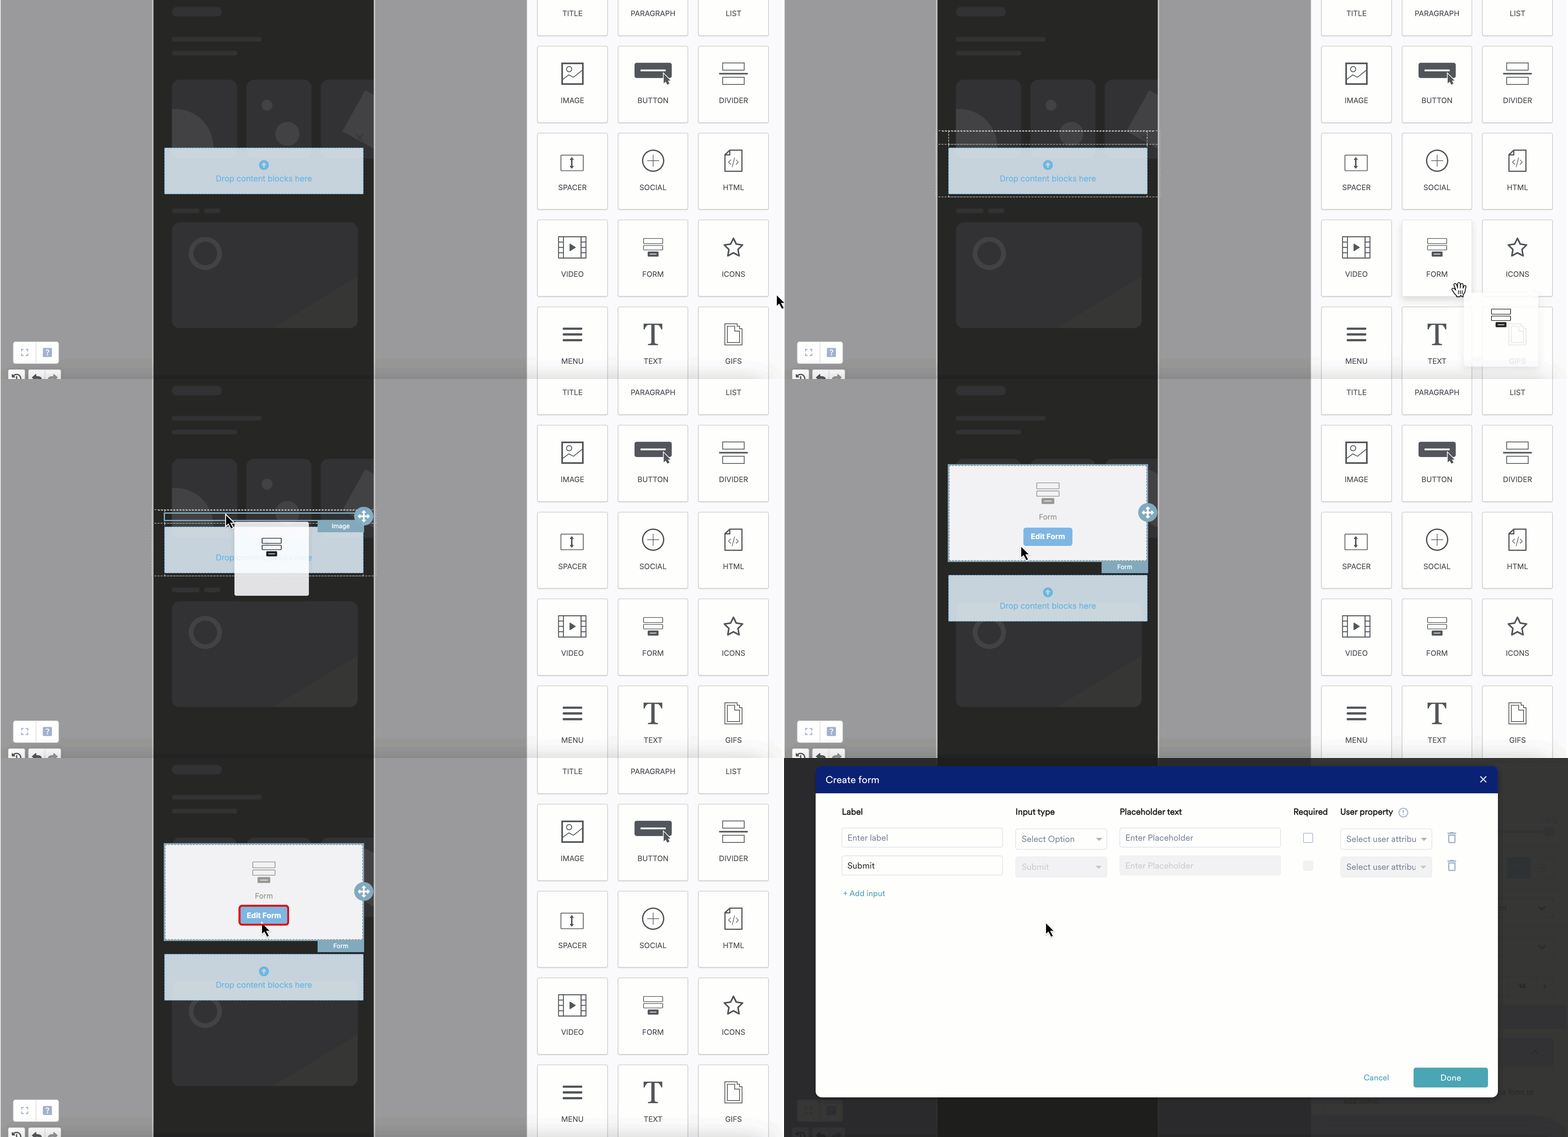 3. In the **Create form** pop-up, enter the following details:
* **Label**: A user-friendly name to identify form fields.
* **Input type**: Select one of the following input types:
* **Email**: A valid email address.
* **Text Checkbox**: Allows users to select multiple options from a list.
* **Date**: Allows users to select a date from a calendar or enter a date in DD/MM/YYYY format.
* **Label**: Guides users on the value to enter in the associated input field.
* **Number**: Accepts numerical values, such as a phone number or age.
* **Radio**: Allows users to select a single option from a set.
* **Dropdown**: Presents a list of options for users to choose from.
* **Telephone**: Accepts a user's phone number.
* **DateTime**: Allows users to enter both date and time for bookings or appointments.
* **Placeholder text**: A short text to help users enter the correct data in the input field.
* **Required**: Select this option to make the field mandatory before the user can continue or submit the form.
* **User property**: Select a user attribute to update with the value that users enter in the form. The user property updates only after users submit the form.
3. In the **Create form** pop-up, enter the following details:
* **Label**: A user-friendly name to identify form fields.
* **Input type**: Select one of the following input types:
* **Email**: A valid email address.
* **Text Checkbox**: Allows users to select multiple options from a list.
* **Date**: Allows users to select a date from a calendar or enter a date in DD/MM/YYYY format.
* **Label**: Guides users on the value to enter in the associated input field.
* **Number**: Accepts numerical values, such as a phone number or age.
* **Radio**: Allows users to select a single option from a set.
* **Dropdown**: Presents a list of options for users to choose from.
* **Telephone**: Accepts a user's phone number.
* **DateTime**: Allows users to enter both date and time for bookings or appointments.
* **Placeholder text**: A short text to help users enter the correct data in the input field.
* **Required**: Select this option to make the field mandatory before the user can continue or submit the form.
* **User property**: Select a user attribute to update with the value that users enter in the form. The user property updates only after users submit the form.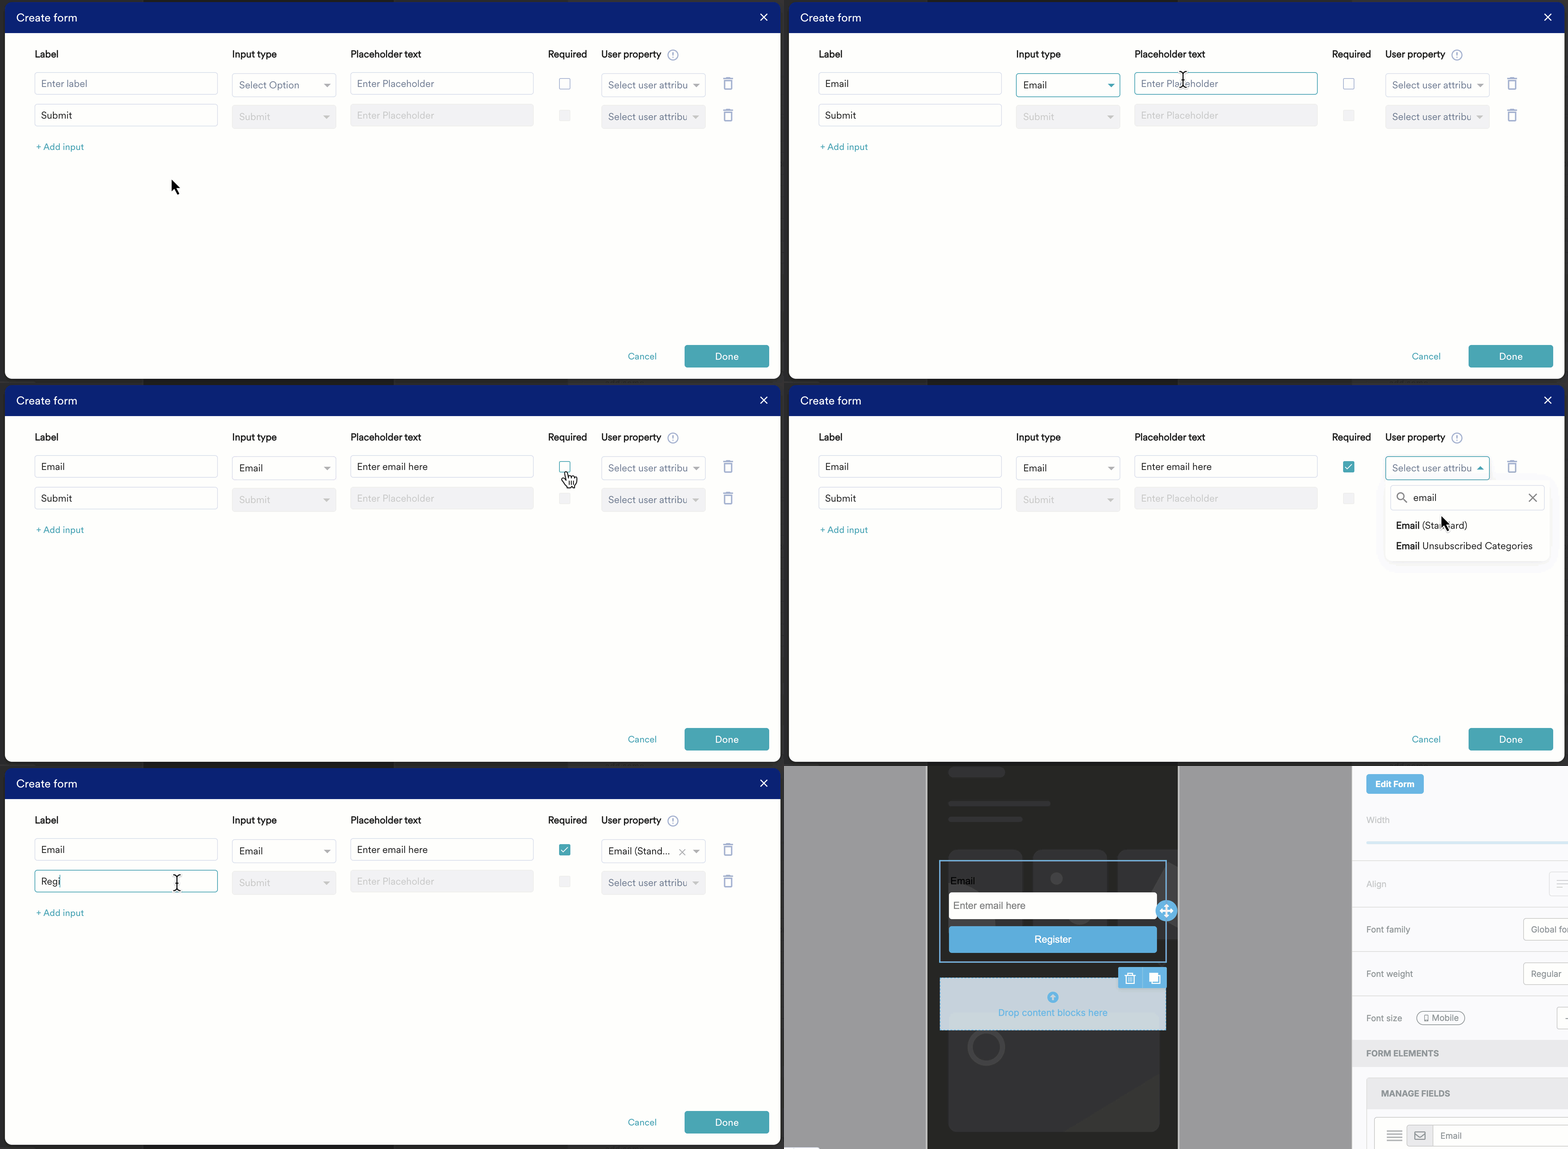 The **Submit** button is enabled by default. You can change only its name.
4. Click **Done** to confirm your form elements.
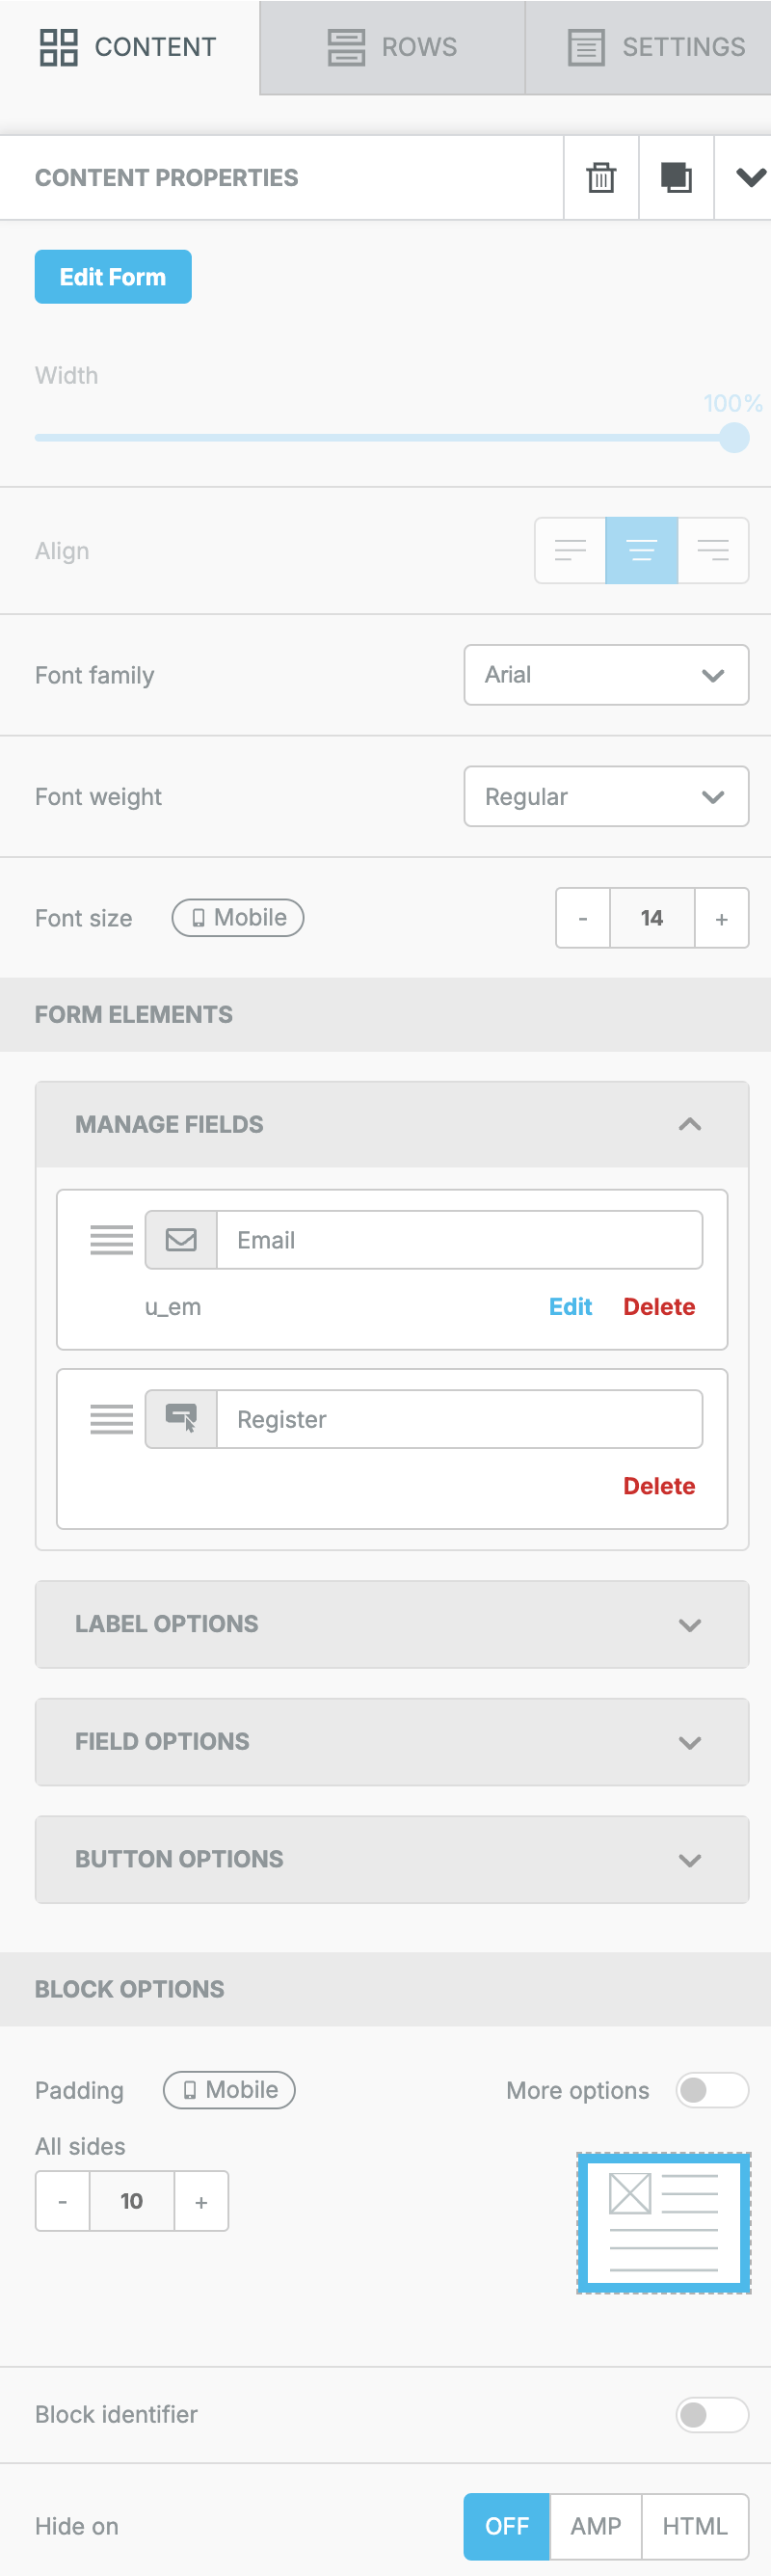
5. Configure the appearance of the form elements in the **Content Properties** section.
The **Submit** button is enabled by default. You can change only its name.
4. Click **Done** to confirm your form elements.
5. Configure the appearance of the form elements in the **Content Properties** section.
 6. Click **Next** to complete the campaign creation.
## View Submitted Form Responses
After you publish a campaign that includes a form, you can monitor and analyze the submitted responses. Go to the **Form Inputs** section in your dashboard for detailed information about the responses.
1. From the left navigation menu in the MoEngage UI, click **Engage** > **Campaigns**.
2. From the **All Campaigns** page, select the campaign that includes the form.
6. Click **Next** to complete the campaign creation.
## View Submitted Form Responses
After you publish a campaign that includes a form, you can monitor and analyze the submitted responses. Go to the **Form Inputs** section in your dashboard for detailed information about the responses.
1. From the left navigation menu in the MoEngage UI, click **Engage** > **Campaigns**.
2. From the **All Campaigns** page, select the campaign that includes the form.
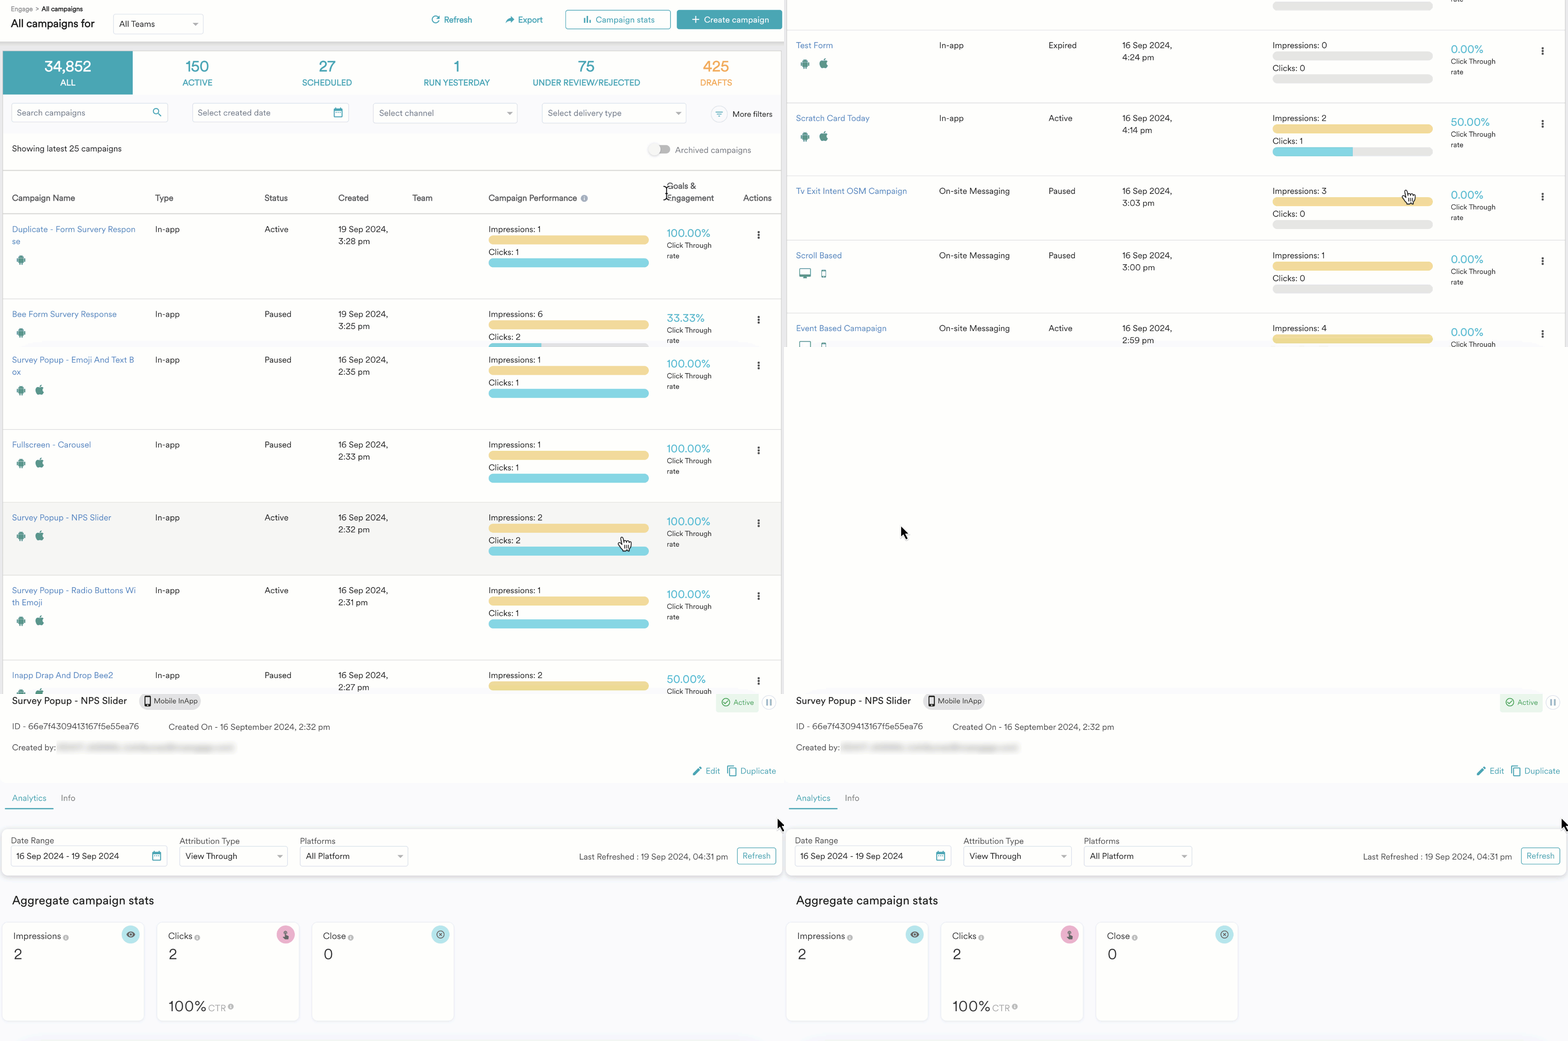 3. Use the high-level filters, such as **Date Range**, **Attribution Type**, and **Platform**, to refine the campaign data. For more information, refer to [Analyze In-App Campaign](/user-guide/campaigns-and-channels/in-app-message/analyze/analyze-in-app-campaigns).
 4. Scroll down to the **Form Inputs** section on the **Analytics** page.
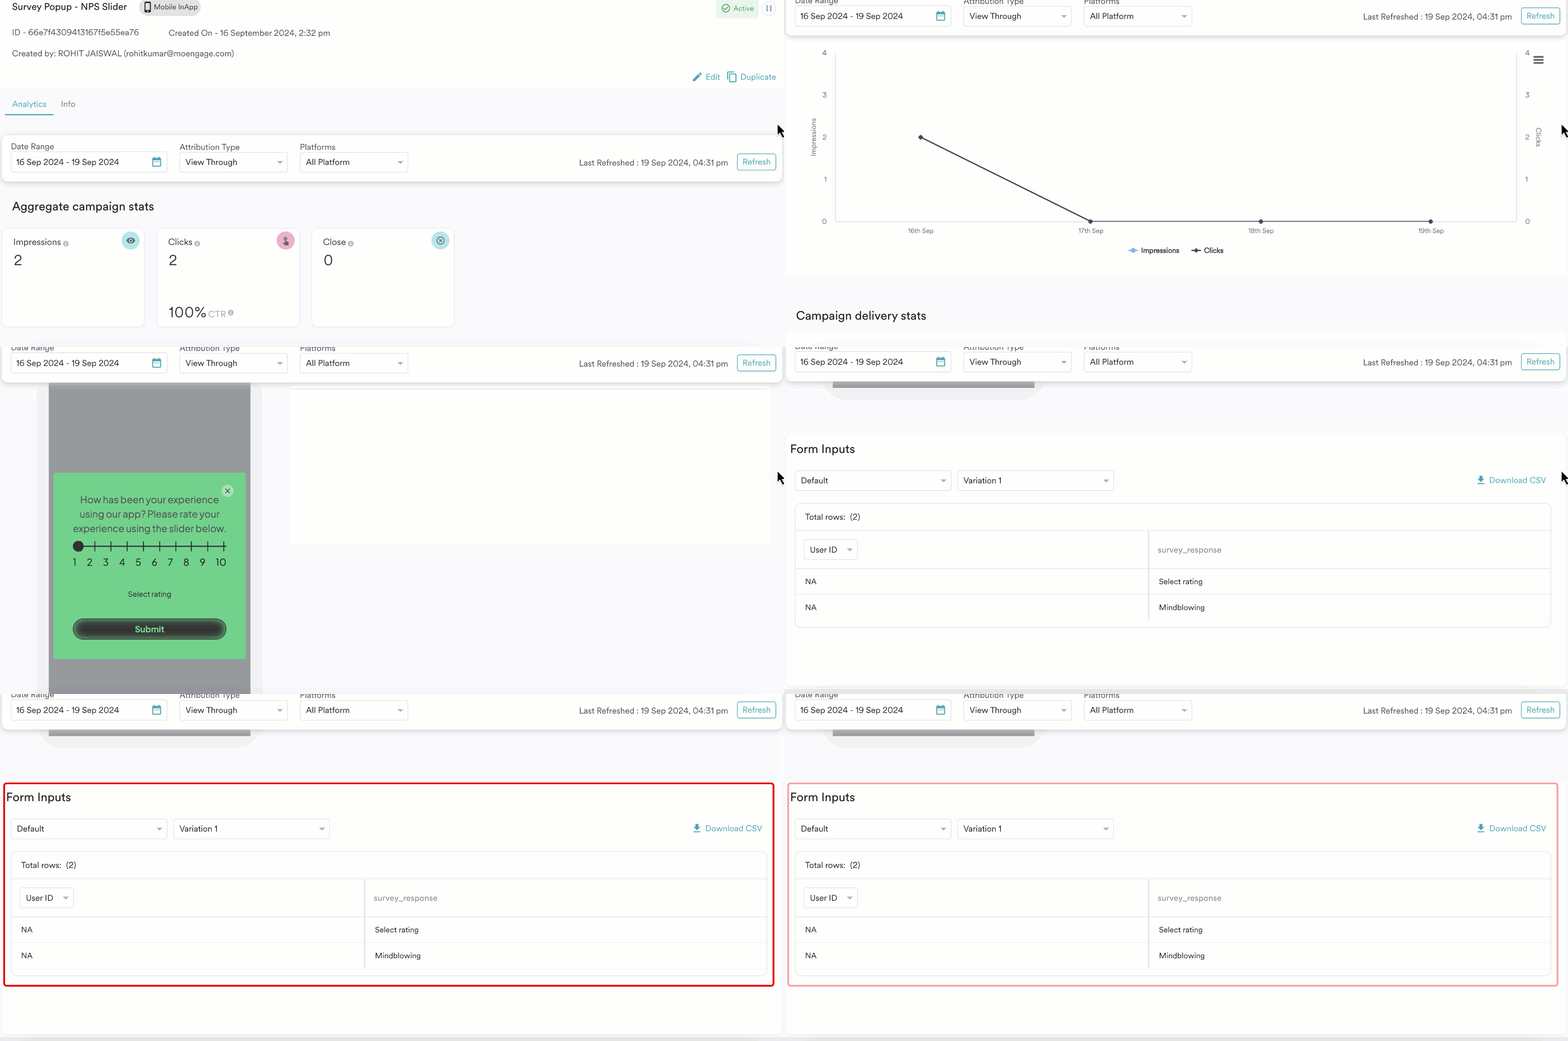 * The **Form Inputs** section appears only after your campaign begins to engage users.
* Data appears in the **Form Inputs** section only after a user submits the form. For example, the **Form Inputs** section shows "Not applicable" if users complete the form but do not submit it.
5. You can view the following details:
* **Locales**: The locale is set to default, but you can change it from the drop-down list.
* **Variations**: Select the specific variation from the drop-down list to view its metrics.
* **Total Rows**: Shows the total number of users who submitted a response. You can filter these users by:
* **User ID**
* **Name**
* **Email**\
**
* The **Form Inputs** section appears only after your campaign begins to engage users.
* Data appears in the **Form Inputs** section only after a user submits the form. For example, the **Form Inputs** section shows "Not applicable" if users complete the form but do not submit it.
5. You can view the following details:
* **Locales**: The locale is set to default, but you can change it from the drop-down list.
* **Variations**: Select the specific variation from the drop-down list to view its metrics.
* **Total Rows**: Shows the total number of users who submitted a response. You can filter these users by:
* **User ID**
* **Name**
* **Email**\
** **
The response for each user attribute appears in the adjacent column. For example, if you select **User ID** from the list, the analytics page displays the user ID "x1z2y3" and their corresponding response "[xyz@gmail.com](mailto:xyz@gmail.com)". If you select **Name** or **Email**, the analytics displays the name or email of the users and their responses.
* Responses for both iOS and Android appear together. You cannot filter responses by platform. To view separate data, ensure you track different attributes for iOS and Android.
* The **Form Inputs** table displays a maximum of seven responses.\
To view all responses, follow these steps:
1. Go to your MoEngage dashboard, then click **Segment** > **Create segment**.
2. In the **Filter users by** tab, select **User behavior**, and add the **Has Executed** event as **Response Submitted**.
3. Specify the event's time range and campaign ID to get a more precise count of users who submitted a response to the campaign.
4. Click **Show count** to analyze the result.
5. Under **Query Results**, you will see the number of users who submitted a response to the campaign.
6. You can also download the CSV file that contains the user responses.
**
The response for each user attribute appears in the adjacent column. For example, if you select **User ID** from the list, the analytics page displays the user ID "x1z2y3" and their corresponding response "[xyz@gmail.com](mailto:xyz@gmail.com)". If you select **Name** or **Email**, the analytics displays the name or email of the users and their responses.
* Responses for both iOS and Android appear together. You cannot filter responses by platform. To view separate data, ensure you track different attributes for iOS and Android.
* The **Form Inputs** table displays a maximum of seven responses.\
To view all responses, follow these steps:
1. Go to your MoEngage dashboard, then click **Segment** > **Create segment**.
2. In the **Filter users by** tab, select **User behavior**, and add the **Has Executed** event as **Response Submitted**.
3. Specify the event's time range and campaign ID to get a more precise count of users who submitted a response to the campaign.
4. Click **Show count** to analyze the result.
5. Under **Query Results**, you will see the number of users who submitted a response to the campaign.
6. You can also download the CSV file that contains the user responses.
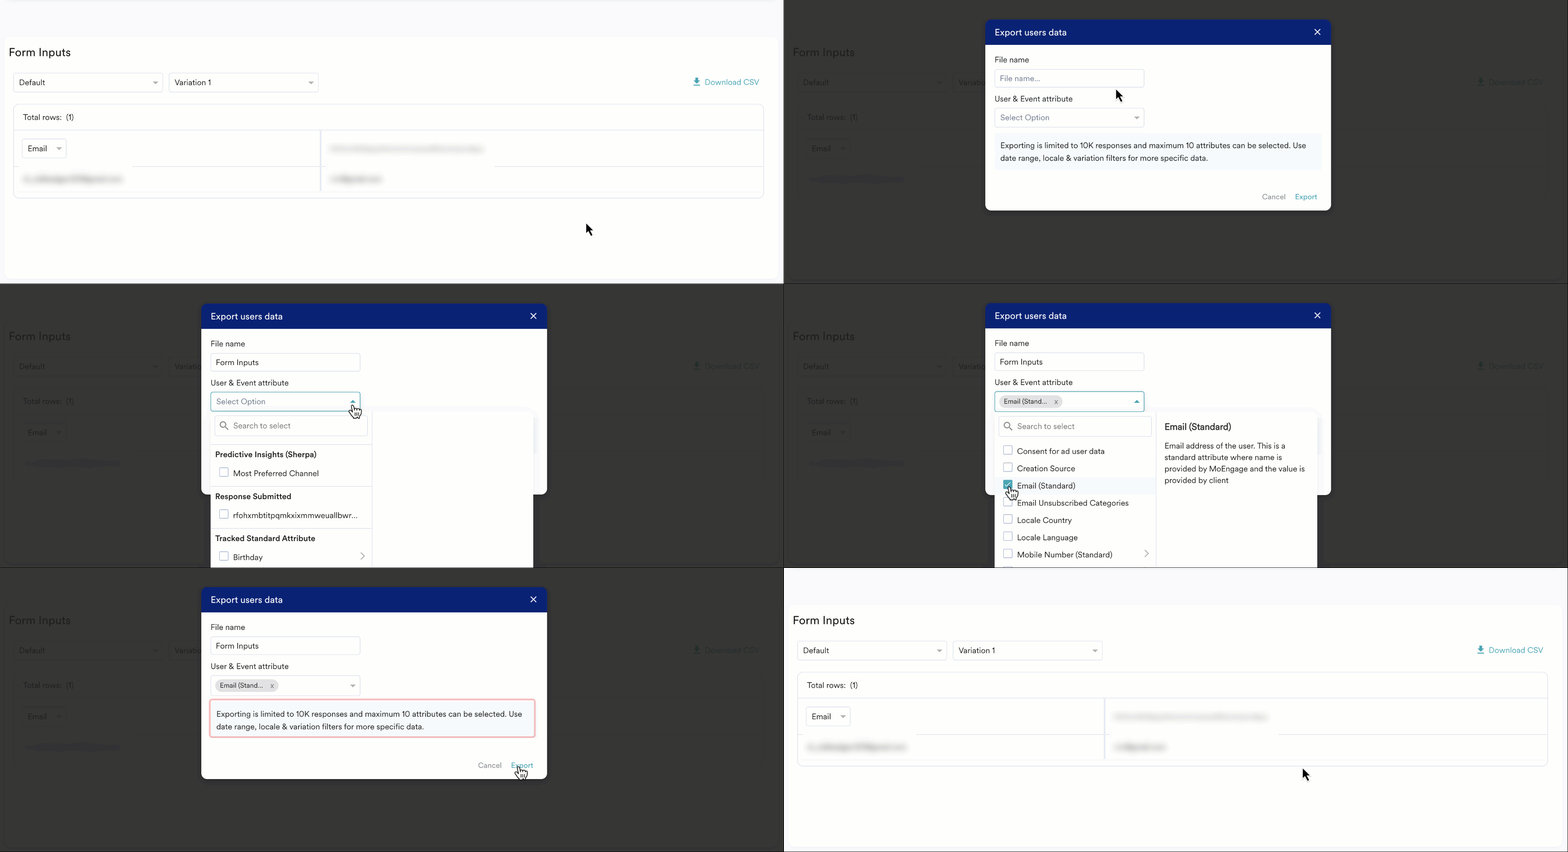 You can select a maximum of 10 attributes to export. Use **Date Range**, **Locale**, and **Variation** filters for more specific data.
## Frequently Asked Questions
You can create only a single form per campaign. Multi-page forms are not supported.
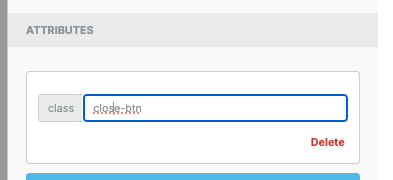
You can upload a custom image for the close button. Then, add the *close-btn* class, as shown in the following screenshot:
You can select a maximum of 10 attributes to export. Use **Date Range**, **Locale**, and **Variation** filters for more specific data.
## Frequently Asked Questions
You can create only a single form per campaign. Multi-page forms are not supported.
You can upload a custom image for the close button. Then, add the *close-btn* class, as shown in the following screenshot:
 We recommend that you add only one form per campaign.
You can add as many inputs as you want. Scroll down the pop-up to access them.
We recommend that you add only one form per campaign.
You can add as many inputs as you want. Scroll down the pop-up to access them.